Use the Groundplan Count Tool to add symbols to Plans or draw over an aerial or a Google map image to estimate material and labour costs before a visit to the construction site. Those added appear in the bill of materials on the Quantities Tab.
Related Articles: Count Labelling | Count Assist | Measurement Parts and Labour
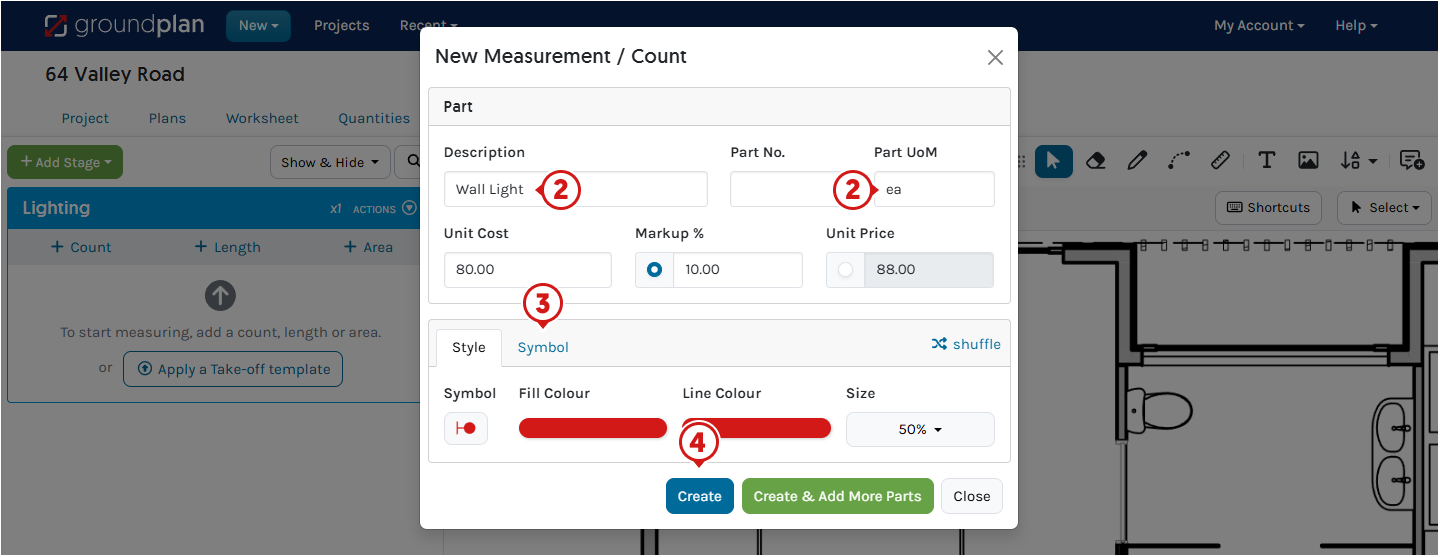
Add a New Count Measurement
- Within a Stage click +Count

- Complete the required details
Unit Cost, Markup Percentage and Unit Price are optional. If using costing, please ensure the Unit Price is populated - Click Symbol and make a selection
- Click Create
If additional Parts and Labour are required, click Create & Add More Parts
Aligning Counts
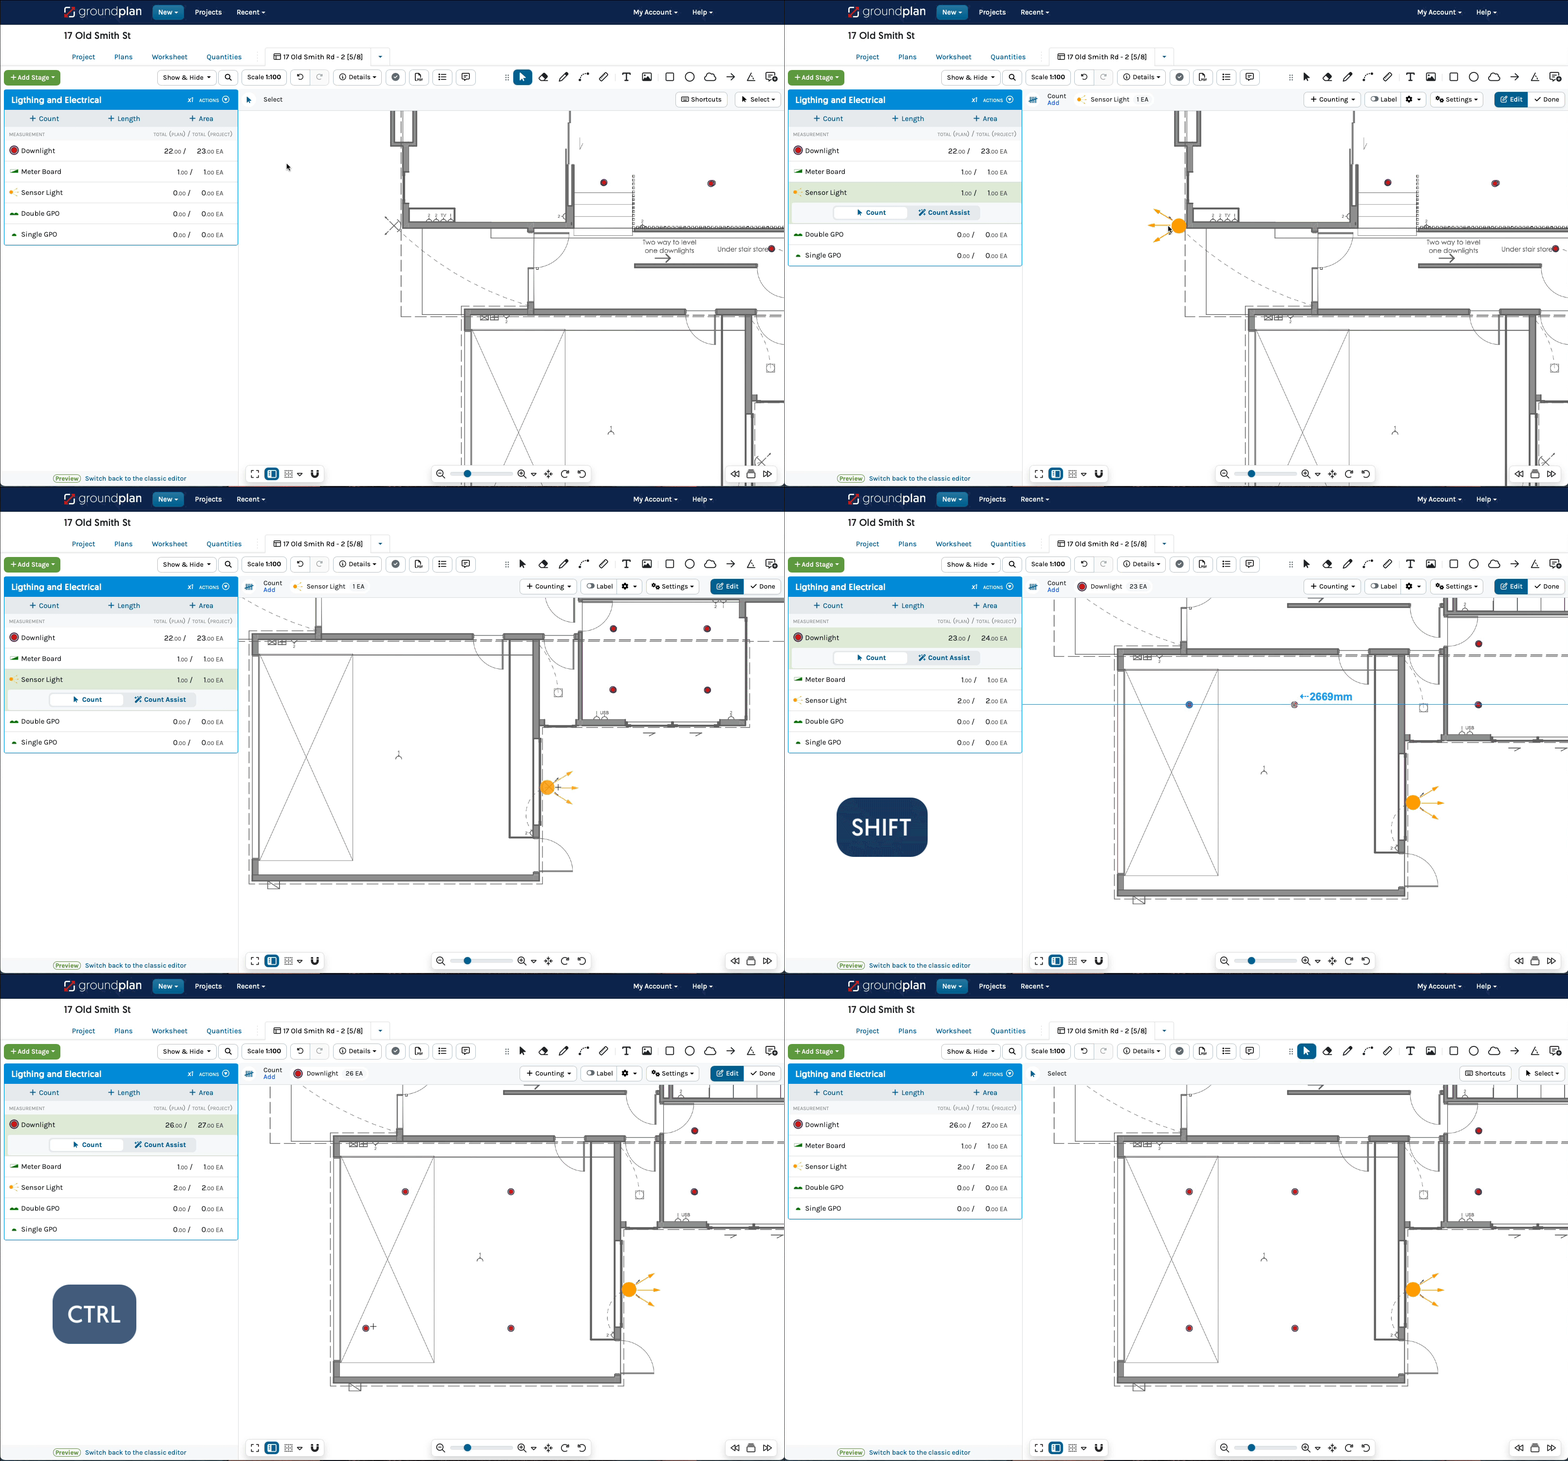
Smart Guides allow a User to space out and align Counts on Plans with vertical and horizontal guides.
Place a Count on the Plan, then hold SHIFT will enable the Smart Guides or read further information about switching them on permanently here.

Using the Count Tool to begin counting
- On the Plan, click to place a Count
- Click, hold and drag to pan around the Plan
- Hold SHIFT to show Smart Guides
- To Rotate: Hold ALT / Option and press R or E
- To Delete a Symbol, Hold CTRL / Command ⌘, then click Symbol to remove
Labelling Counts
Groundplan allows a User to Label Counts with numbering, number sequences, prefixes and suffixes. To find out more about how to Label Counts, read here.

How to Edit existing Counts
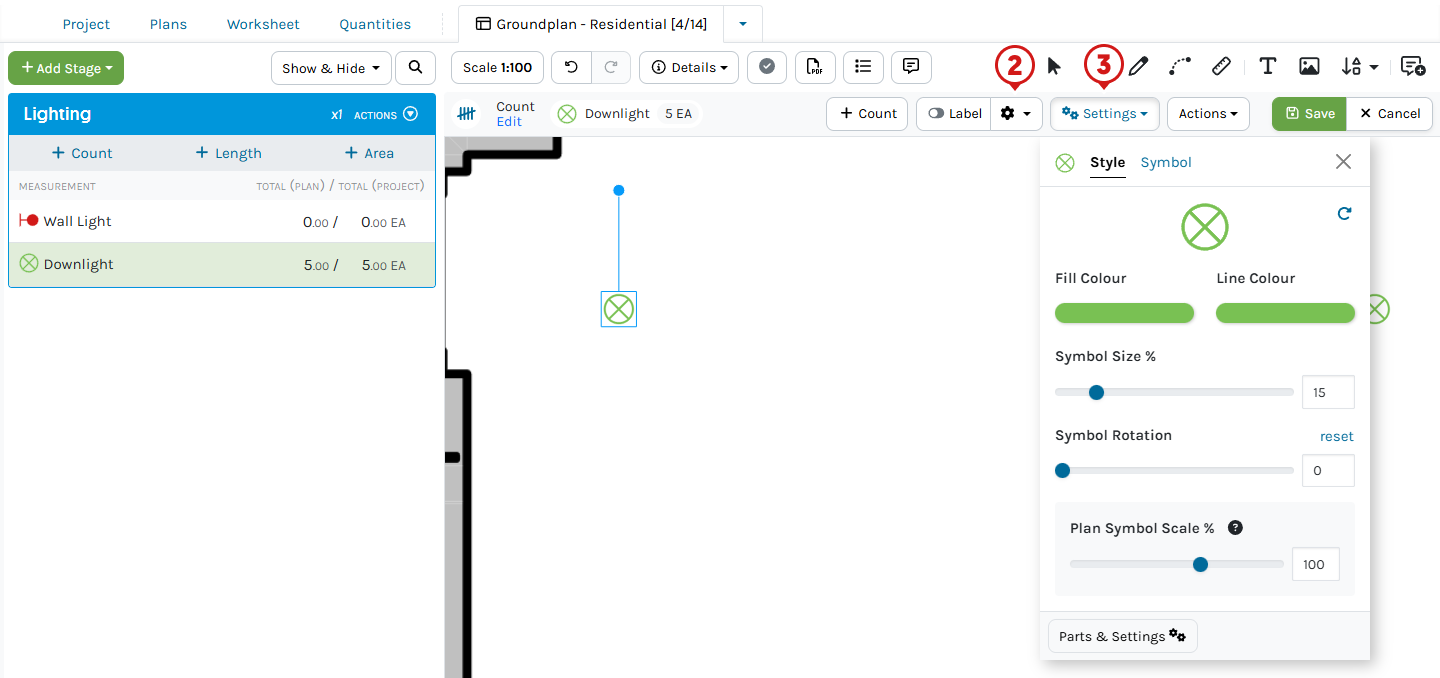
The Settings modal remains open during Editing and requires a click to close once editing is complete.
- Press ESC, Zoom in and click the Count
- Click Label Settings to add Labels
- Click Settings to:
- Edit the Style changing all Symbols associated with this Measurement
- Edit the Symbol type
- Adjust the Symbol Rotation
- Edit the Plan Symbol Scale % (increase all Symbols in all Stages with the same %)
- Add or edit Parts & Settings or Labour

-
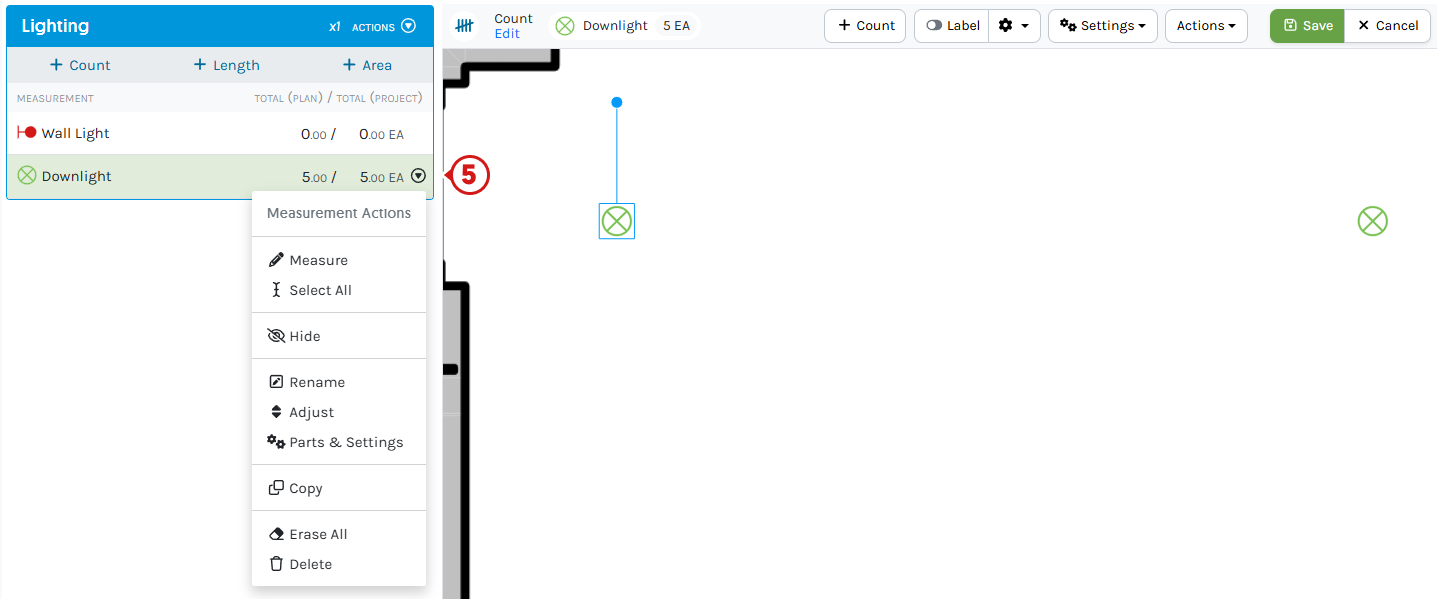
Click Measurement Actions to:
- Hide this Measurement from the Plan
- Select All of the Measurement
- Rename
- Adjust the Measurement Value
- Add or edit Parts & Settings and Labour
- Erase All, removing all Counts from the Plan
- Delete the Measurement from the whole Project Permanently
Click here for Copy Measurement instructions
Copy Measurements will Copy all Parts, Pricing, Formula and Labour to another Measurement in the same or another Stage.
- Click Measurement Actions
- Click Copy
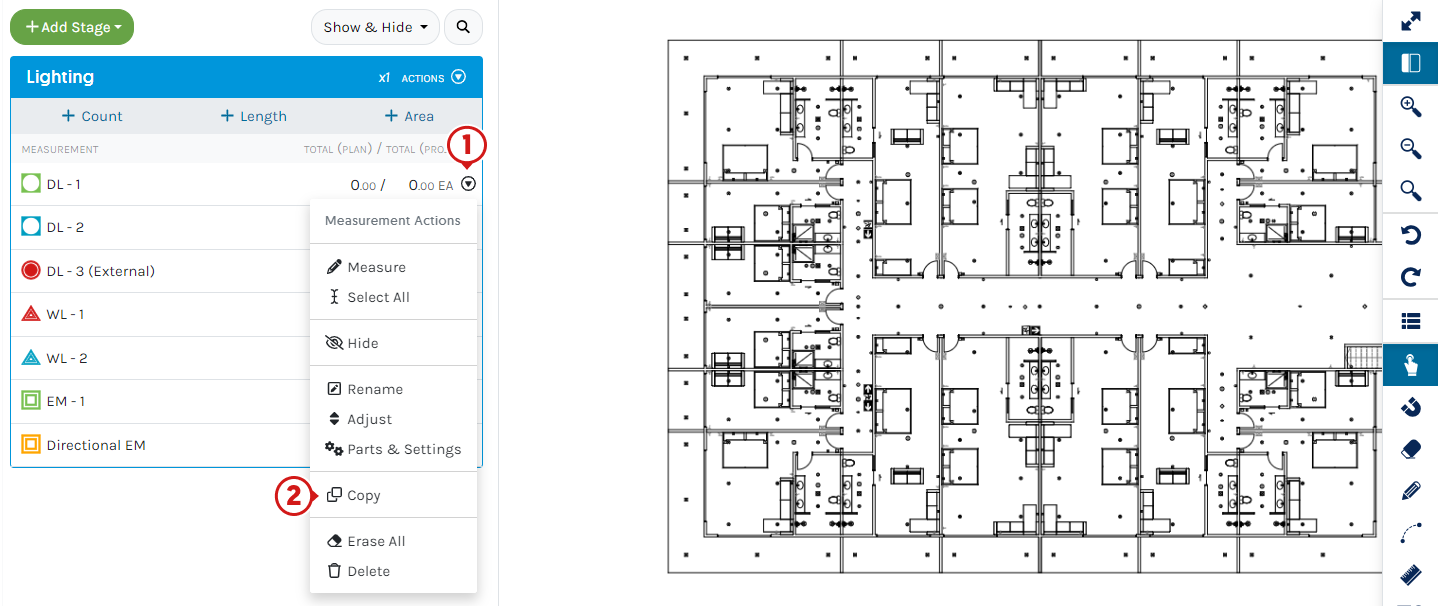
- Type the New Measurement Name
- Select option of where to Copy to:
- Current Stage:
(name) - Another Stage (choose another existing in the Project)
- Current Stage:
- Click Copy Measurement

Click here when a Non-Grouped Part is required after Copying Measurements
.png)
- On the Copied Measurement, click Measurement Actions then Parts and Settings
- Click Part Actions on the Part to be changed
- Click Edit
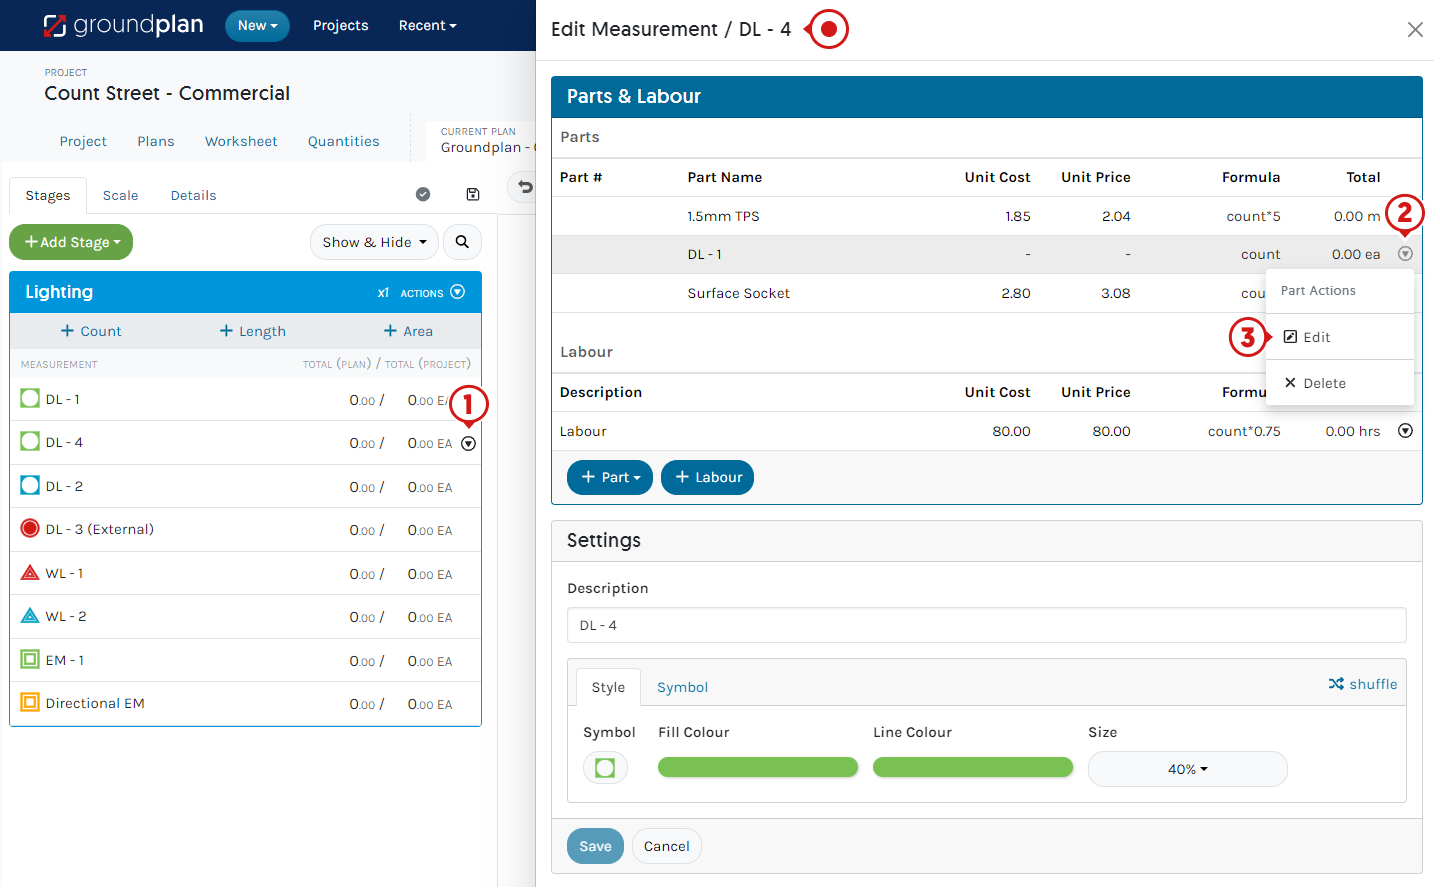
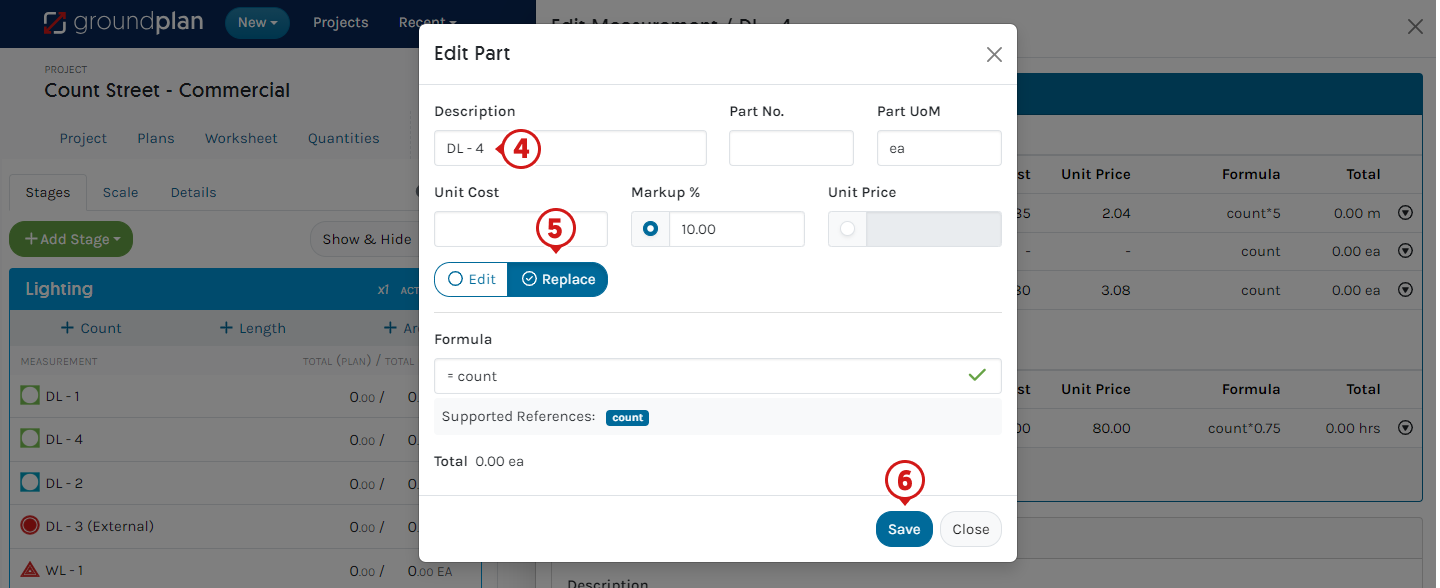
- Rename the Part from the old name, update Pricing or Formula
- Select:
Replace to ensure it is not Grouped / Linked with the Measurement Part it was copied from - Click Save
- (Recommended) Update Style Options then click Save
Style is identical to the Measurement it was copied from - Click X to Close
Adjusting Count Totals
Adding or removing Counts after Adjusting the Plan or Project Totals will not be reflected in the Totals
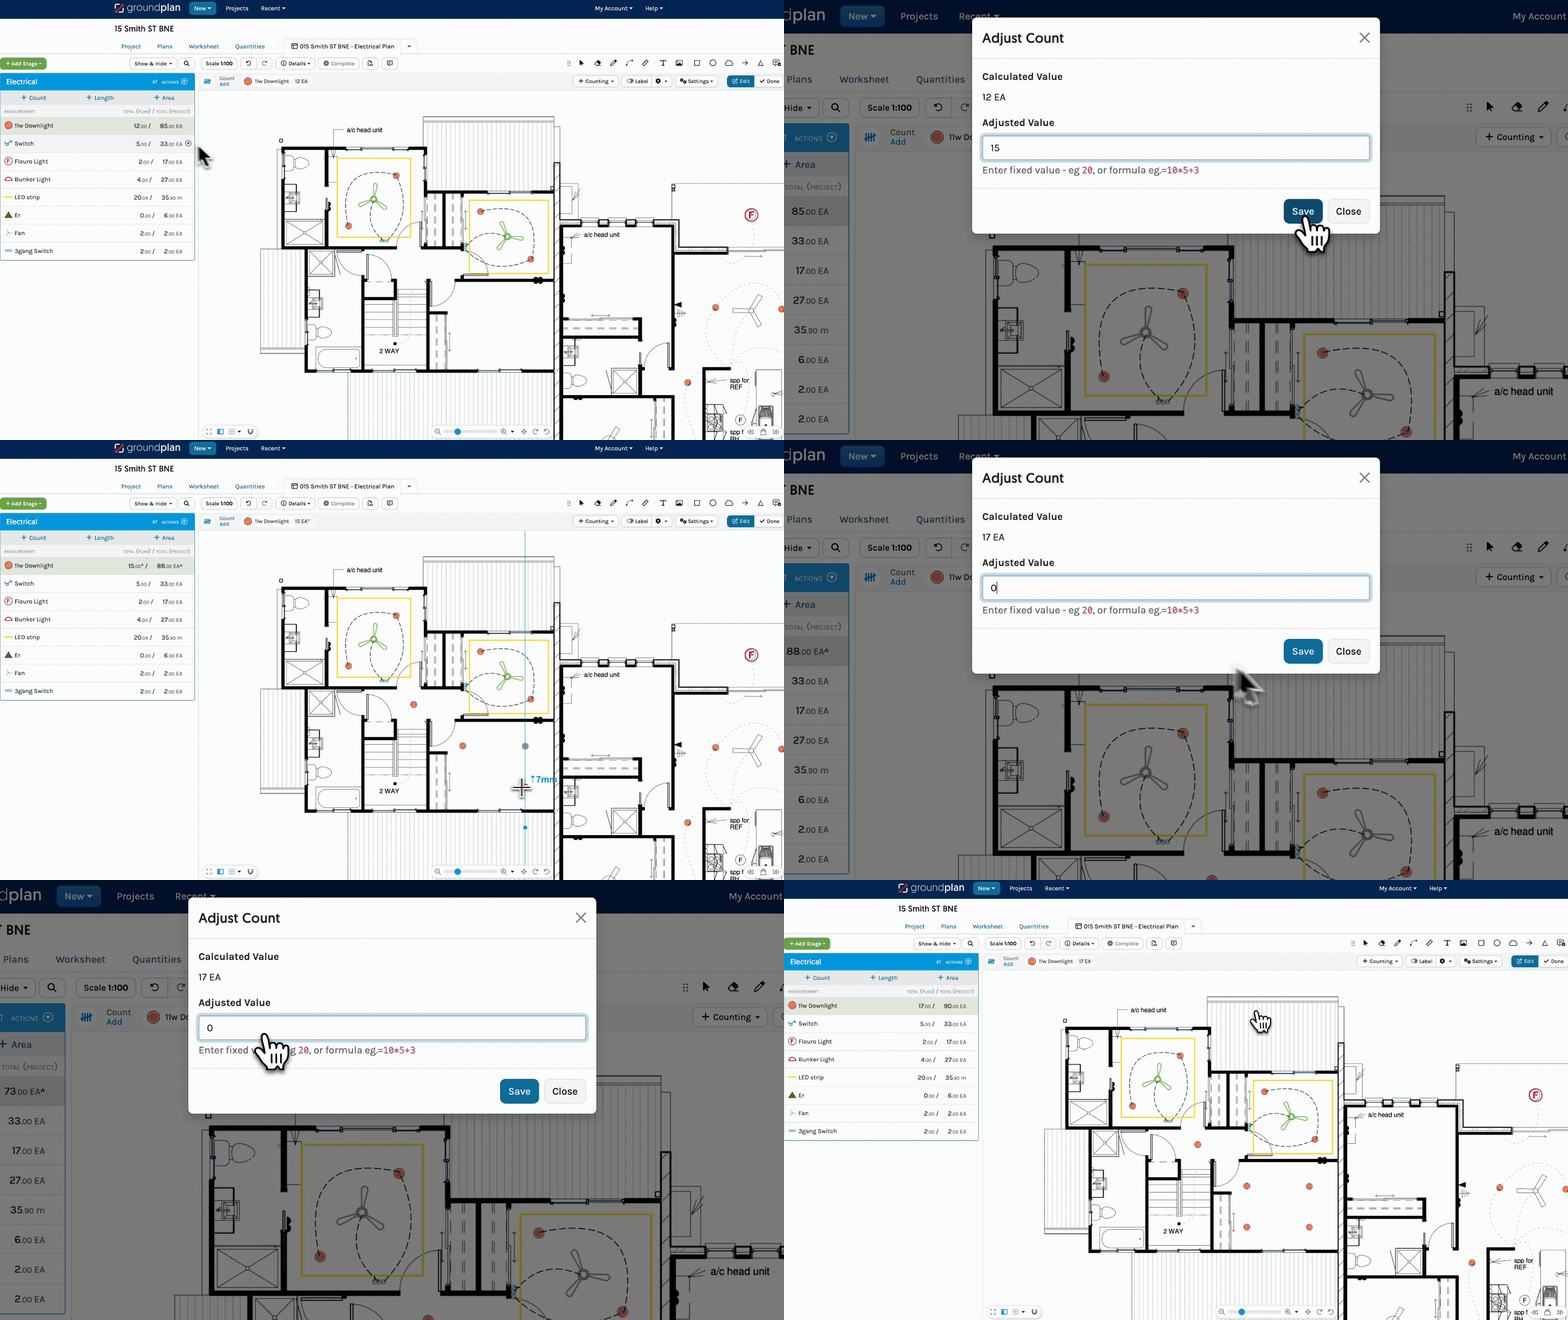
- To Adjust Measurement Totals, click the Plan Total ( * ) or Project Total (^)
- Enter a new value in Number form (e.g.
3) or Formula form (e.g.2*10) - Click Save
- The asterisk (*) on the Count Value means that the Total is Adjusted
- The hat (^) on the Measurement Total means that it contains a Count(s) that has been Adjusted
4. To remove an Adjusted Total, click the Adjusted Total and clear the value
Please note: Entering 0 will give an Adjusted Total of 0
Unit of Measure and Supported References
There is only one Unit of Measure and Supported Reference for Counts, that is Count.
Groundplan uses simple Excel-type Formula to calculate Parts and Labour. The Formula follows the PMDAS Rule: Parentheses (brackets) first followed by multiplication, division, addition, then subtraction. Calculations are prioritised within the brackets. More detailed information about Formulas with examples are provided in our article Using Formulas in Groundplan.
Each Formula must contain a Supported Reference/s to be accepted and relate directly to elements on the Plan.
The below image displays how Count correspond to a Plan:

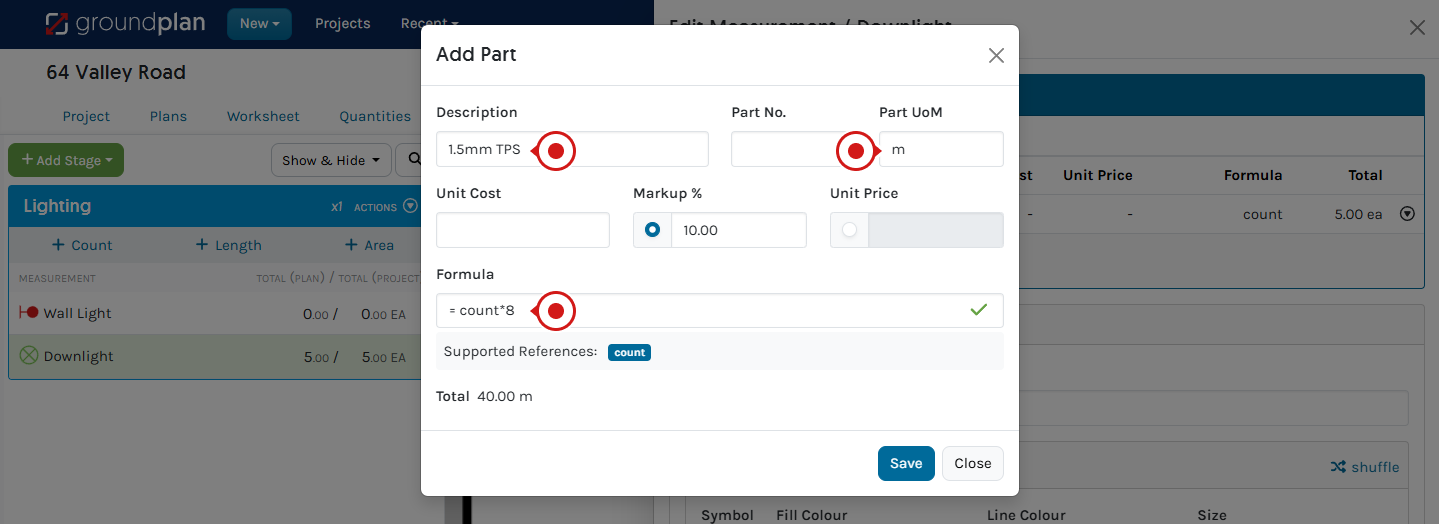
The below example is multiplying the Count by a set number count*8 which adds an additional eight items each time a Count is placed.
In this case, an extra 8 metres for every symbol placed on the Plan.
What else can the Count Tool be used for?
- Adding drawing symbols like doors and windows to create a new floor/construction Plan.
- Creating As built / Ascon / As laid Plans
- Add texture to an Area to create a pattern using repetitive symbols including the Select Tool, used often used to add to a landscaping design (Figure A) and using the Eraser Tool to assist
- Adding fixtures like D1, D2 using the Count Labelling Tool (Figure B)
- Updating item placement and notes during client walk-throughs
.png)
Frequently Asked Questions
How can I use the same item across the Project instead of creating a new one each time?
Selecting Link from Worksheet allows an existing Stage to be selected and used to create one Project Total for the Measurement.
To combine marked-up Stages, please use the Transfer Tool. This moves Measurement Totals from one Stage or one Measurement to another.
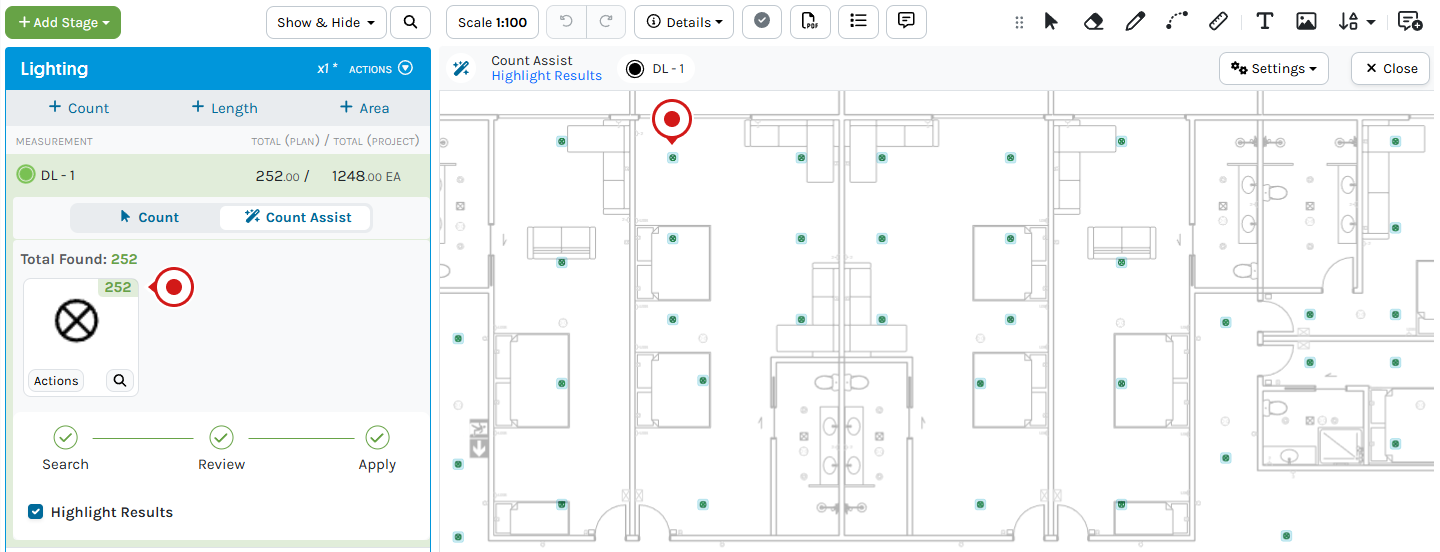
Can Groundplan automatically Count Symbols on Plans?
Yes.
Count Assist Tool is Groundplan's very own assistant to help search and locate Symbols on Plans.
Head to Help > Send us a Message now and ask our friendly Support Team to switch on a free trial for you.
Why you can’t double-click to place Counts in the same place?
Counts cannot be added in the exact location to stop accidental double Counts.
Some solutions are:
- Slightly move the mouse then click to add another Count
Or - Go to the Worksheet
- Click the Measurement
- Add Formula
e.g.count*2This Formula means that each click would add a quantity of 2 items to the Quantities tab - Click Save