The Groundplan Length Tool helps calculate metres, square metres, volume and pitch on Plans or Google Map images, enabling accurate material and labour estimates ahead of a site visit. These appear in the bill of materials on the Quantities Tab.
Related Articles: Length Labelling | Measurement Parts and Labour
Add a New Length Measurement
- Within a Stage click +Length

-
Complete the required details
Part no, Unit Cost, Markup Percentage and Unit Price are optional. If using costing, please ensure the Unit Price is populated -
Select the Measurement Unit or add a Pitch degree
This will update the Part UoM box -
Click Create
If additional Parts and Labour are required, click Create & Add More Parts
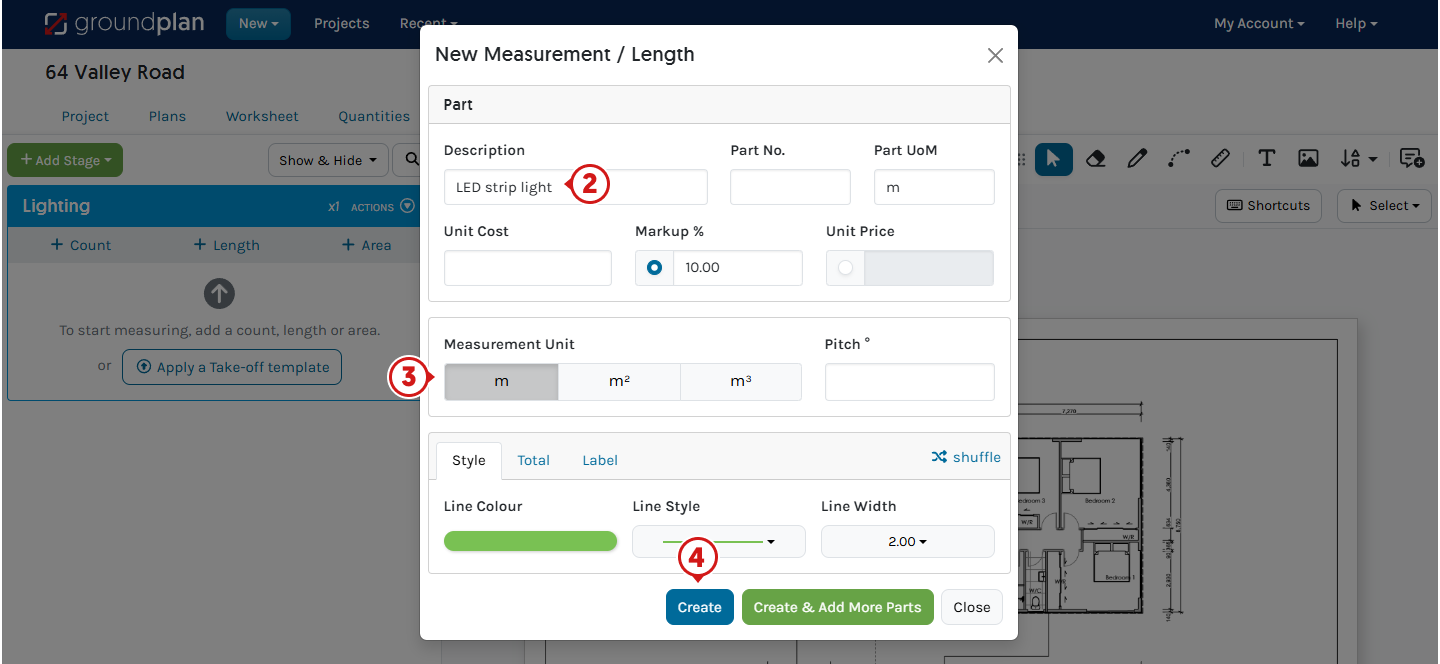
Using the Length Tool to begin measuring
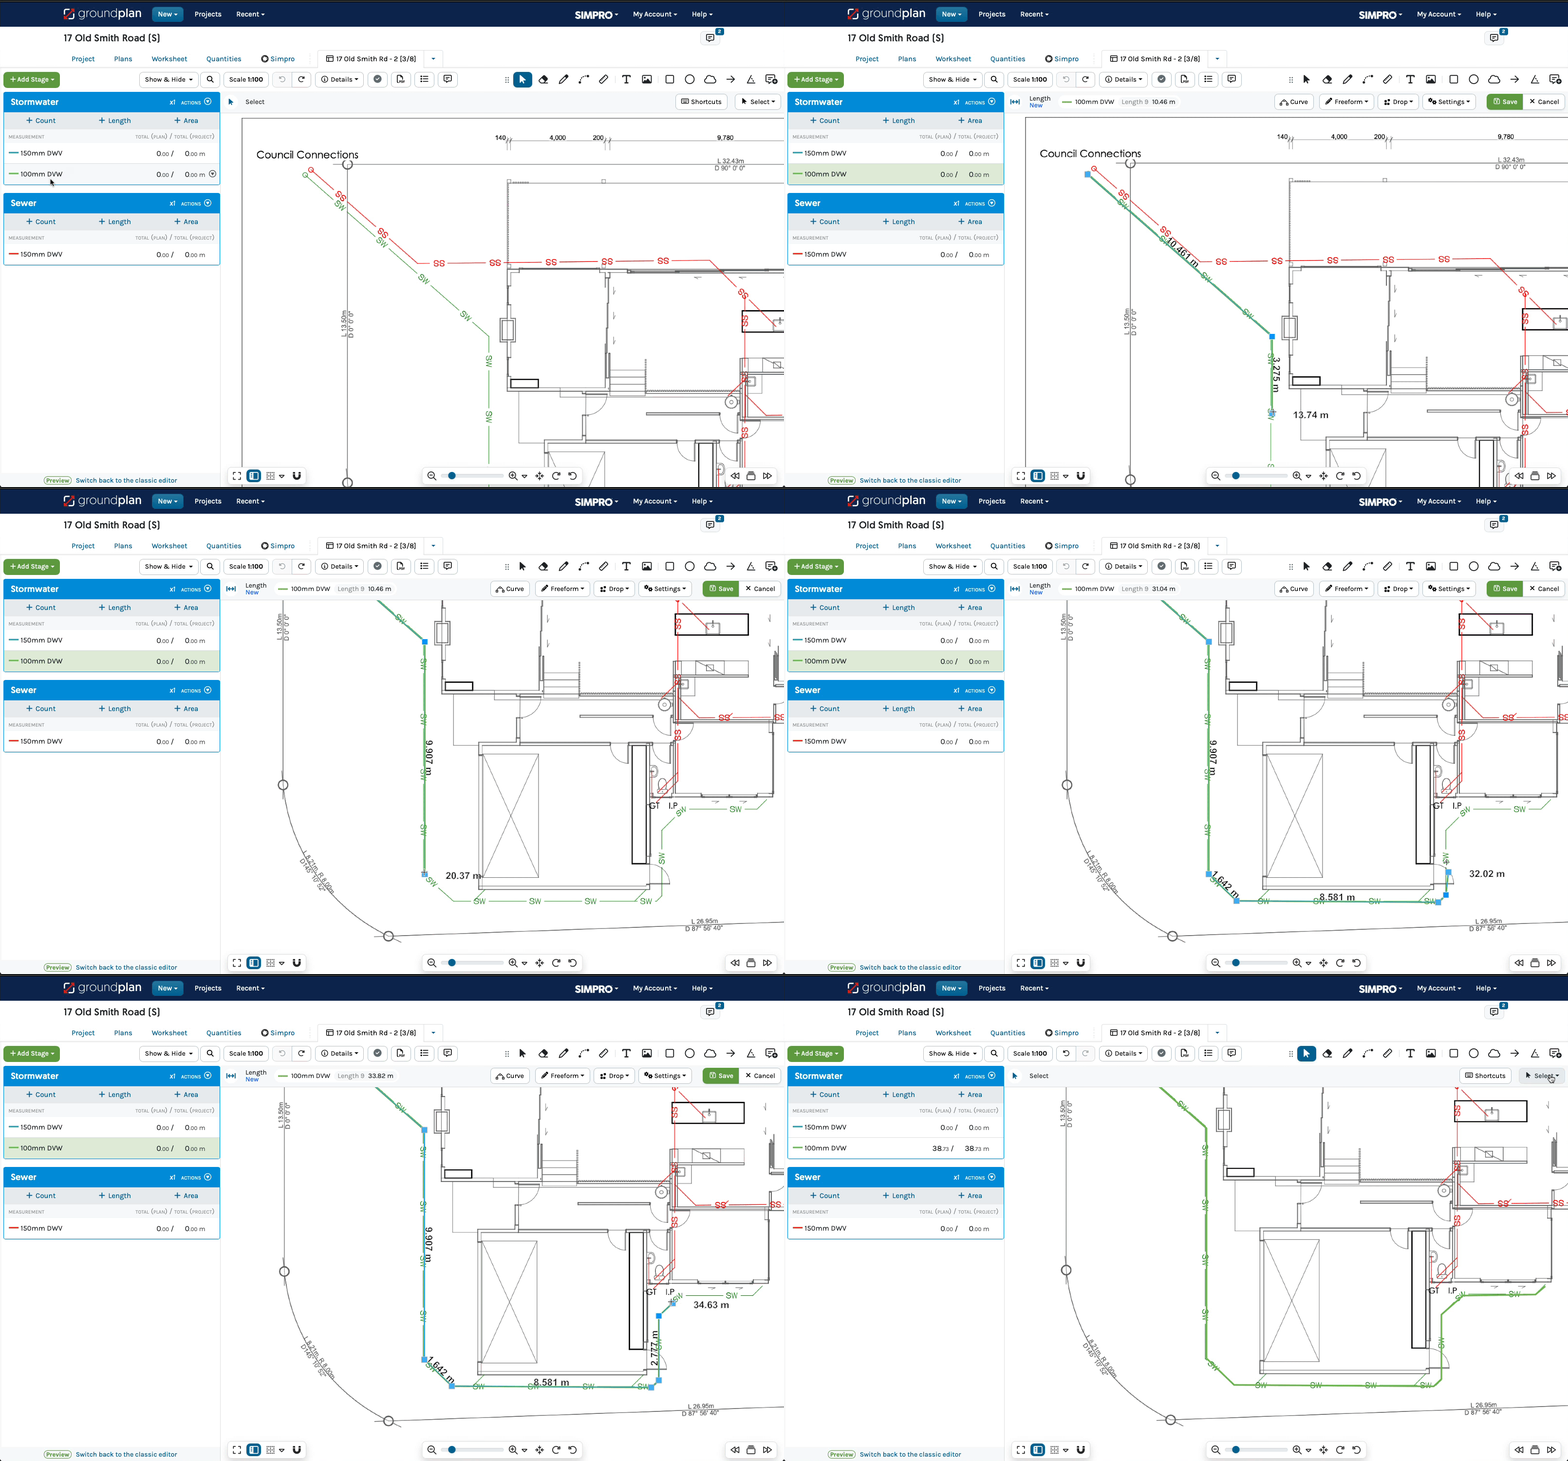
⚠️ To measure a Length, set the Plan Scale
- On the Plan, click to begin a Length
- Click once to change direction
- Click, hold and drag to pan around the Plan
- Hold SHIFT to hold in 15-degree increments
- Hold CTRL / Command⌘ and press Z to undo the last point
- Double click to complete
Adding Drops to Lengths
Additional allowances for Lengths may be necessary beyond the true measured value drawn on the Plan. The Drop function allows the additional to be added to the Length total.
- Click on the Length
- Click Drop
- Add the extra allowance
Remove if no Drop is required - Draw the Length on the Plan
Subsequent runs will include the same added length unless this is reset.
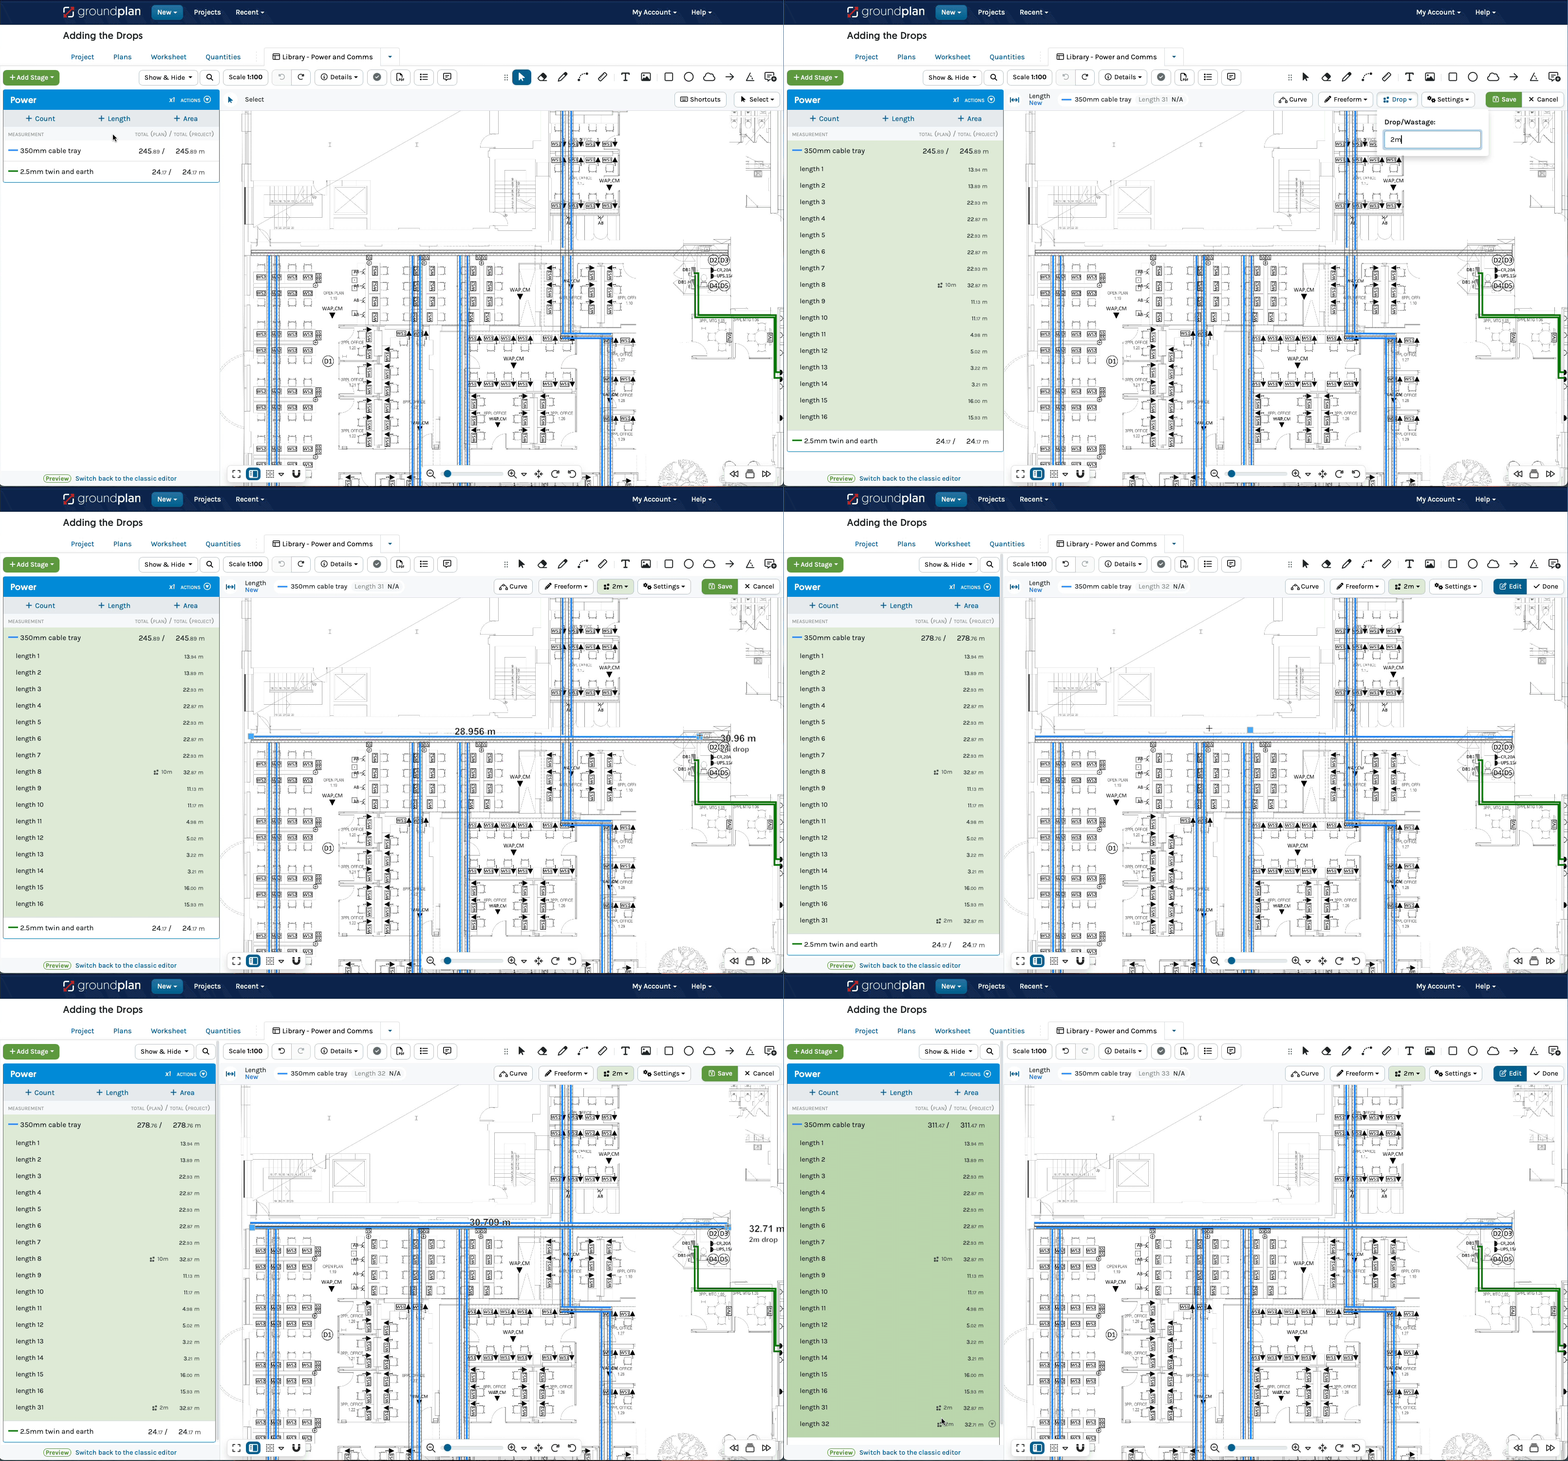
In the Stage, added drops are indicated by a symbol followed by the specific amount.

To Edit a Drop
Drops can be added while creating a Length or after it is drawn.
- Click on a drawn Length
- Click Drop
- Either Add total Drop allowance or remove a Drop
- Click Save
Total will update in the Stage

Square Drawing Mode
After a Length has been created, choose Square Drawing Mode to draw rectangles and squares.
- Click Freeform then click Square
- Click once to begin
- Move to the opposite side corner and click once to complete

Curve Drawing Mode
After a Length has been created, choose Curve Drawing Mode to draw curves.
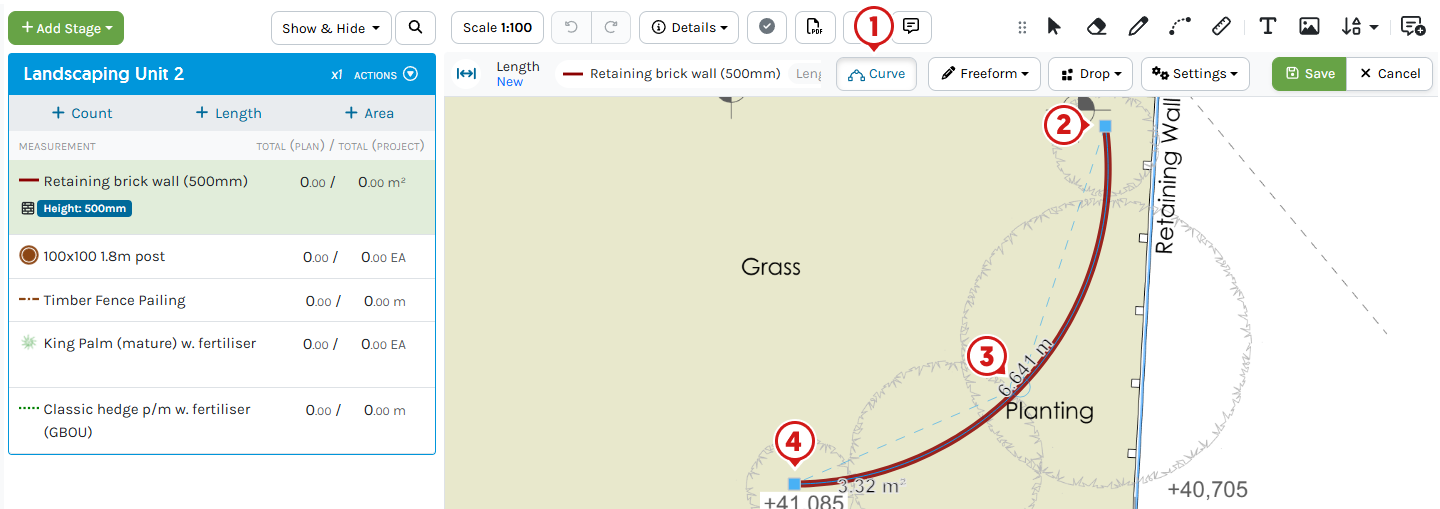
- Click Curve
- Click once to begin
- Click once along the Curve
Close to the apex / highest point for best results - Click at the end of the Curve
- Click the Curve button again to return to Freeform or click the last point to complete
When Curved Mode is enabled, it will not dis-engage until the button is clicked again.
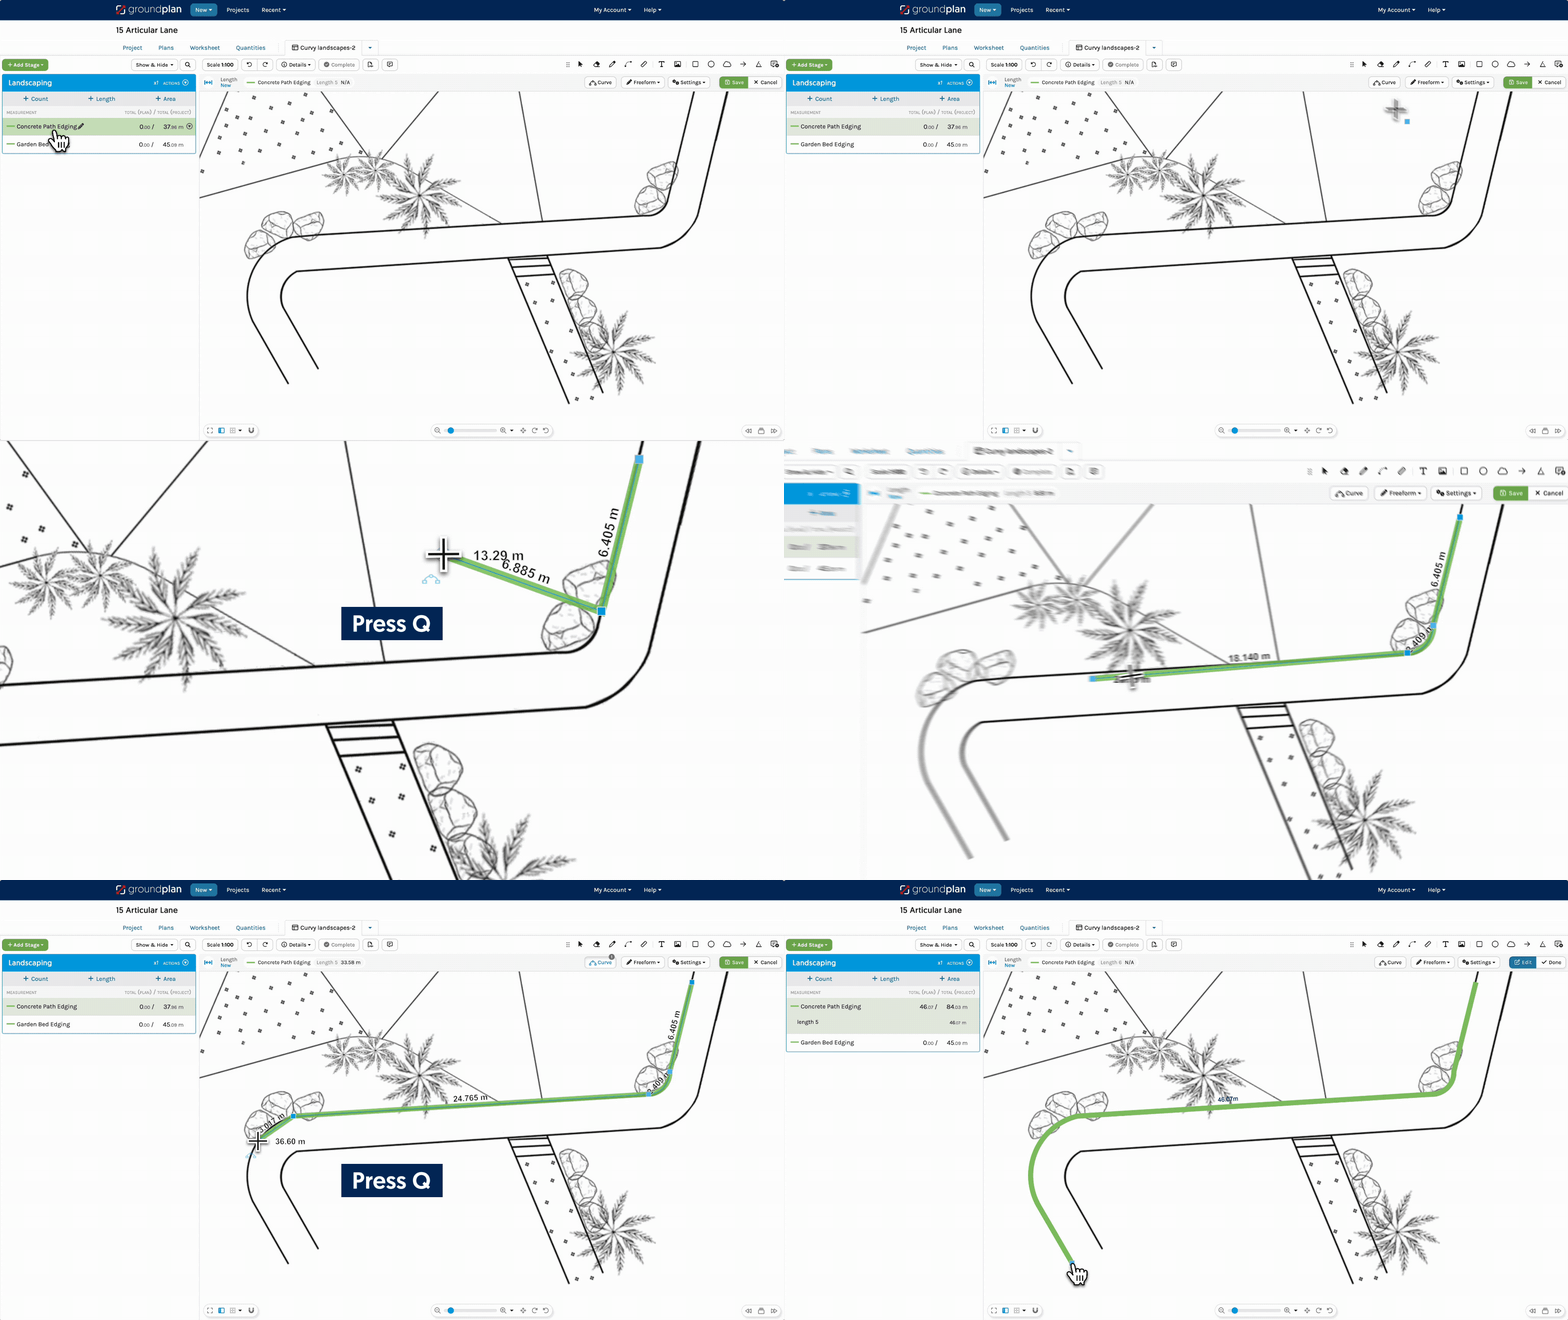
To create Curves and straight lines in the same Length run
- In Freeform Mode, click at the beginning of the Curve
- Press Q
- Click once along the Curve
Close to the apex / highest point for best results - Continue on or click the last point to complete
When the Curve is complete, Freeform Mode will automatically engage.
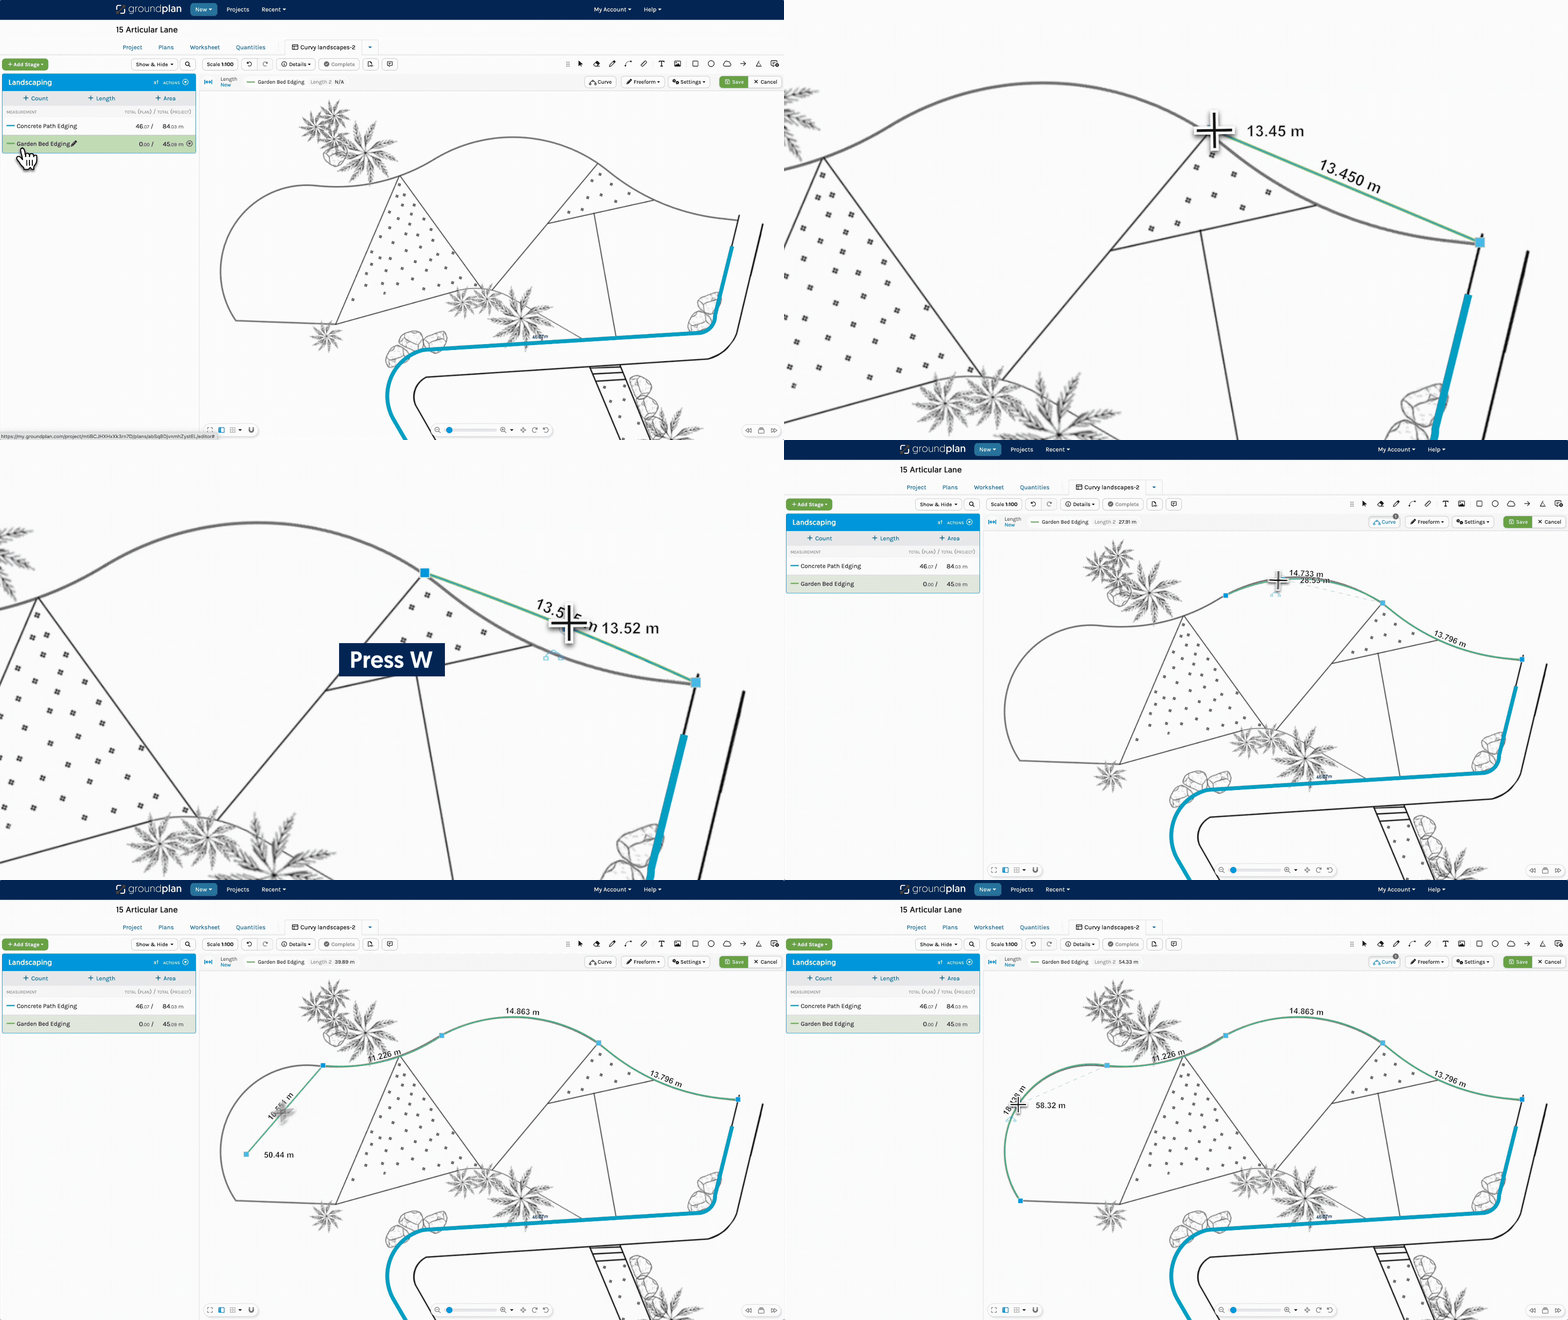
To transform the last straight segment into a Curve
- In Freeform Mode, click the point at the beginning of the Curve
- Click at the end of the Curve
- Press W and moving the cursor back to the apex / highest point of the Curve and click once
- Continue on or click the last point to complete
When the Curve is complete, Freeform Mode will automatically engage.
Length Labelling
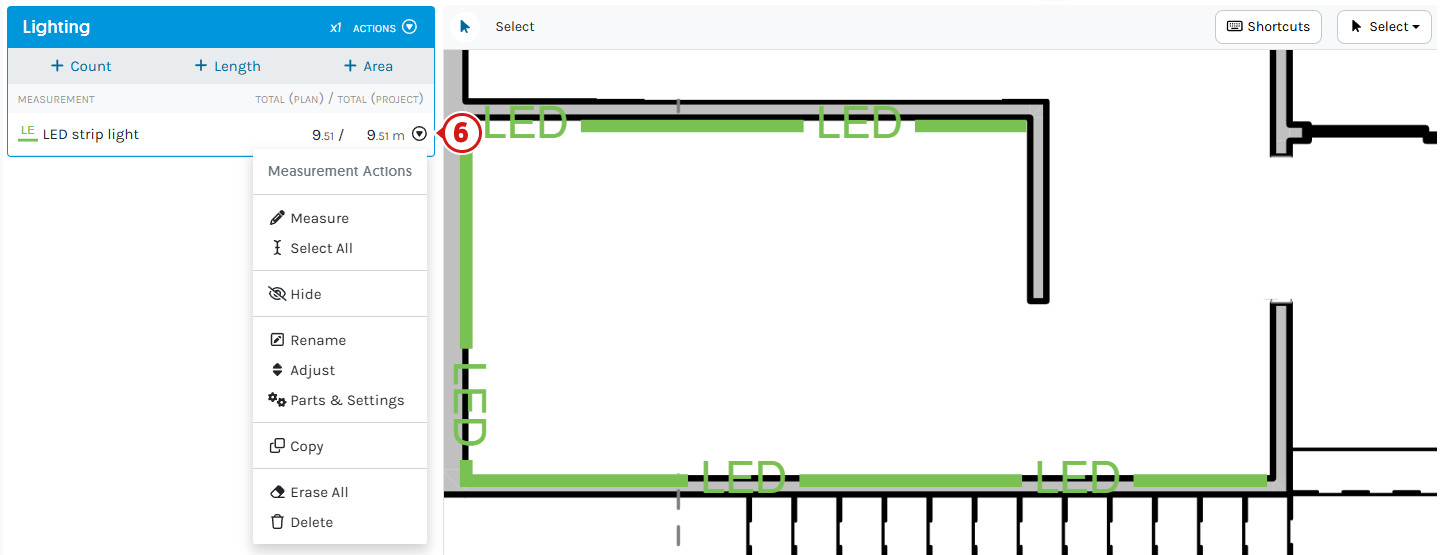
Labels can be added to Lengths to further enhance designs and take-offs. Letters, numbers and special characters can be positioned within a Length on the Plan with abbreviations in the Stage and Legend. Useage examples include pipework, ducting, direction, garden edging, demolition zones, trenching and barriers.

How to Edit an existing Length
The Settings modal remains open during Editing and requires a click to close once editing is complete.
- Press ESC, Zoom in and click the Length
- Click Settings to:
- Edit the Style Line Colour, Line Style and Line Width changing all Lengths associated with this Measurement
- Add or edit Parts & Settings or Labour

- Click Total to:
- Enable / Disable Show Totals
- Edit Text Colour, Text Size and Number Format

- Click Label to
- Add Add a Label to the Length on the Plan
- Click Advanced to edit the Text Size, Colour or the Frequency


-
Click Measurement Actions to:
- Hide this Measurement from the Plan
- Select All of the Measurement
- Rename
- Adjust the Measurement Value
- Add or edit Parts & Settings and Labour
- Erase All, removing all Lengths from the Plan
- Delete the Measurement from the whole Project Permanently
Click here for Copy Measurement instructions
Copy Measurements will Copy all Parts, Pricing, Formula and Labour to another Measurement in the same or another Stage.
Measurement Unit Options and all Parts and Labour are identical when copied.
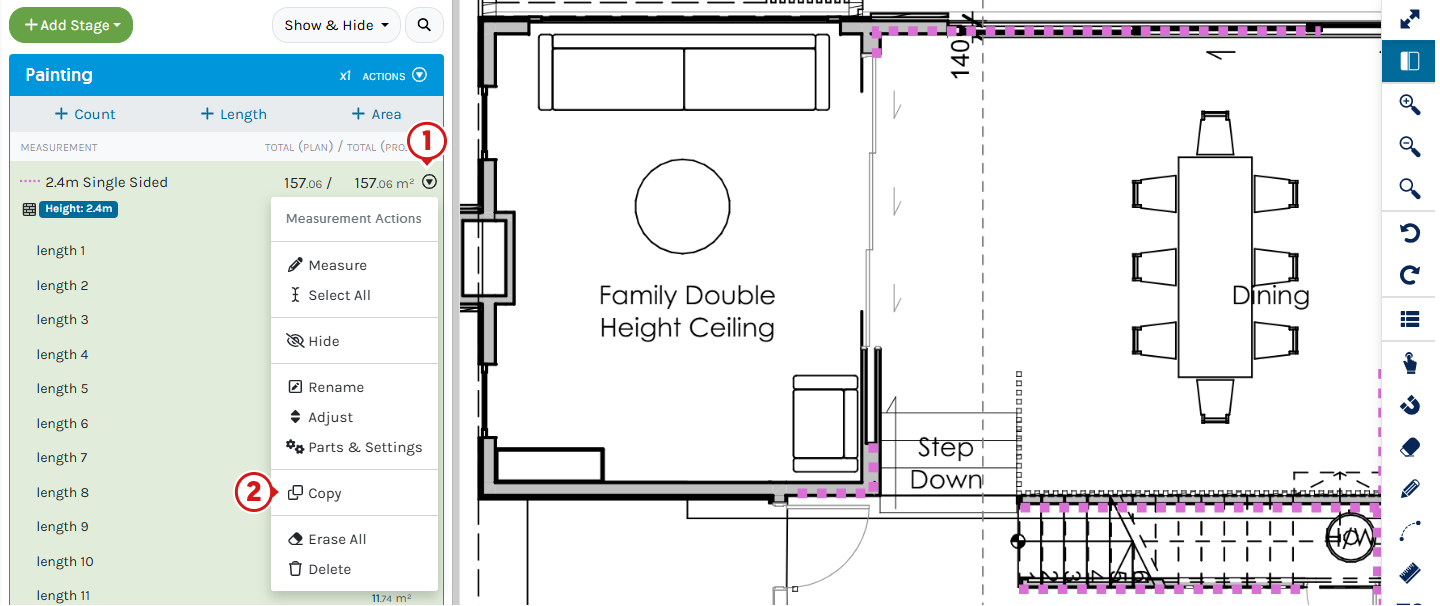
- Click Measurement Actions
- Click Copy
- Type the New Measurement Name
- Select option of where to Copy to:
- Current Stage:
(name) - Another Stage (choose another existing in the Project)
- Current Stage:
- Click Copy Measurement

Click here if a different Height or Width is required after Copying Measurements
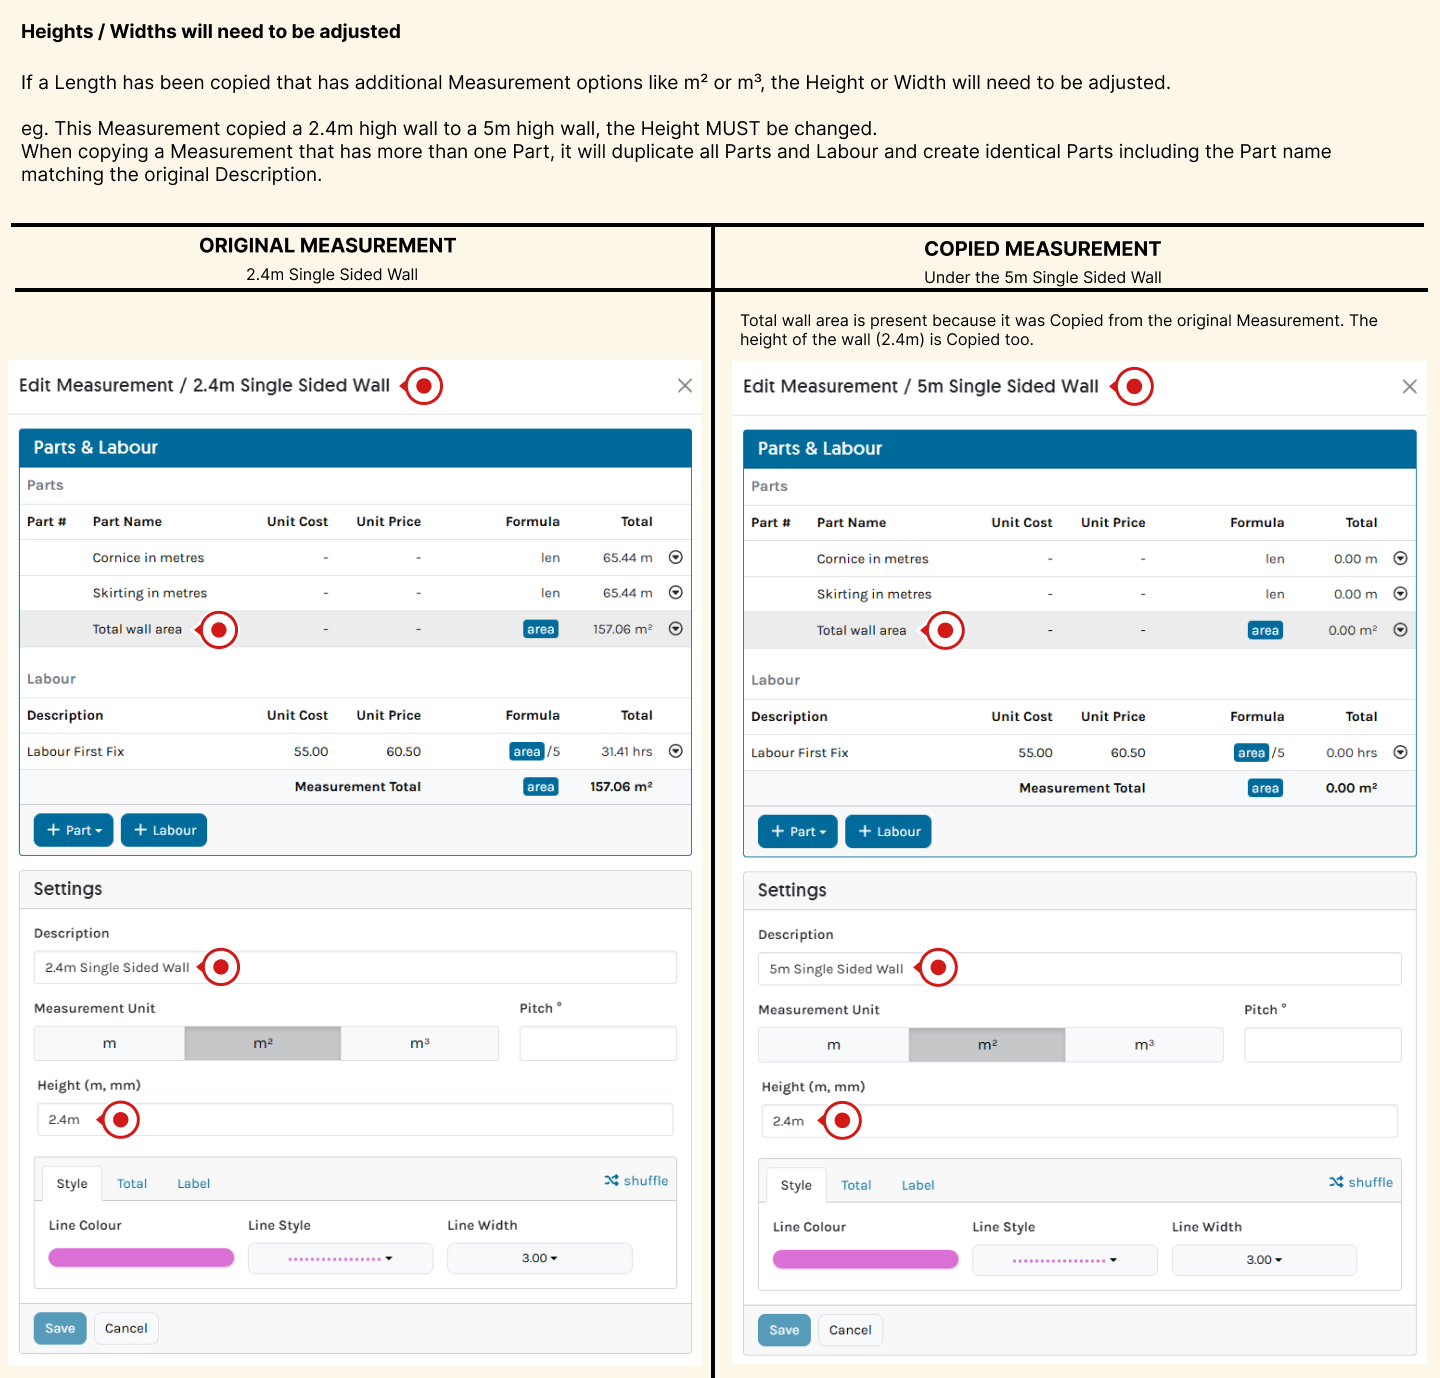
- On the Copied Measurement, click Measurement Actions then Parts and Settings
- Update Measurement Unit - Height / Depth
Type the correct value in - (Recommended) Update the Style
Style is identical to the Measurement it was copied from - Click Save
- Click X to Close
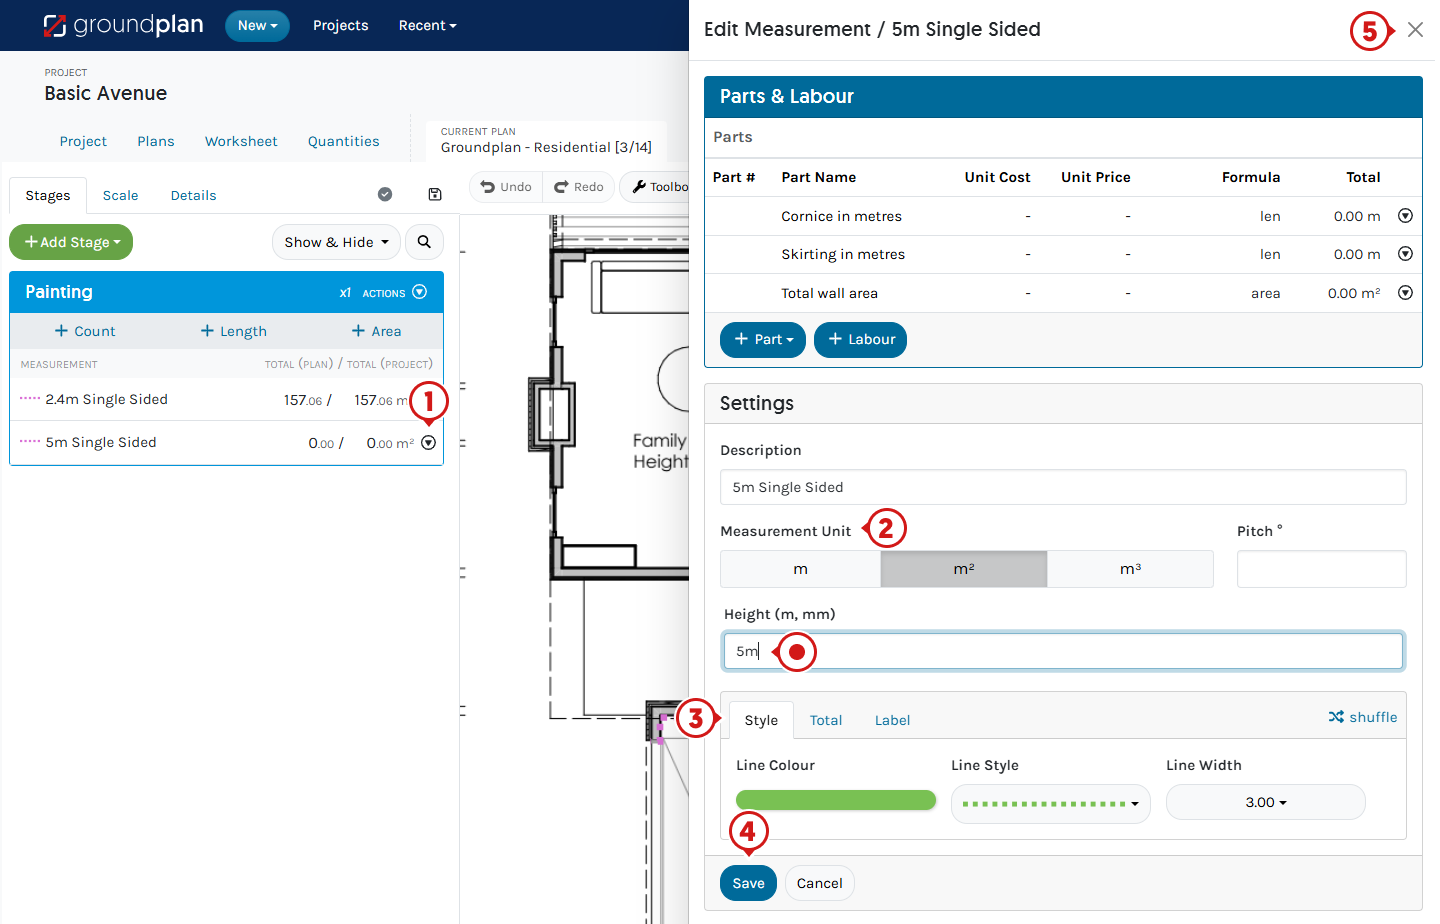
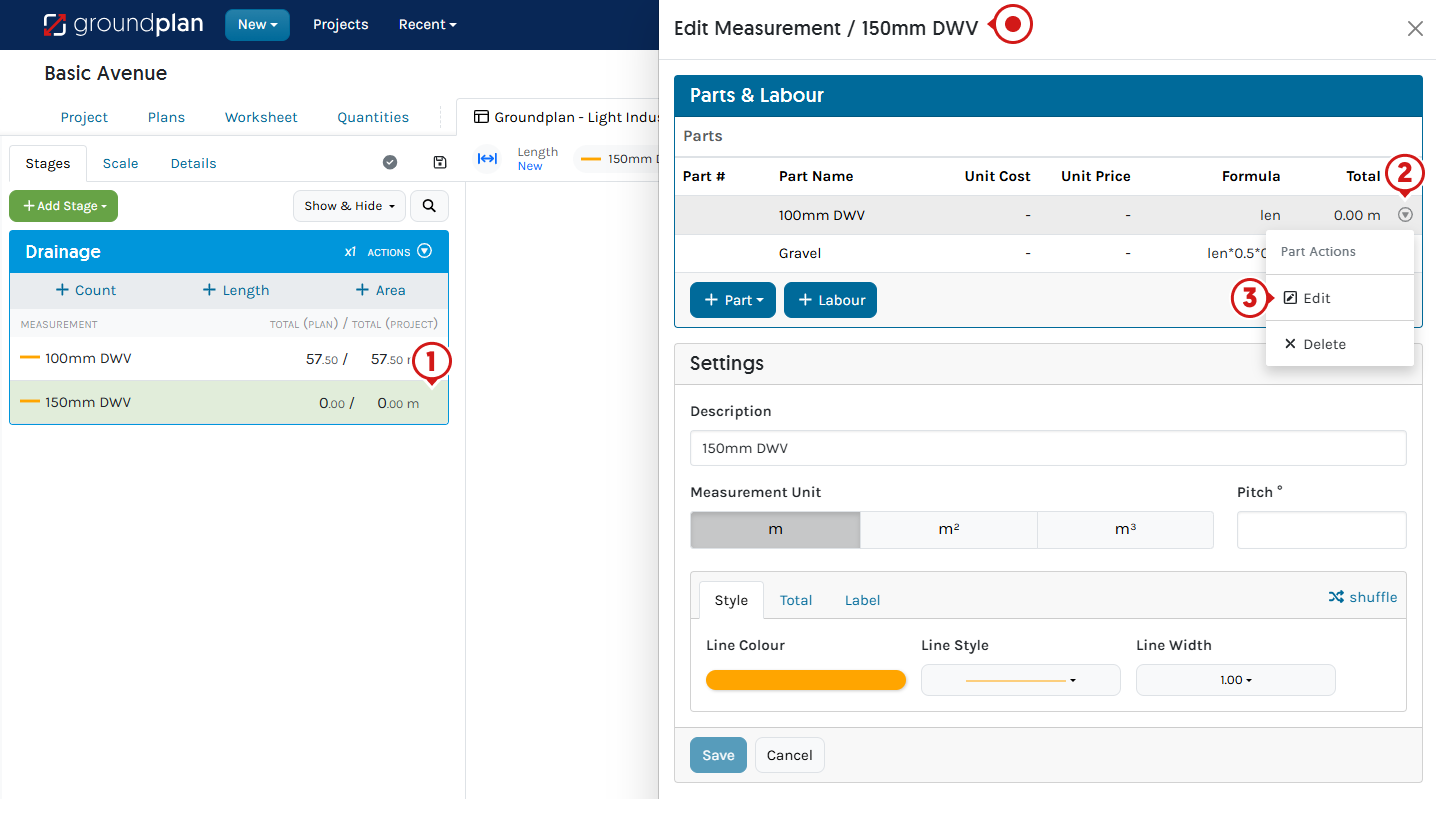
Click here when a Non-Grouped Part is required after Copying Measurements
.png)
- On the Copied Measurement, click Measurement Actions then Parts and Settings
- Click Part Actions on the Part to be changed
- Click Edit
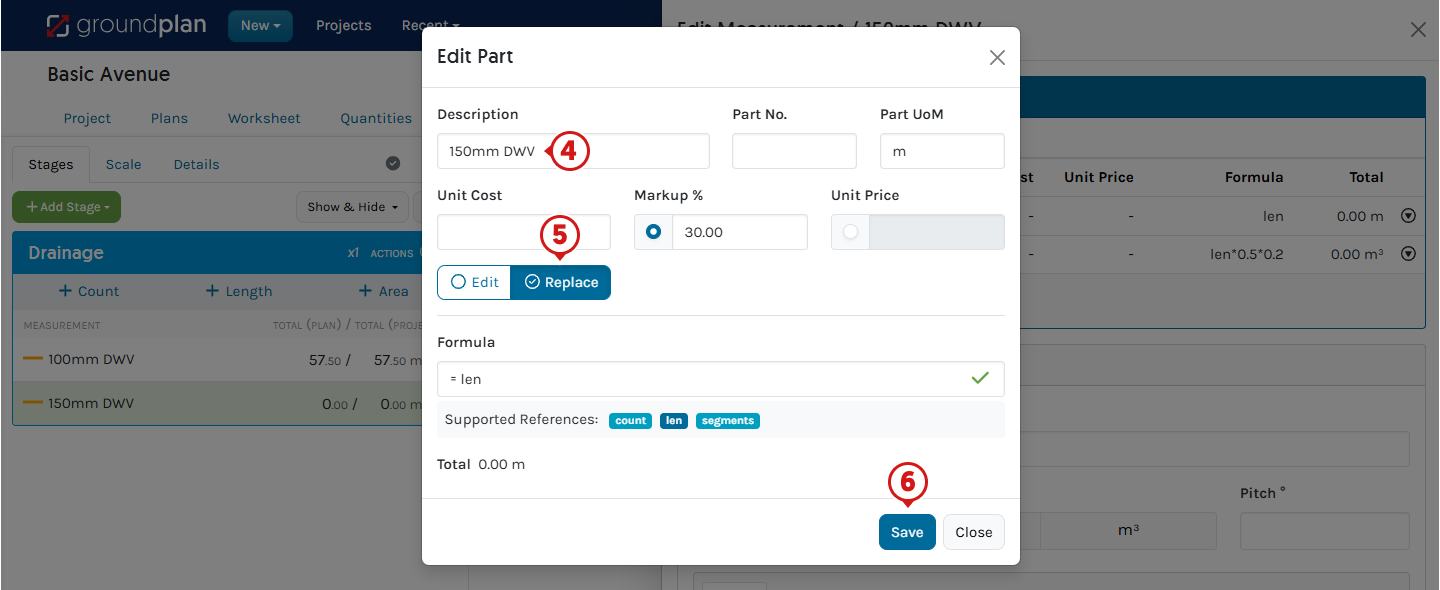
- Rename the Part from the old name, update Pricing or Formula
- Select:
Replace to ensure it is not Grouped / Linked with the Measurement Part it was copied from - Click Save
- Click X to Close
Adjusting Length Totals
Adding or removing Lengths after Adjusting the Plan or Project Totals will not be reflected in the Totals.
Editing Individual Lengths will not be shown when the Value is Adjusted.
- To Adjust Measurement Totals, click the individual run Total ( * ), click the Plan Total ( * ) or Project Total (^)
- Enter new Value in Number form (e.g.
3) or via a Formula (e.g.2*10) - Click Save
The asterisk (*) on the individual run means that the Total is Adjusted.
The hat (^) on the Measurement Total means it contains an Adjusted Length (s).

- To remove an Adjusted Total, click the Adjusted Total and clear the Value
Please note: Entering 0 will give an Adjusted Total of 0
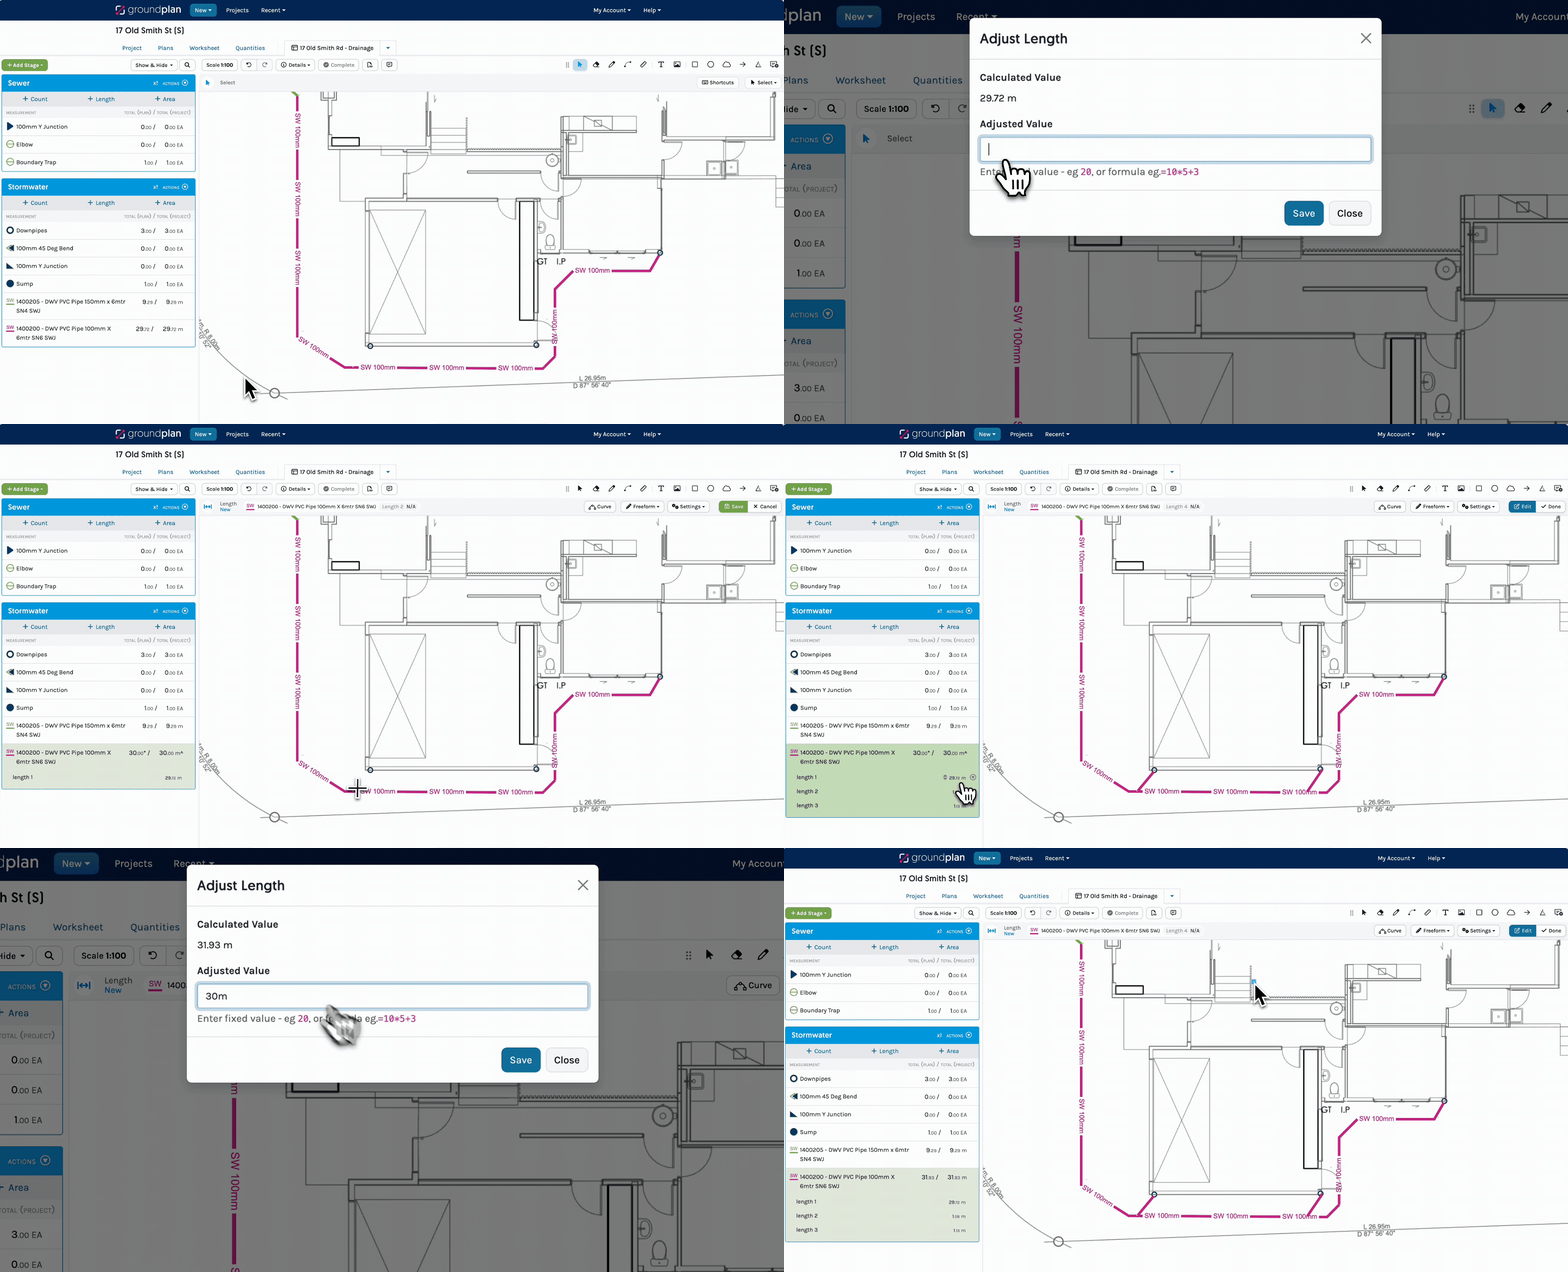
As seen above, adding additional Lengths after Adjusting the Plan or Project Totals will not be reflected in the Totals.
Unit of Measure and Supported References
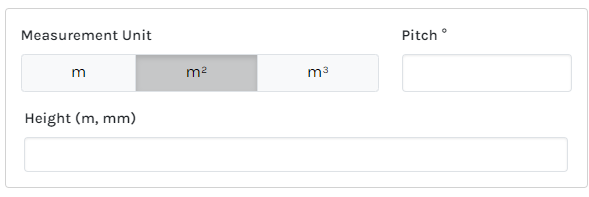
There are different options for Unit of Measure when creating Lengths.
| Length Measurement Unit of Measure (UoM) | Part Supported References | |
|---|---|---|
 |
▶ |
 |
 |
▶ |
 |
 |
▶ |
 |
Groundplan uses simple Excel-type Formula to calculate Parts and Labour. The Formula follows the PMDAS Rule: Parentheses (brackets) first followed by multiplication, division, addition, then subtraction. Calculations are prioritised within the brackets. More detailed information about Formulas with examples are provided in our article Using Formulas in Groundplan.
Each Formula must contain a Supported Reference/s to be accepted and relate directly to elements on the Plan.
The below image displays how the main Supported References correspond to a Plan:

What else can the Length Tool be used for?
- Measuring square metres / square feet of walls
- Measuring the cubic metres / cubic feet of foundations
- Showing dimensions on the plan using Show Totals
- Labelling stormwater, sewer or gas lines
- Adding walls / boundaries to help create a new floor / construction Plan.
- Draw over items on hand-drawn plans (Figure A) and using the Eraser Tool to assist
- Creating As built / Ascon / As laid Plans using the Length Labelling Tool to assist
- Showing wall heights or types on the plan
.png)
Frequently Asked Questions
Is there a way to show the Total of a Length on the Plan?
Yes.
Click Show Total in the Style section when creating a new Measurement.
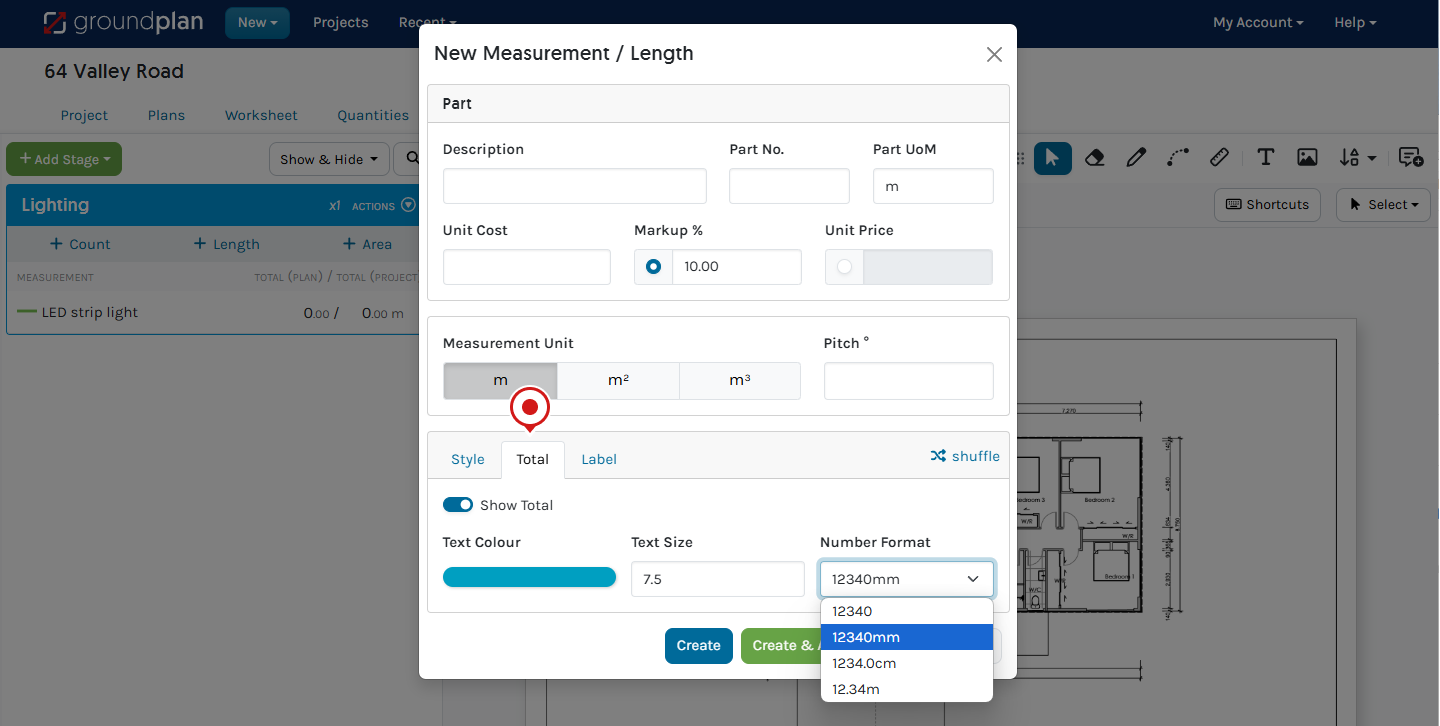
Alternatively, within an existing Measurement, head to Settings then Total to adjust the Settings. Number Formats include no format, Metric (mm, cm, m) and Imperial (in, ft).
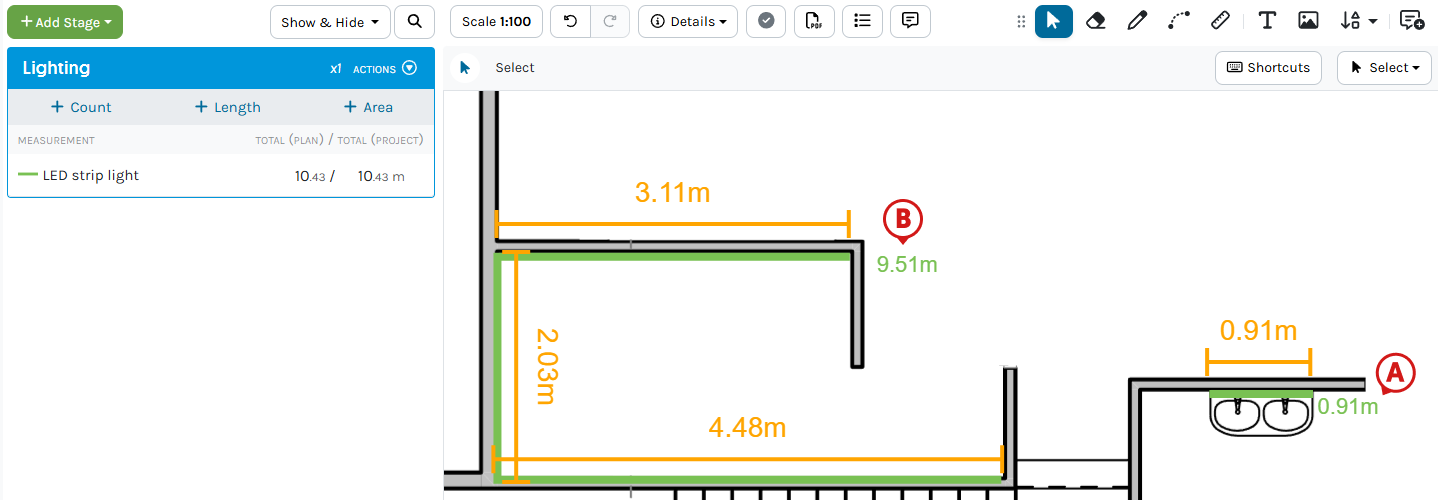
Below image Explanation:
- Point A - Show Totals will only show the run Total, not segment Totals.
- Point B - To display segment Totals on the Plan, use the Ruler Tool or Text Tool.
How can I measure the same item across the Project instead of creating a new one each time?
Selecting Link from Worksheet allows an existing Stage to be selected and used to create one Project Total for the Measurement.
To combine marked-up Stages, please use the Transfer Tool. This moves Measurement Totals from one Stage or one Measurement to another.
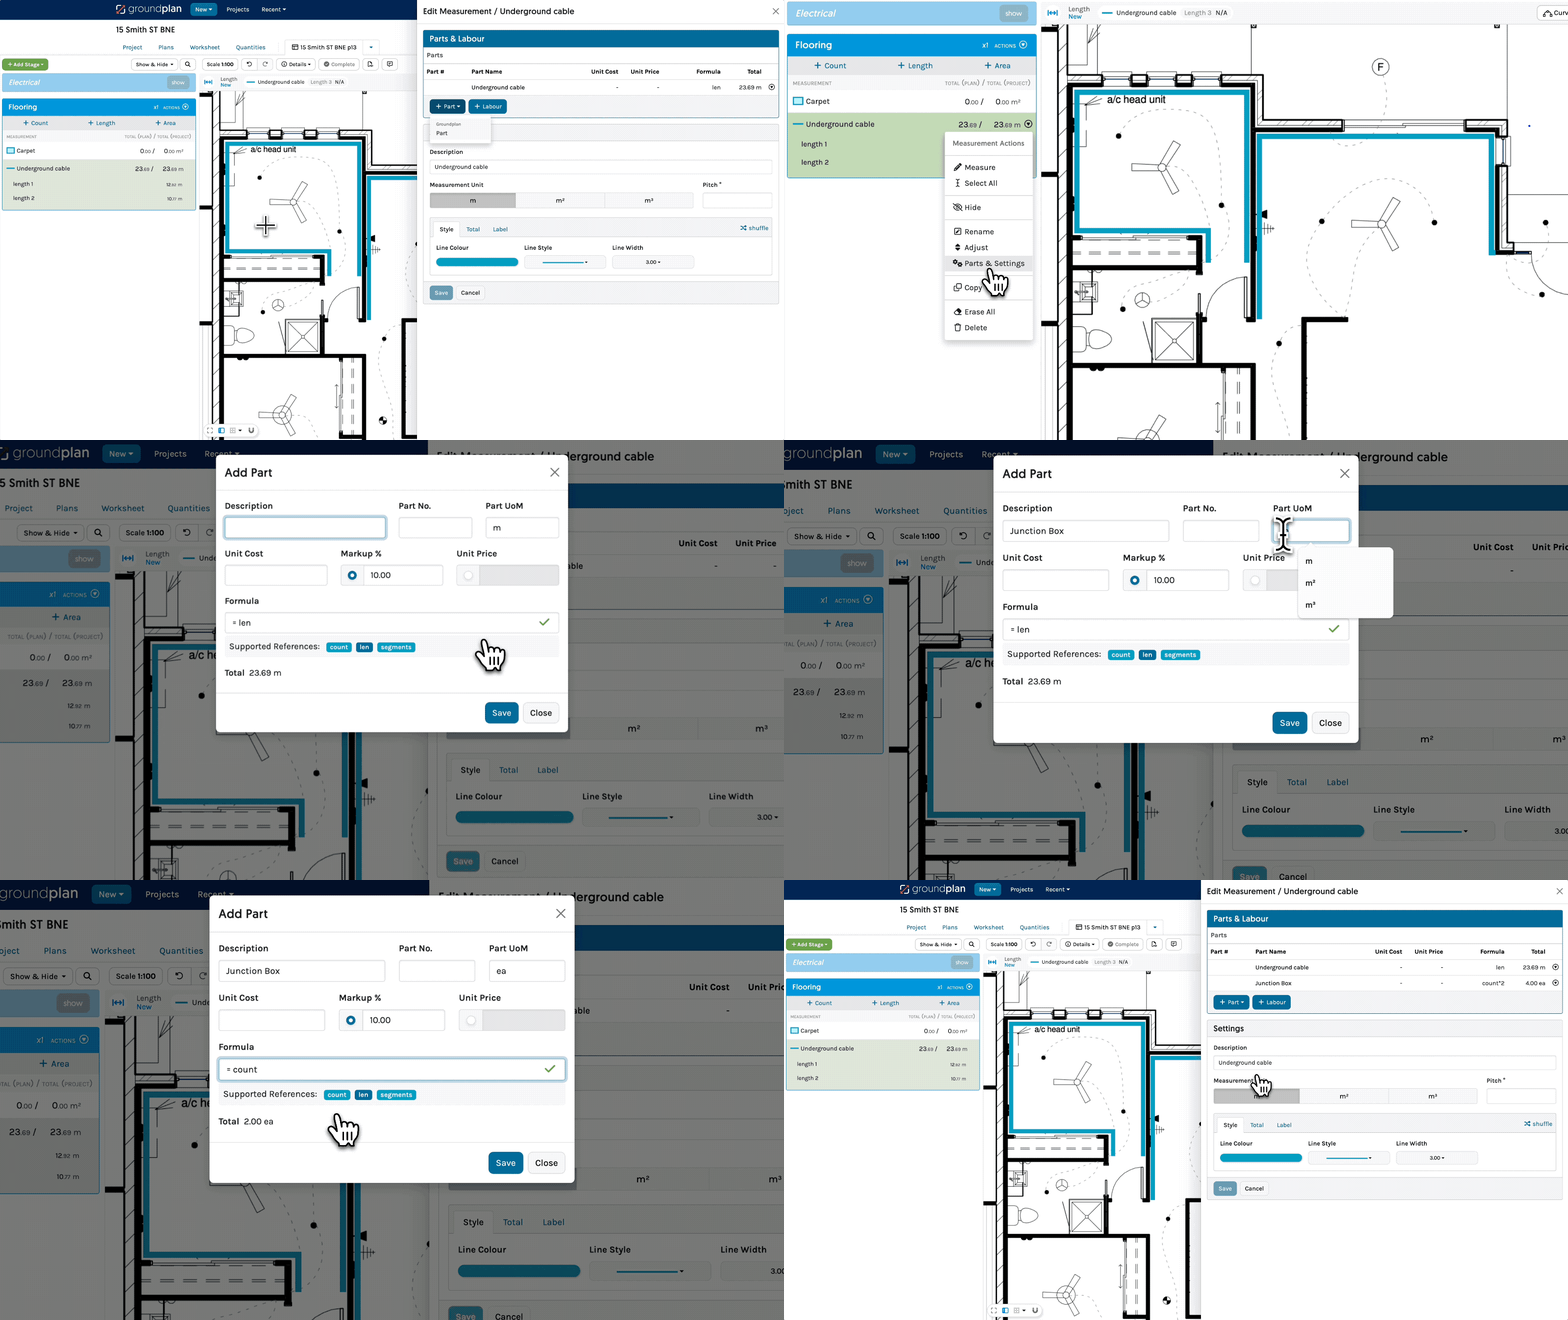
I need to add a junction box at the start and finish of each underground cable. How can I work out the Total number of junction boxes I need?
Yes.
Add a Part of Junction inside the Measurement and use the Formula count*2 and Unit of Measure as ea. This Formula takes the Count (runs) measured on the Plan, multiplies them by two and calculates the junction boxes required for the Measurement.
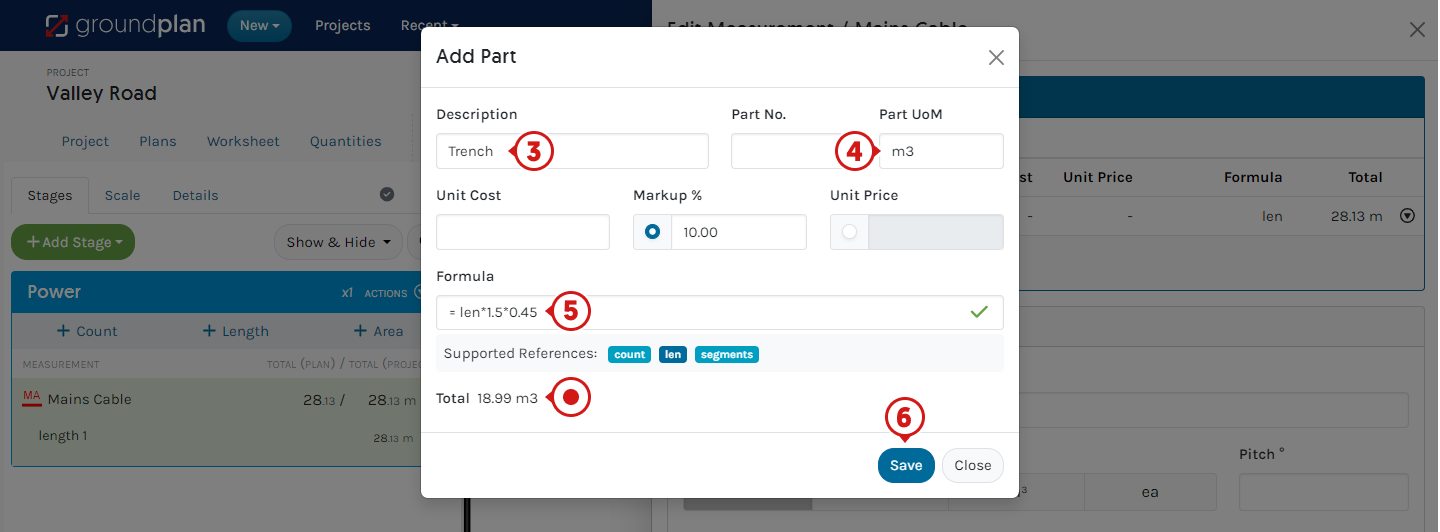
I want to measure a trench for one of my cables and work out the volume. Can this be done?
Yes.
- Click Measurement Actions then select Parts and Settings
- Click +Part and select Part
- Populate the Description with Trench
- Adjust the Part UoM to m3
- Use the Formula
Len *( depth * width ). This Formula equates to Length multiplied by depth and width to calculate the trench volume. - Click Save
What is the difference between the Drop/Wastage setting and Adjusting Totals?
The Drop / Wastage value can only be applied to specific runs and needs a Length Measurement to apply it to. The Adjustment can be made on individual runs, Total Length Measurement or Plan Totals when there are no Measurements on the Plan.
Please note: The Adjusted Value ignores the actual Measurement and locks the Value that has been defined at that point in time. Adding or Deleting runs will not change an Adjusted Total.
You may look at using Formula within the Measurement or Part if the same Drop or Wastage is to apply to all runs within a Measurement.