A Stage is a collection of Measurements that organises the Worksheet, Quantities and Integration tabs. A stage can also be likened to a group of similar items. Example Stages include lighting, sanitary drainage and demolition.
This article explores different Settings and Actions for Stages.
New Stage or Link from Worksheet?
| Action | Benefit | |
|---|---|---|
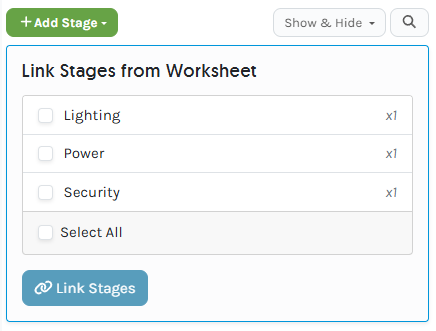 |
+ Add Stage Link Stages from Worksheet |
Creates a new Stage Selects an existing Stage on the Project, or a Stage from a Project Template to create one Project Total for the Stage Measurements across multiple Plans |
Add a New Stage
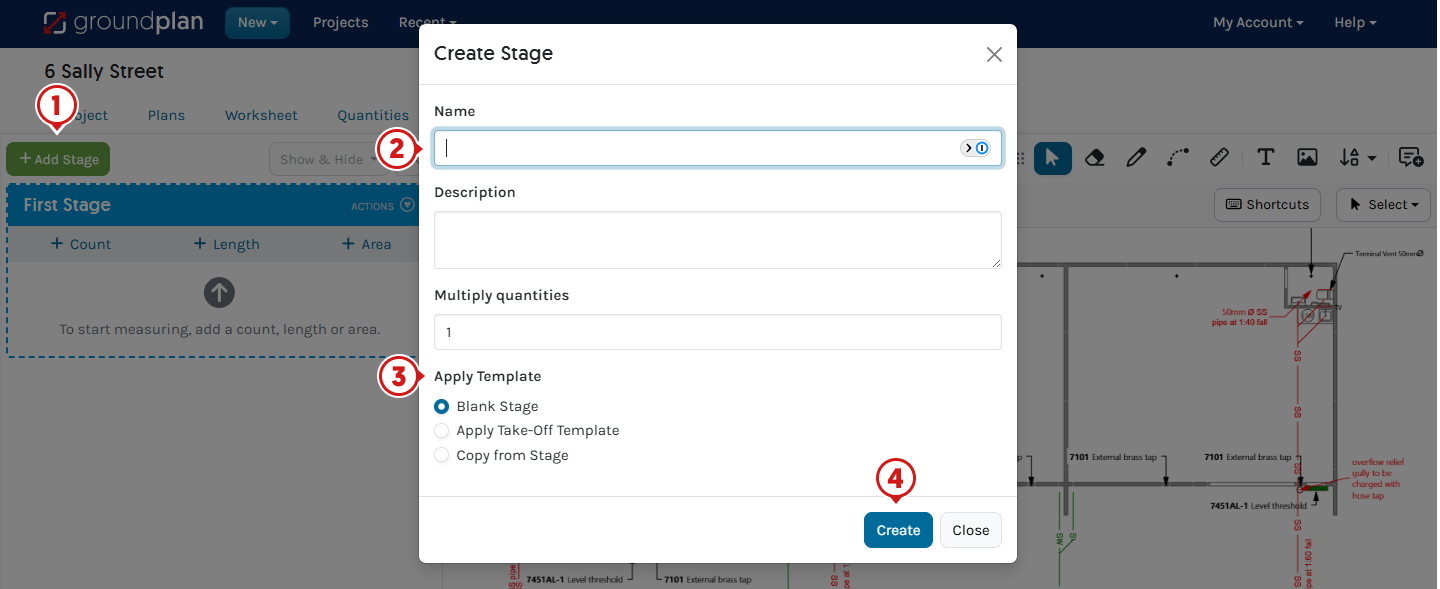
- Click + Add Stage
- Complete the required details
- Select from:
- Blank Stage
- Apply Take-off Template choosing pre-saved Measurements
- Copy from Stage - copying Measurements from another Stage already in the Project creating separate Totals
e.g. Landscaping Unit 1, Landscaping Unit 2
- Click Create
Link from Worksheet
Creates one Project Total for the Stage across multiple Plans. This selection appears when there are other Stages in the Project including Stages preset in a Project Template.
- From within the table, click to select the appropriate Stage/s
- Click Link Stage/s

Example of Totals from a Linked Stage:

⚠️ Deleting a Measurement from a Linked Stage will remove the Measurement and all Totals from all Plans using the Linked Stage in the Project
This action is not reversible
Stage Multiplier
Stage Multipliers can be set to multiply all Measurement Quantities within a Stage. Multipliers can also be set per Plan. Stage Multipliers can be used as another way to duplicate a level.
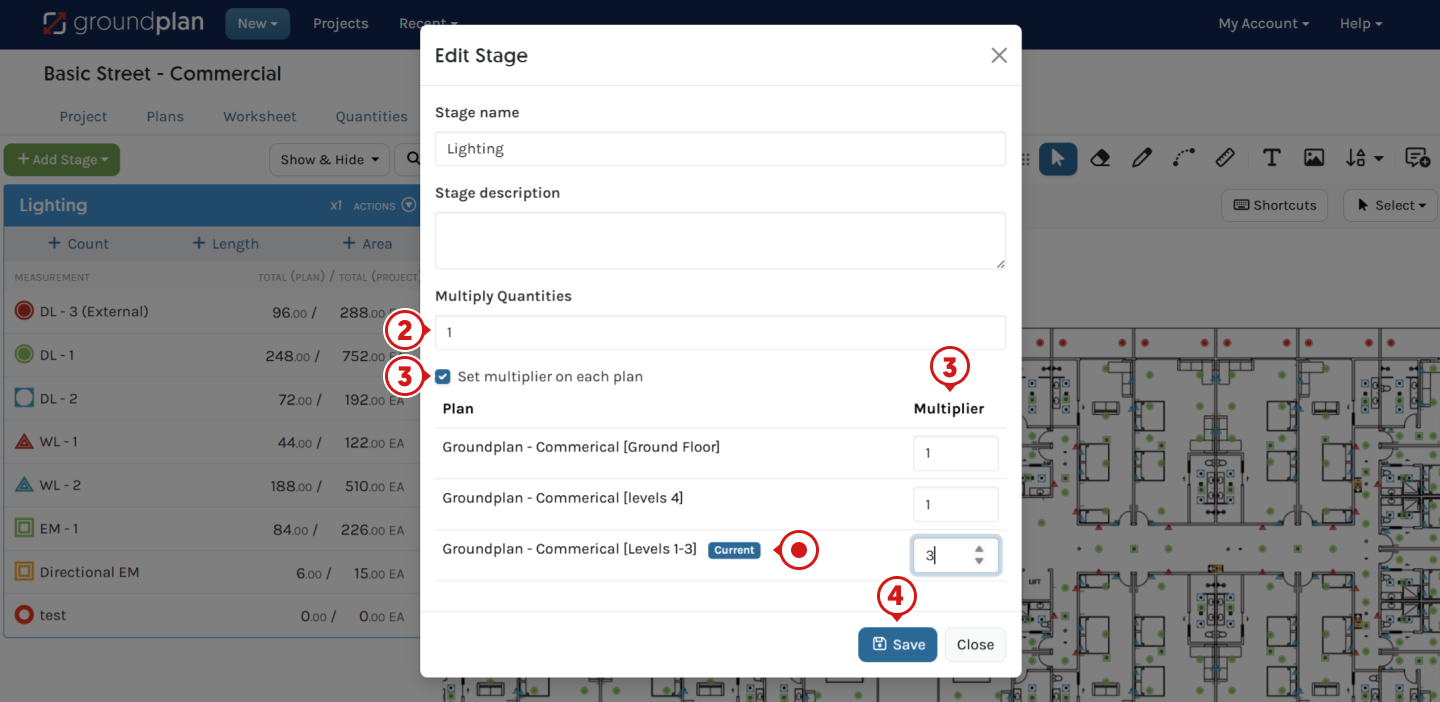
- Click Stage Multiplier (x1)

- Enter the Multiplier for all Measurement Quantities in the Stage
- If different Multipliers are needed on Plans, tick Set Multiplier on each Plan
Set a Multiplier per Plan for the Stage
An asterisk next to multiplying number ( eg. x2*) indicates that Plans linked to that Stage have different Multipliers per Plan - Click Save
Rename Plans to include the Plan Multiplier
- Click Details
- Click Rename and rename the Plan
- Click Save

Un-link a Stage from a Plan
Un-link a Stage to remove all Measurement Totals from a Plan without removing the Stage and Measurement Totals from the entire Project.
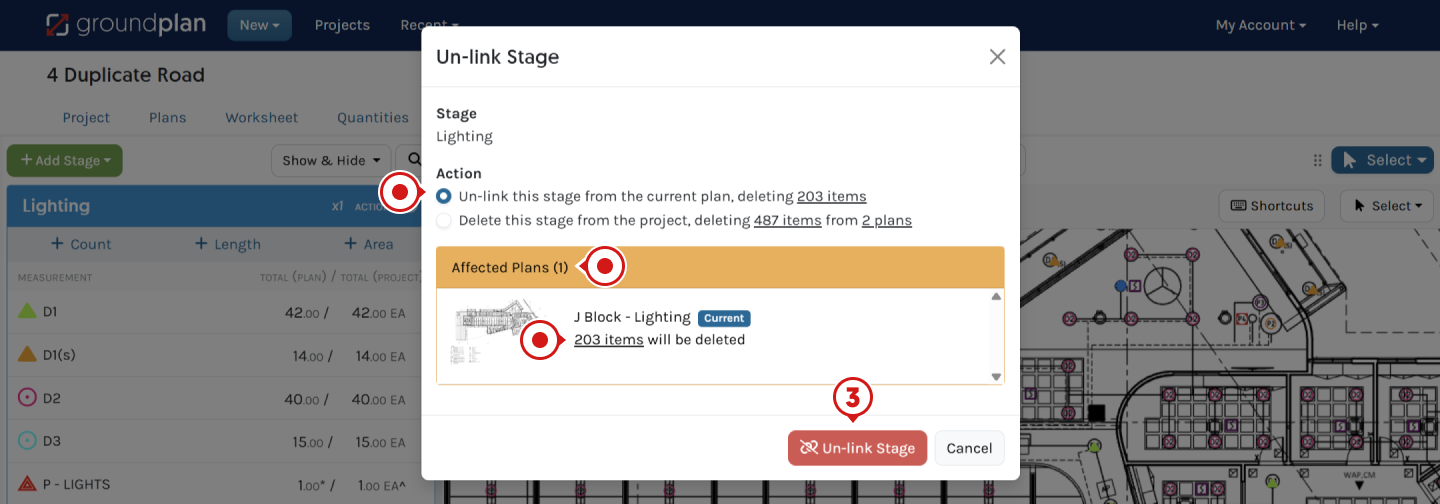
- Click Stage Actions
- Click Un-link from Plan
Un-linking a Stage will remove all Measurements and totals from the Current Plan

- Click Un-link Stage
To Cancel the Action click Cancel
⚠️Un-linking a Stage will remove all Measurements and totals from the Current Plan.
This Action is not reversible
Deleting a Stage
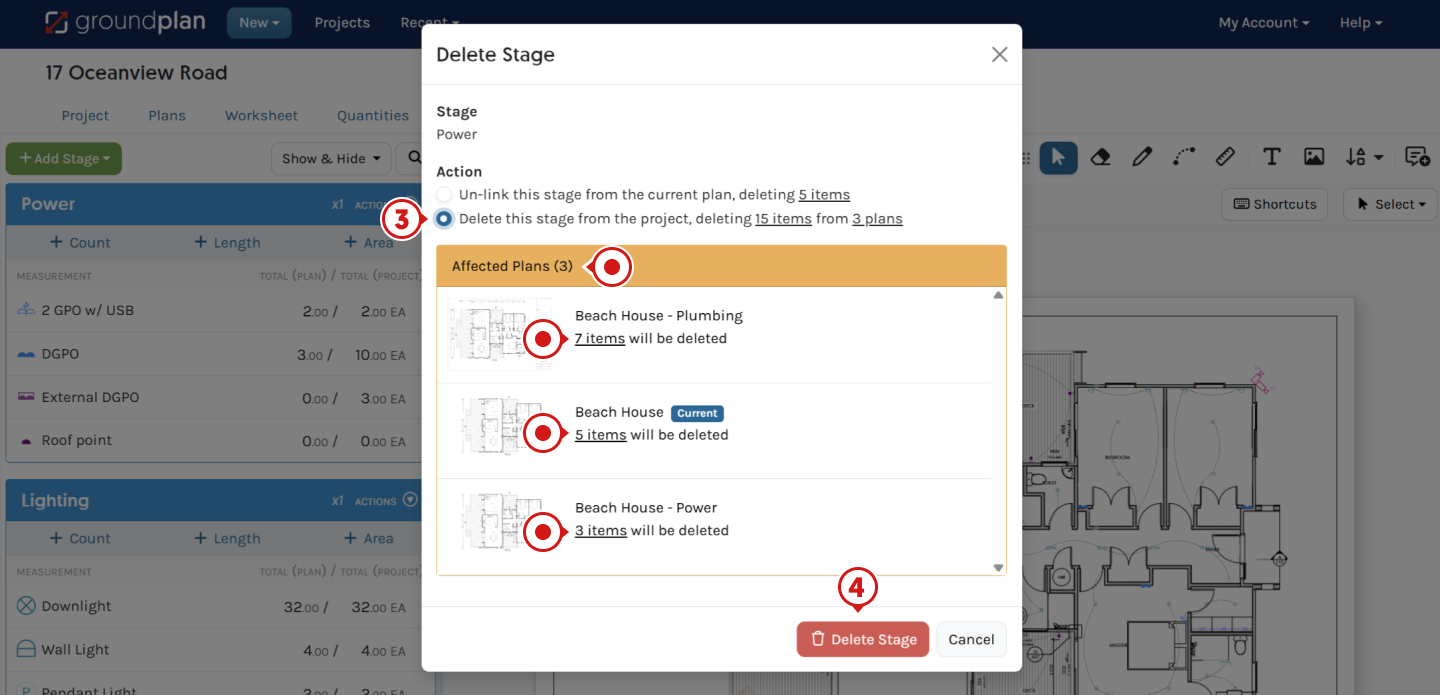
Remove a Stage and all Measurement Totals from the entire Project.
⚠️ Deleting a Stage will remove all Stage Measurements and all totals from all Plans in the Project Permanently.
This Action is not reversible
- Click Stage Actions
- Click Delete from Project
Remove a Stage and all Measurement totals from the entire Project

- Select the action, Delete this stage from the project, deleting
x itemsfromx plans
When there is more than one Plan effected - Click Delete Stage
To Cancel the Action click Cancel
Copy Measurements on a Stage
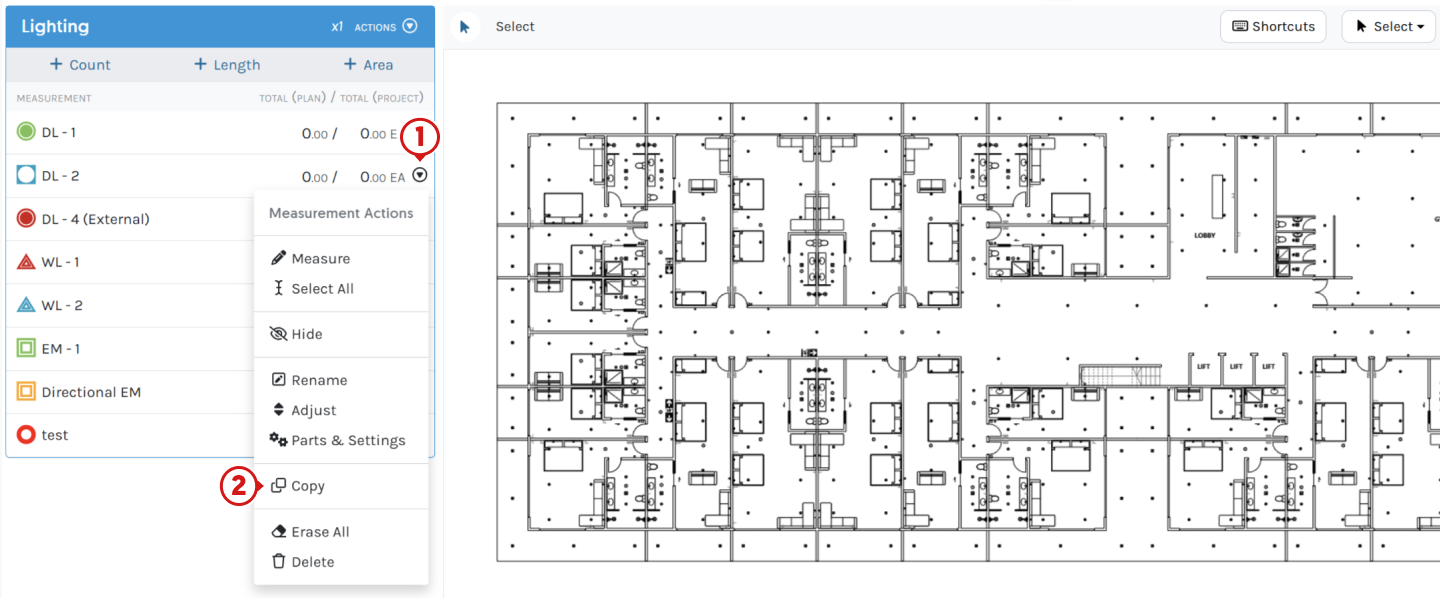
Copy Measurements will Copy all Parts, Pricing, Formula and Labour to another Measurement in the same or another Stage. Copying a Measurement will not copy Quantities.
- Click Measurement Actions
- Click Copy
- Type the New Measurement Name
- Select option of where to Copy to:
- Current Stage:
(name) - Another Stage (choose another existing in the Project)
- Current Stage:
- Click Copy Measurement

Changing / Updating Parts on a Copied Measurement
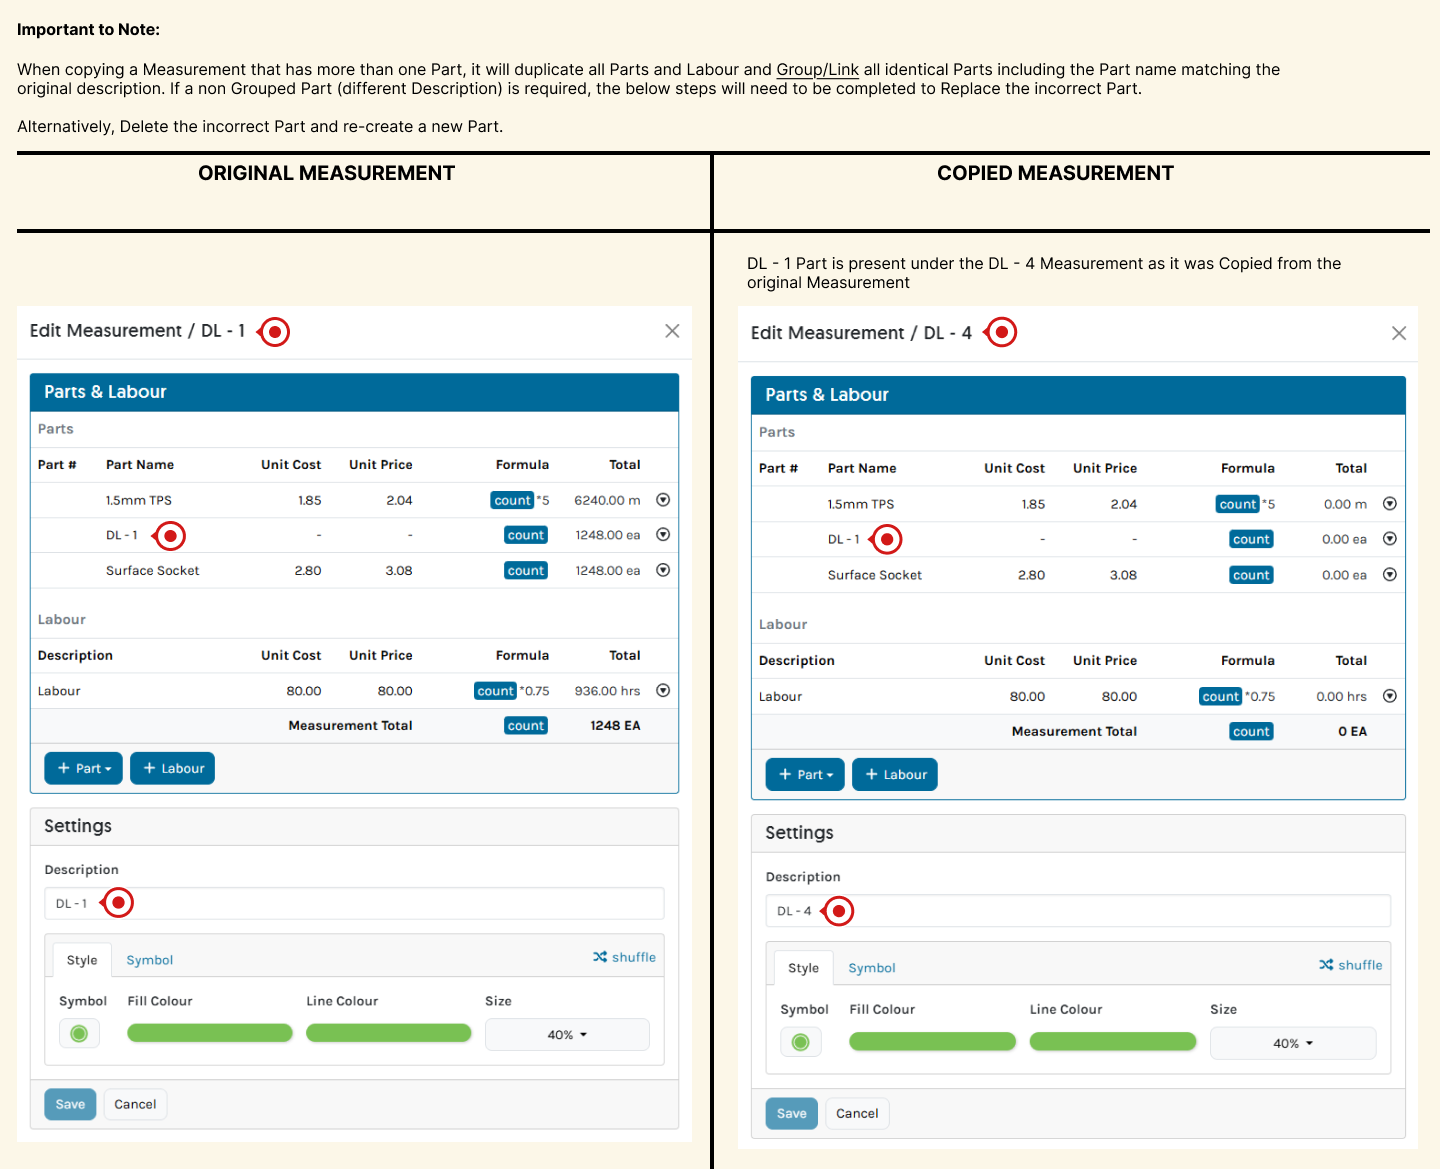
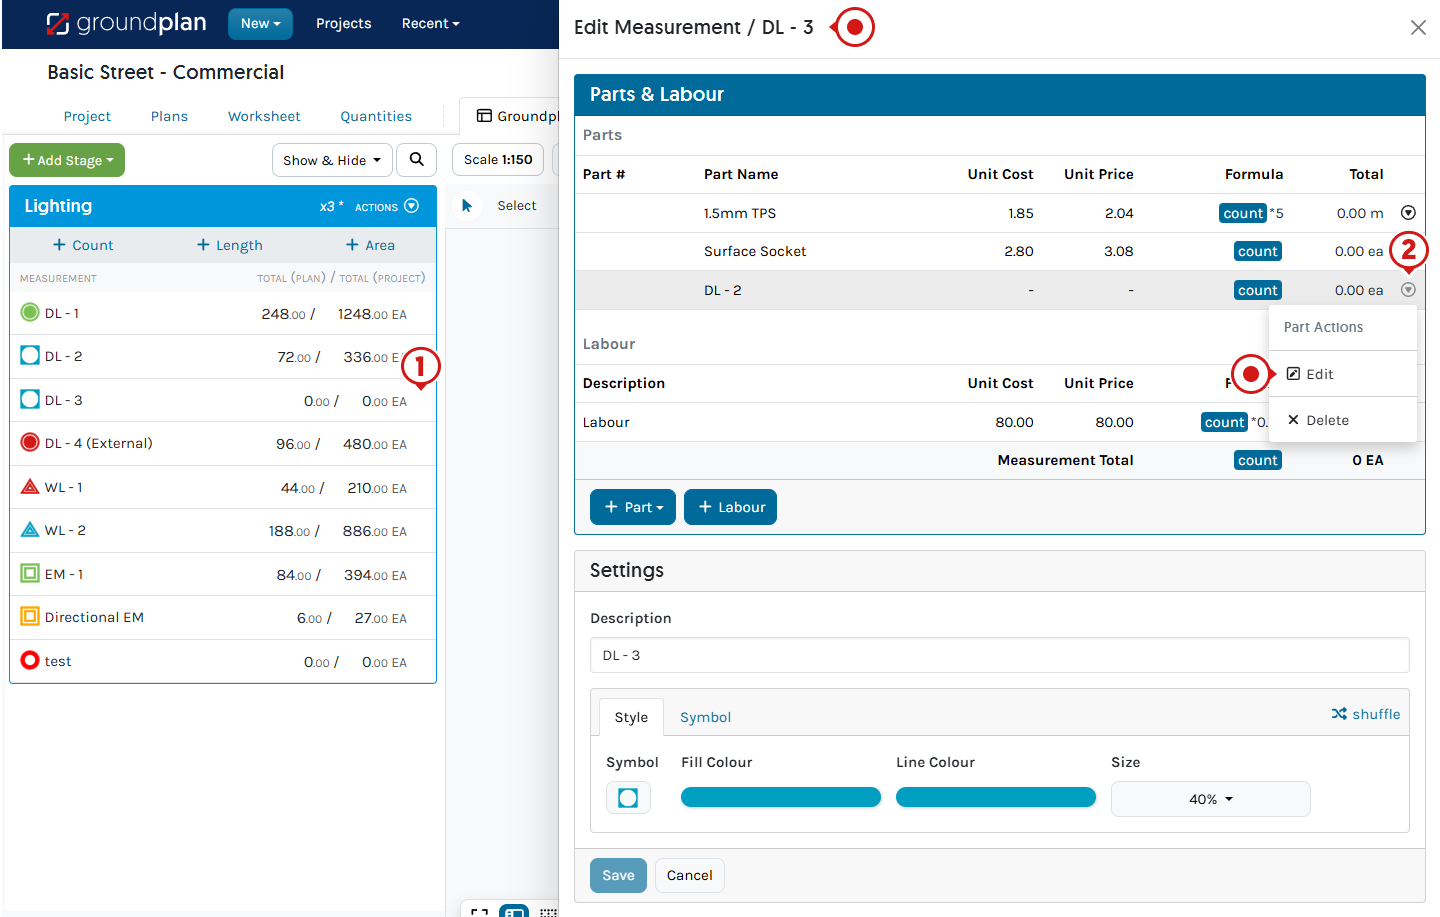
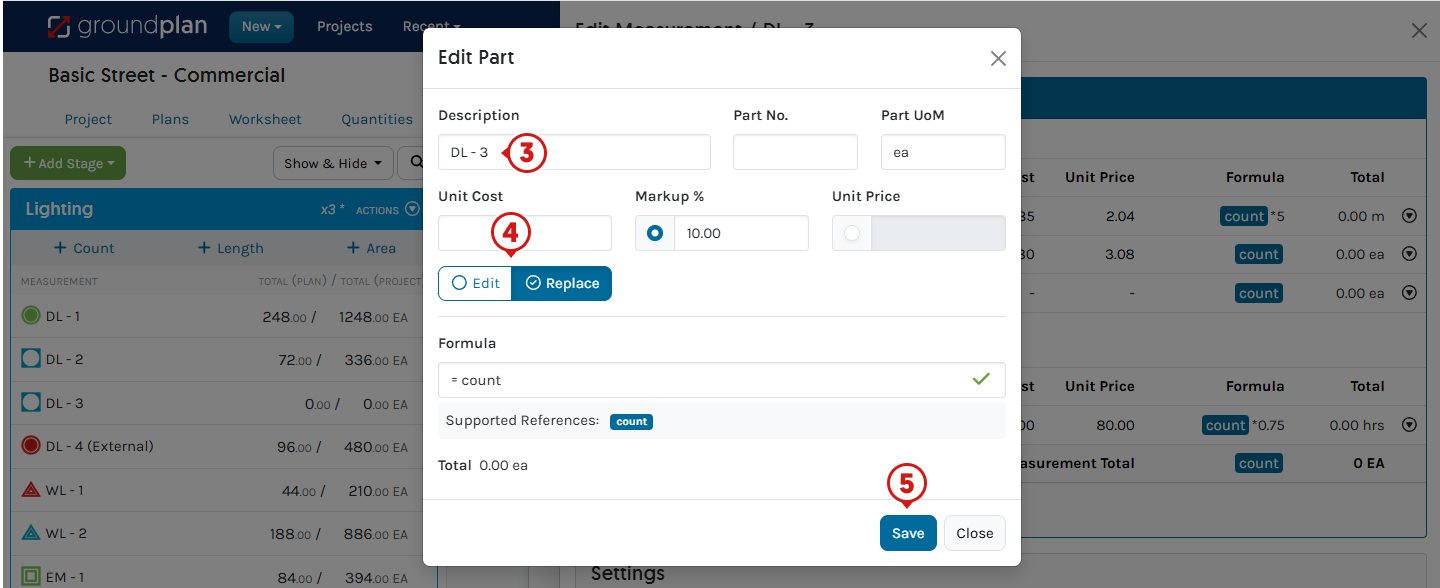
- Click Part Actions then Parts & Settings
- Click Part Actions then Edit
-
Rename the Part from the old name, update Pricing or Formula
-
Select:
- Edit to update all linked Parts OR
- Replace to ensure it is not Grouped / Linked with the Measurement Part it was copied from
-
Click Save
- (Optional) update Style Options then click Save
Style is identical to the Measurement it was copied from - Click X to Close
Specific information can be located in each Measurement article:
Delete Measurements on a Stage
Remove a Measurement and Totals from the entire Project permanently.
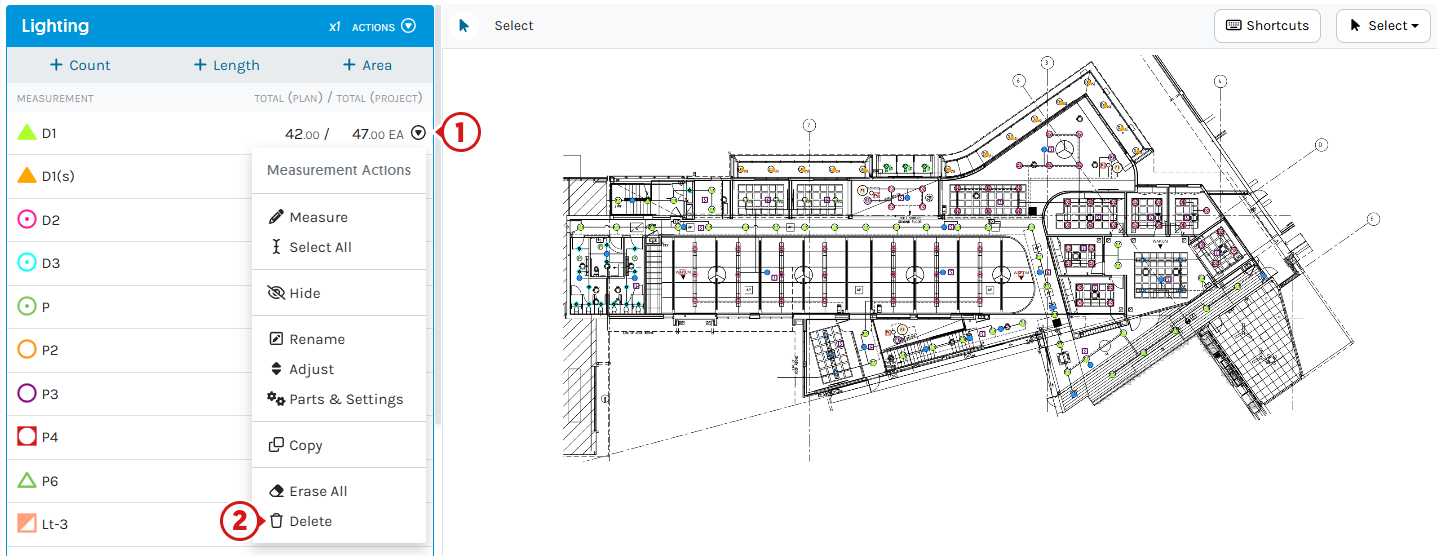
- Click Measurement Actions
- Click Delete
Remove a Measurement and totals from the entire Project
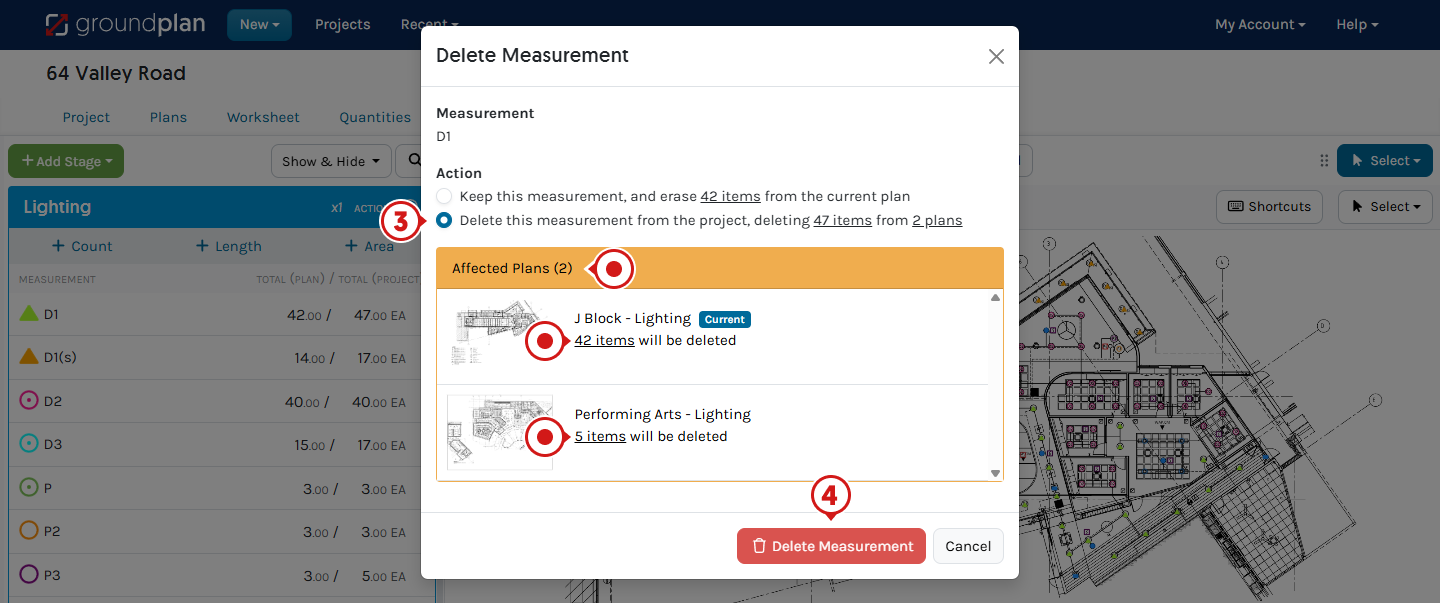
- Select the action, Delete this measurement from the project, deleting
x itemsfromx plans
If it is a Linked Stage - Click Delete Measurement
To Cancel the Action click Cancel
⚠️ Deleting a Measurement from a Stage will remove the Measurement and Totals from all Plans in the Project. If this is a Linked Stage, it will Delete across all Plans it is Linked to.
This Action is not reversible
Rearrange Stages
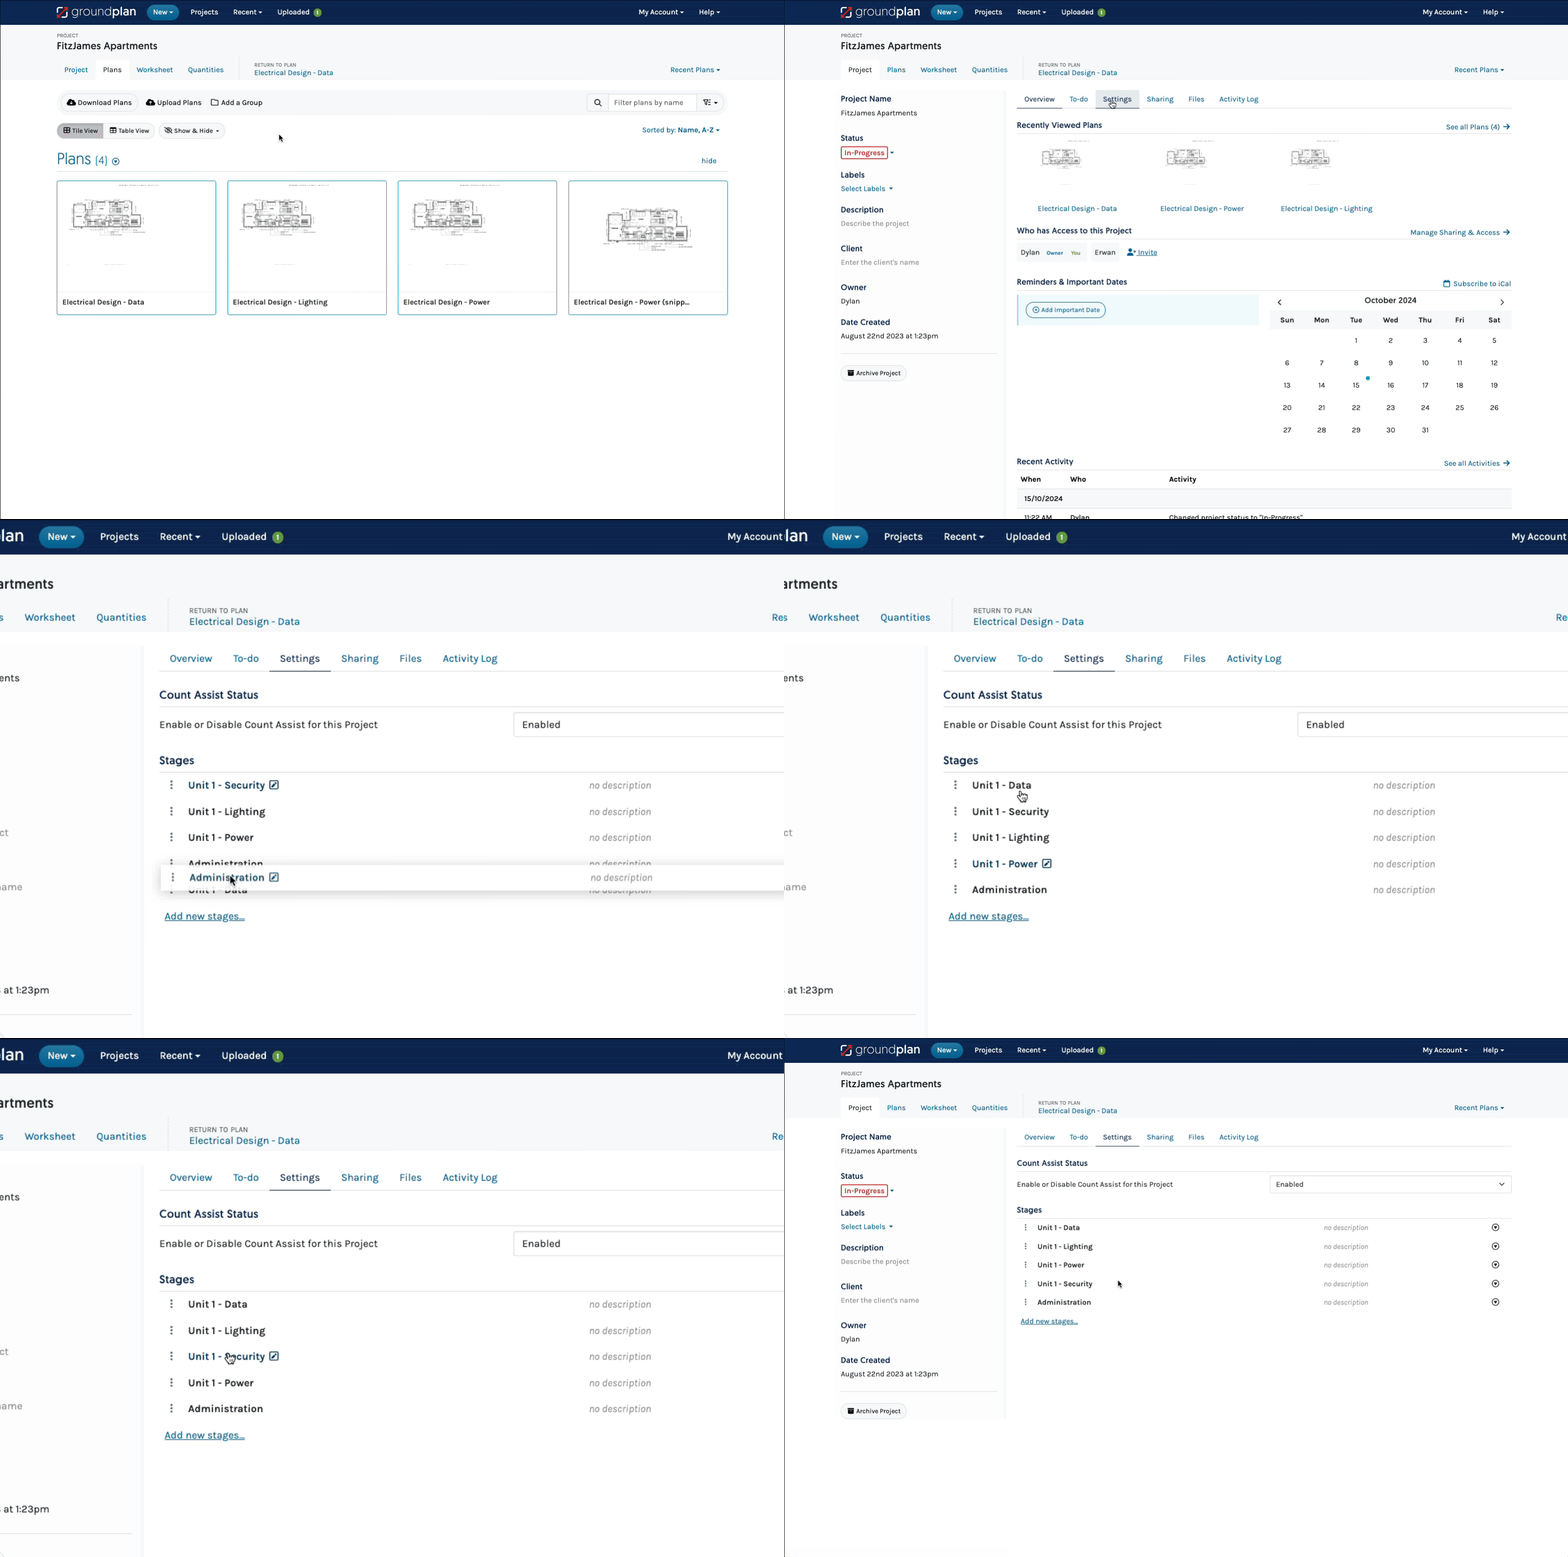
The order of Stages is edited in the Project tab.
- Click Project
- Click Settings
- Drag and drop the Stages to reorder
Will be applied to all Stages, Worksheet, Quantities and Integration tabs
Frequently Asked Questions
Can I choose the Stages I want shown on the Legend?
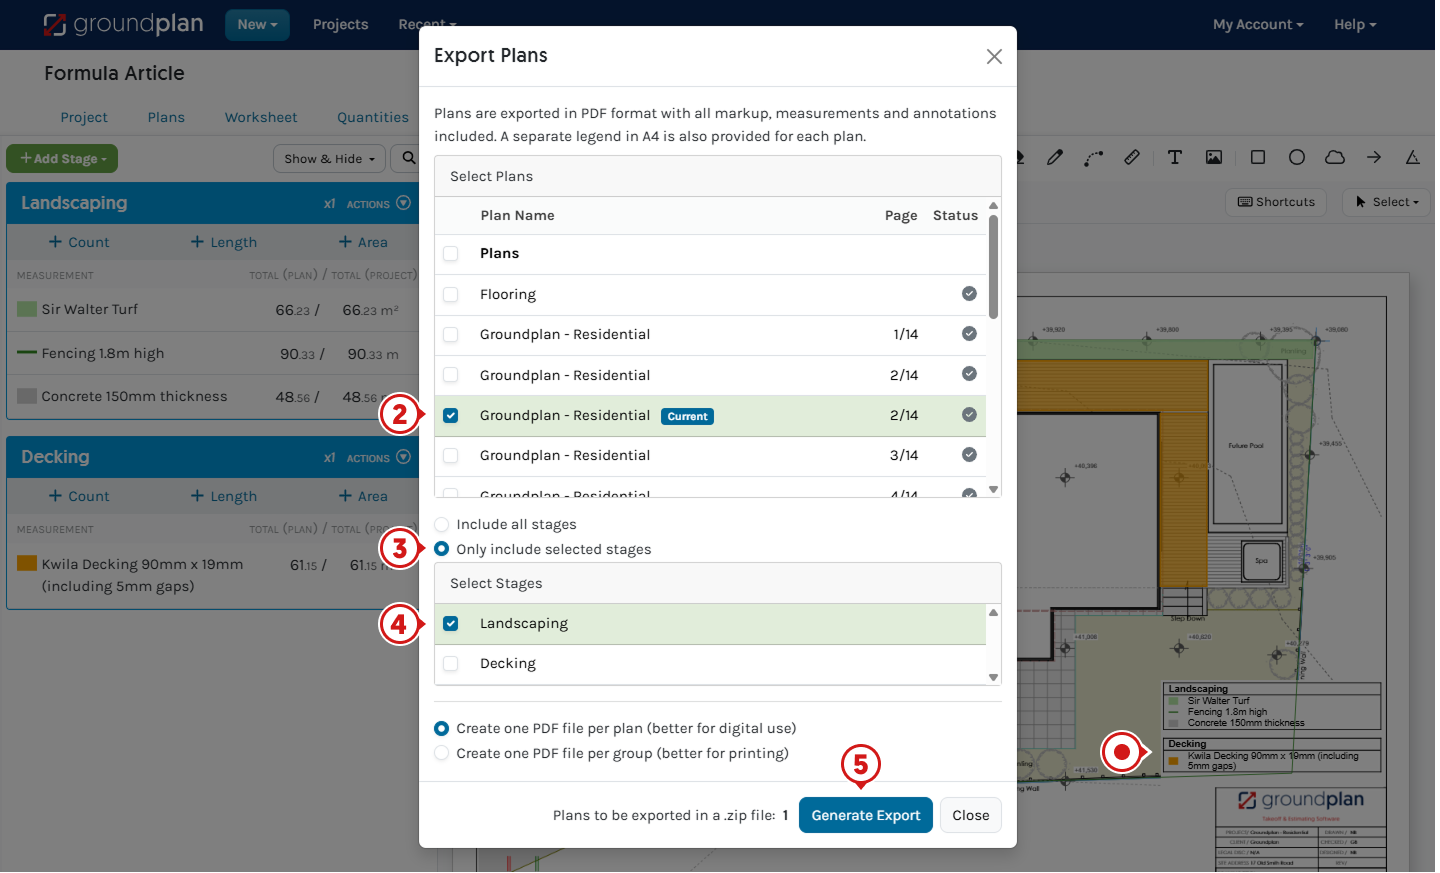
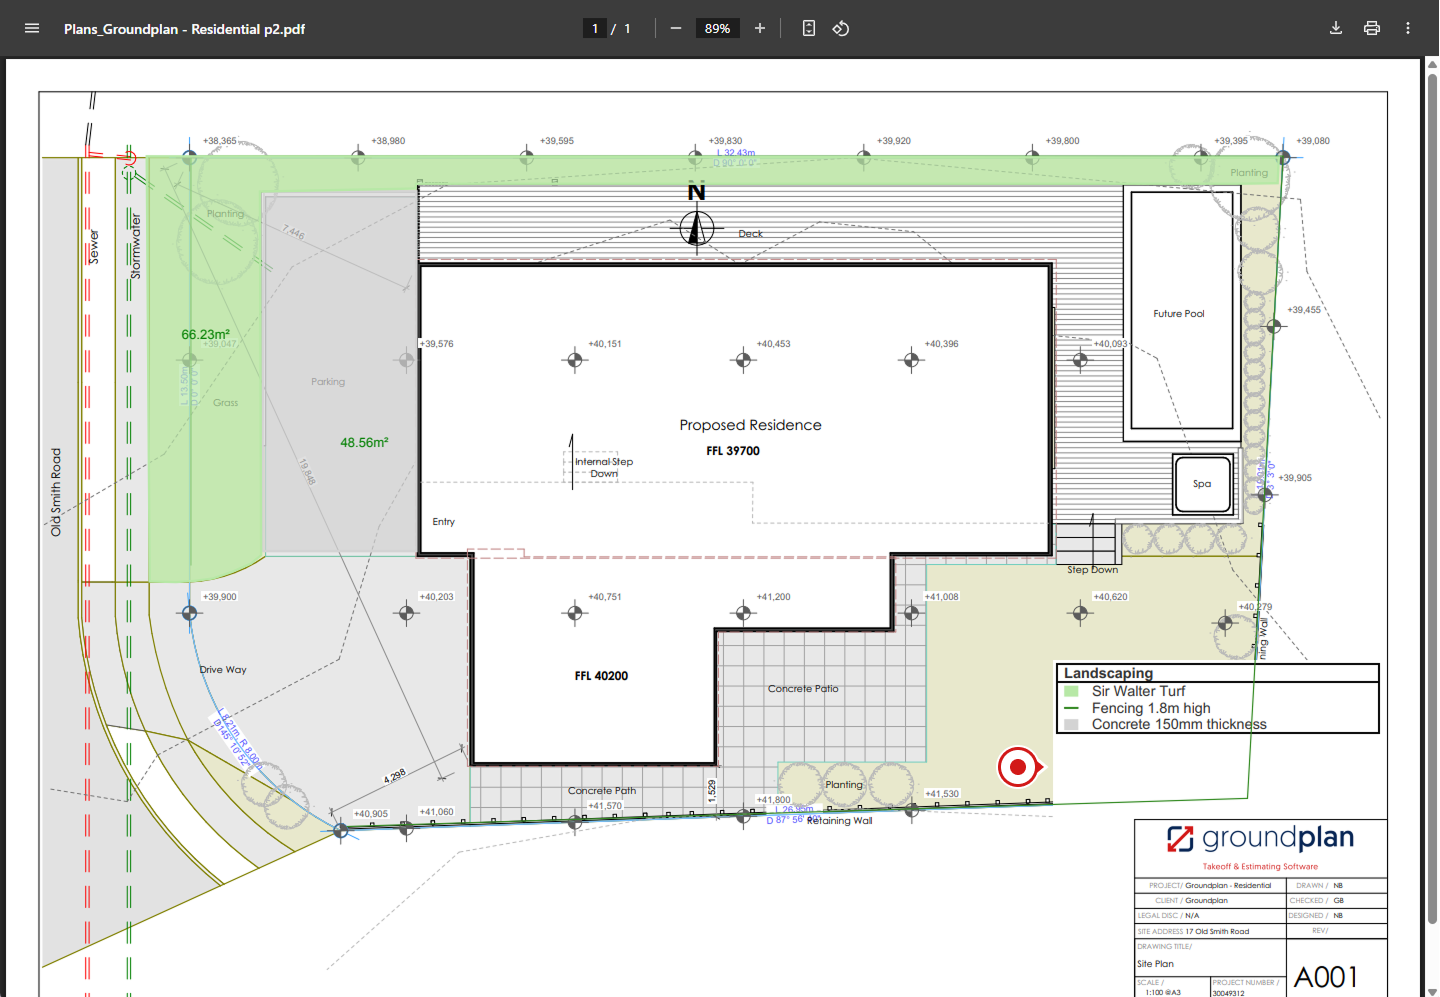
Yes. Even if the Stage is displayed in the "on screen" Legend, the Stage/s can be selected or excluded upon Export.
- Click Export to PDF
- Select the Plan/s to be Exported
- Choose Only Include Selected Stages and select the Stage/s required
- Choose the PDF file generation option (Default) Create one PDF per Plan (better for digital use) or switch to Create one PDF per Group (better for printing)
- Click Generate Export
Can you use a Stage you added from another Plan to a new Plan?
Yes. Select Link from Worksheet when adding a Stage onto a new Plan.

If a second Stage has already been created, unfortunately, there is no ability to merge Stages.
Using the Transfer function will allow Measurement Totals to be Transferred from one Stage to another.
What happens if I add another Measurement to a Stage that I just linked?
The Measurement will populate within the Stage of every Plan the Linked Stage appears on.