The Groundplan Area Tool is used to calculate metres, square metres, volume, footprint or add pitch on Plans or Google Map images, enabling accurate material and labour estimates ahead of a site visit. These appear in the bill of materials on the Quantities Tab.
Related articles: Area Cut-Out Tool | Negative Areas | Measurement Parts and Labour
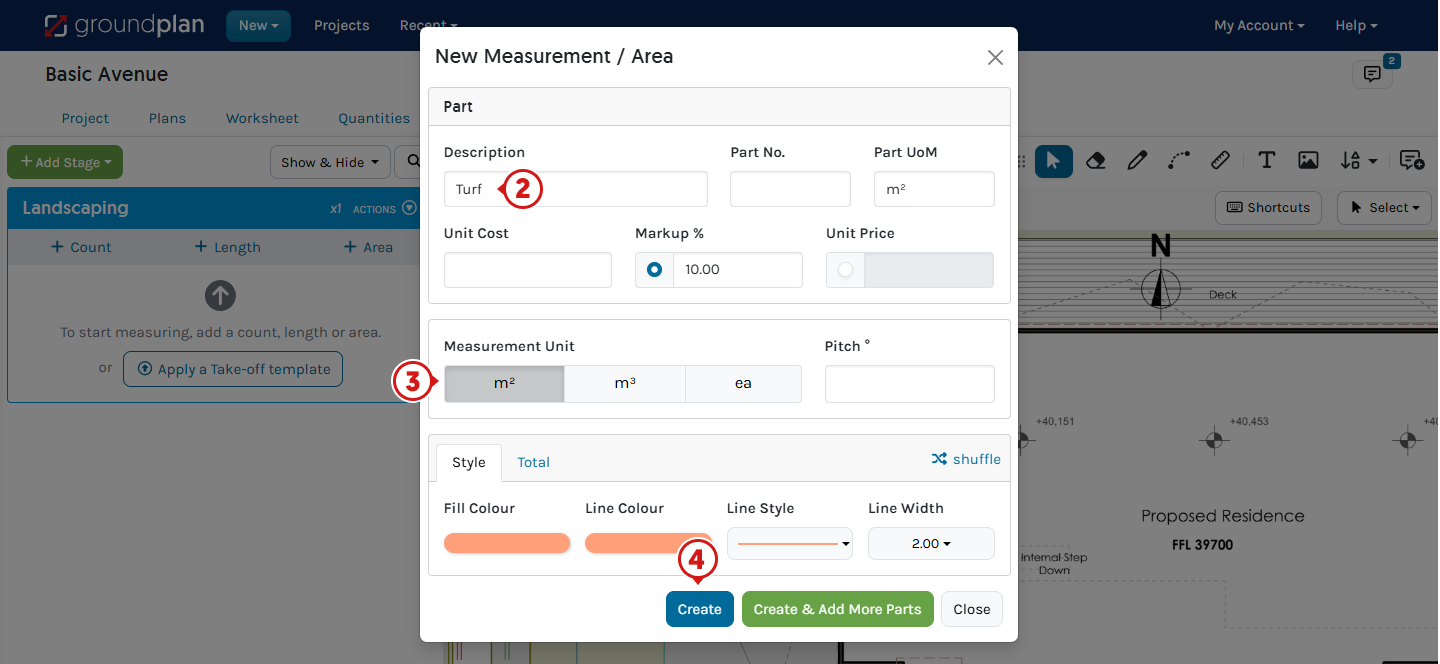
Add a New Area Measurement
- Within a Stage click +Area

-
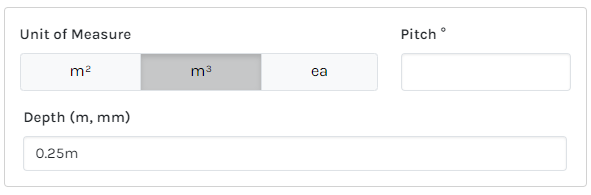
Complete the required details
Part no, Unit Cost, Markup Percentage and Unit Price are optional. If using costing, please ensure the Unit Price is populated -
Select the Measurement Unit or add a Pitch degree
This will update the Part UoM box -
Click Create
If additional Parts and Labour are required, click Create & Add More Parts
Using the Area Tool to begin Measuring
⚠️ To measure a Length, set the Plan Scale
- On the Plan, click to begin an Area
- Click once to change direction
- Click, hold and drag to pan around the Plan
- Hold SHIFT to draw a straight line and hold in 15-degree increments
- Hold CTRL / Command⌘ and press Z to undo the last point
- Double click to complete the Area

Square Drawing Mode
After an Area has been created, choose Square Drawing Mode to draw rectangles and squares.
- Click Freeform then click Square
- Click once to begin
- Move to the opposite side corner and click once to complete

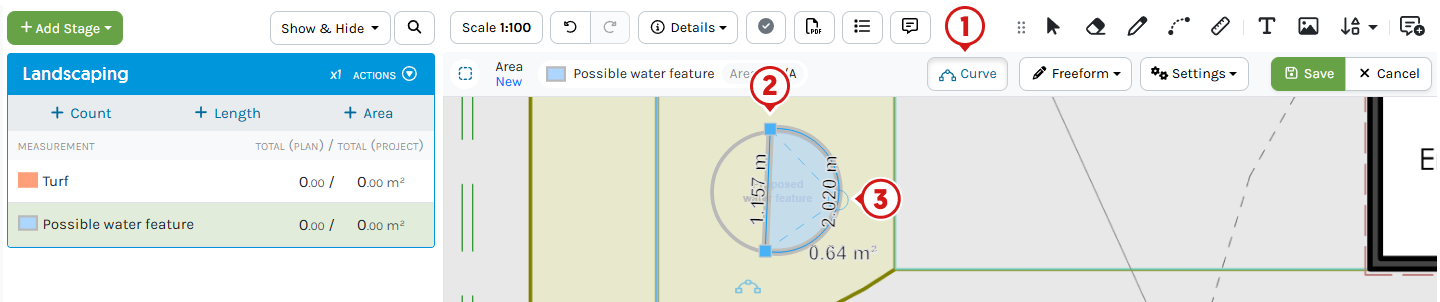
Curve Drawing Mode
After an Area has been created, choose Curve Drawing Mode to draw curves.
- Click Curve
- Click once to begin
- Click once along the Curve
Close to the apex / highest point for best results - Click at the end of the Curve
- Click the Curve button again to return to Freeform or click the last point to complete
When Curved Mode is enabled, it will not dis-engage until the button is clicked again.
To create Curves and straight lines in the same Area
- In Freeform Mode, click at the beginning of the Curve
- Press Q
- Click once along the Curve
Close to the apex / highest point for best results - Continue on or click the last point to complete
When the Curve is complete, Freeform Mode will automatically engage.
To transform the last straight segment into a Curve
- In Freeform Mode, click the point at the beginning of the Curve
- Click at the end of the Curve
- Press W and moving the cursor back to the apex / highest point of the Curve and click once
- Continue on or click the last point to complete
When the Curve is complete, Freeform Mode will automatically engage.
Area Cut-out Tool
The Area Cut-Out Tool is used to subtract an Area from a Measurement. On Plans, it removes an island bench from flooring or windows from external cladding.
Read more about it here.
How to Edit existing Areas
The Settings modal remains open during Editing and requires a click to close once editing is complete.
- Press ESC, Zoom in and click the Area
- Click Settings to:
- Edit Fill Colour, Line Style, Line Colour and Line Width changing all Areas associated with this Measurement
- Change the selected Area to a Negative
- Add or edit Parts & Settings or Labour

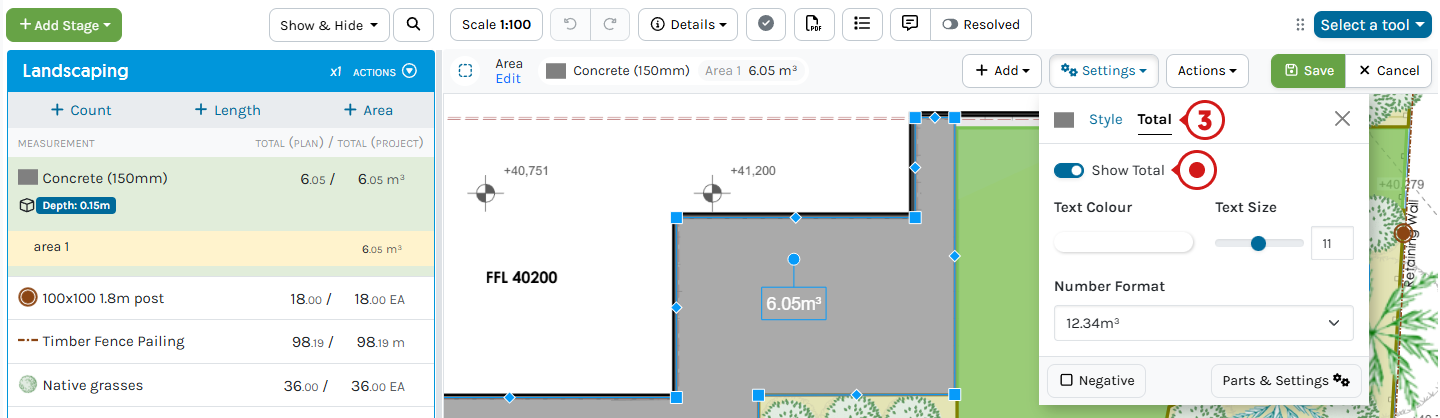
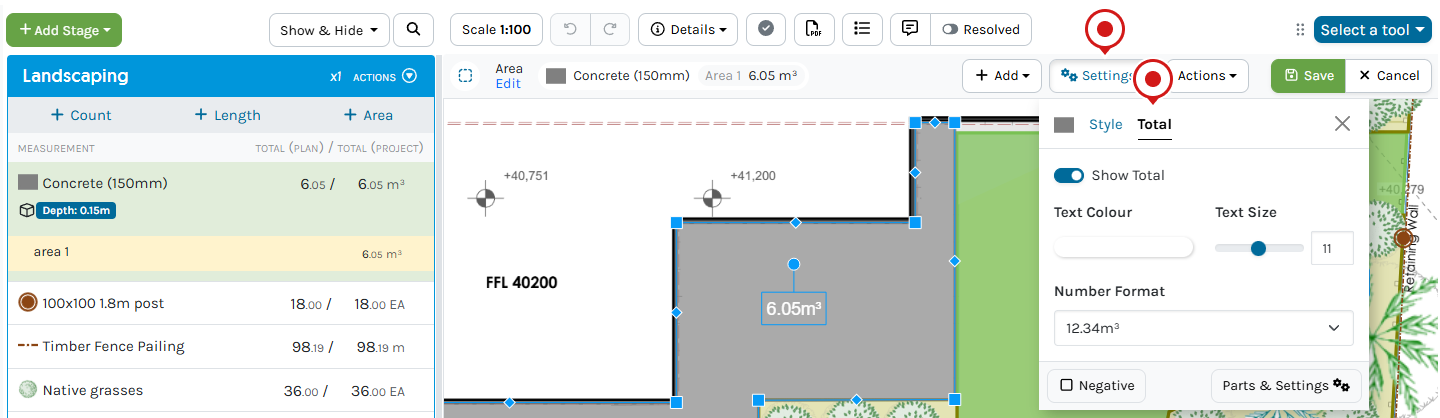
- Click Total to:
- Enable / Disable Show Totals
- Edit Text Colour, Text Size and Number Format
- Change the selected Area to a Negative
- Add Parts and Labour
- Click +Add to:
- Create another Area
- Create an Area Cut Out

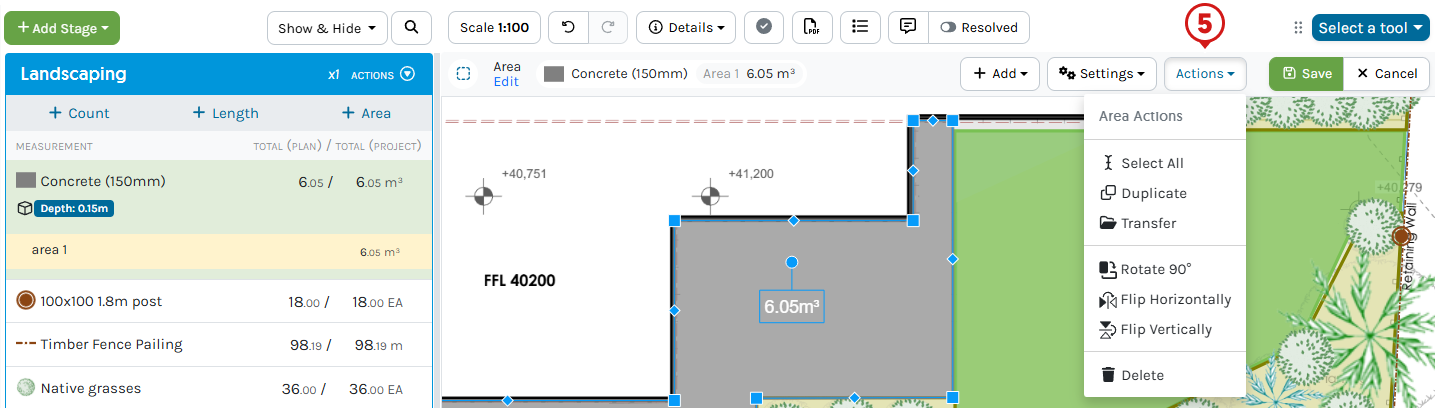
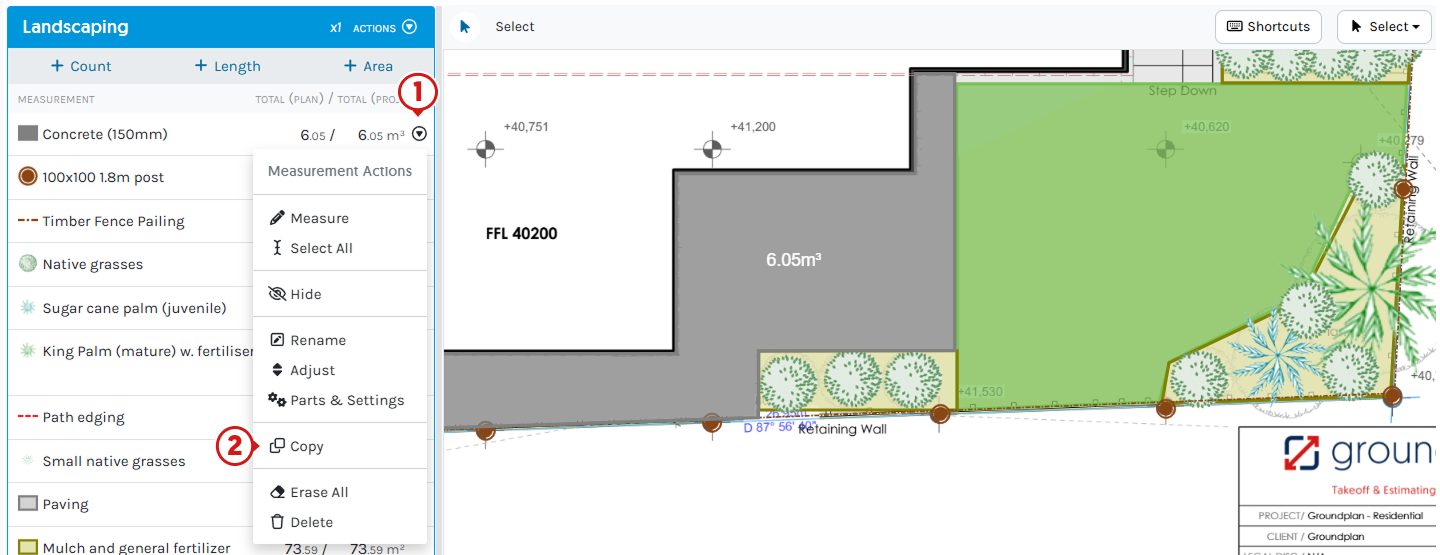
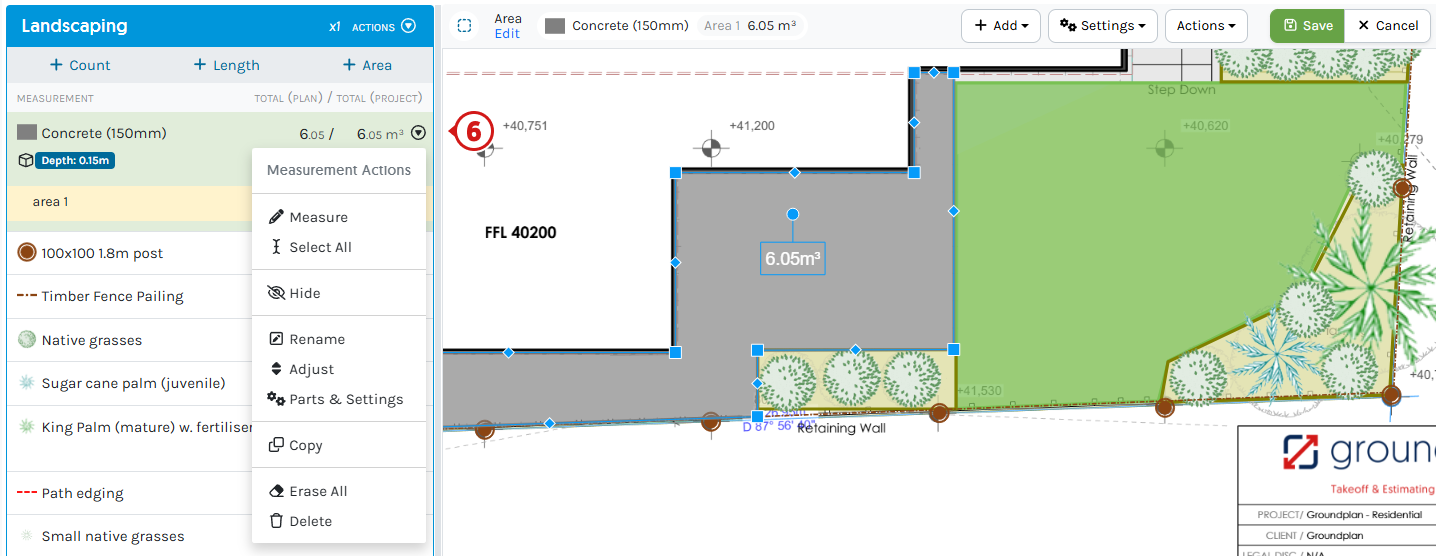
- Click Measurement Actions to:
- Hide this Measurement from the Plan
- Select All of the Measurement
- Rename
- Adjust the Measurement Value
- Add or edit Parts & Settings and Labour
- Copy (more information provided below)
- Erase All, removing all Lengths from the Plan
- Delete the Measurement from the whole Project Permanently
Click here for Copy Measurement instructions
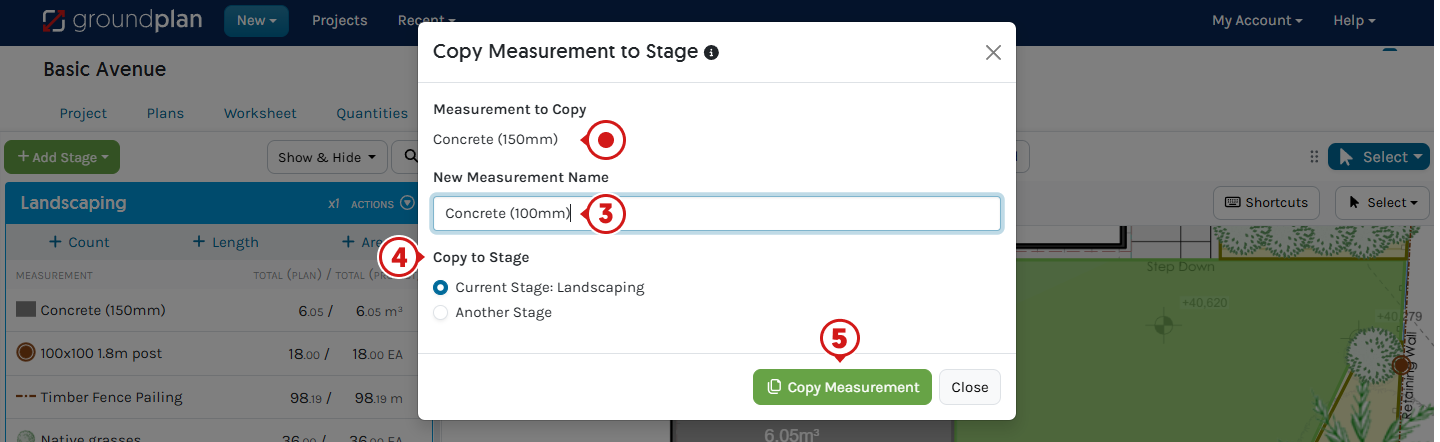
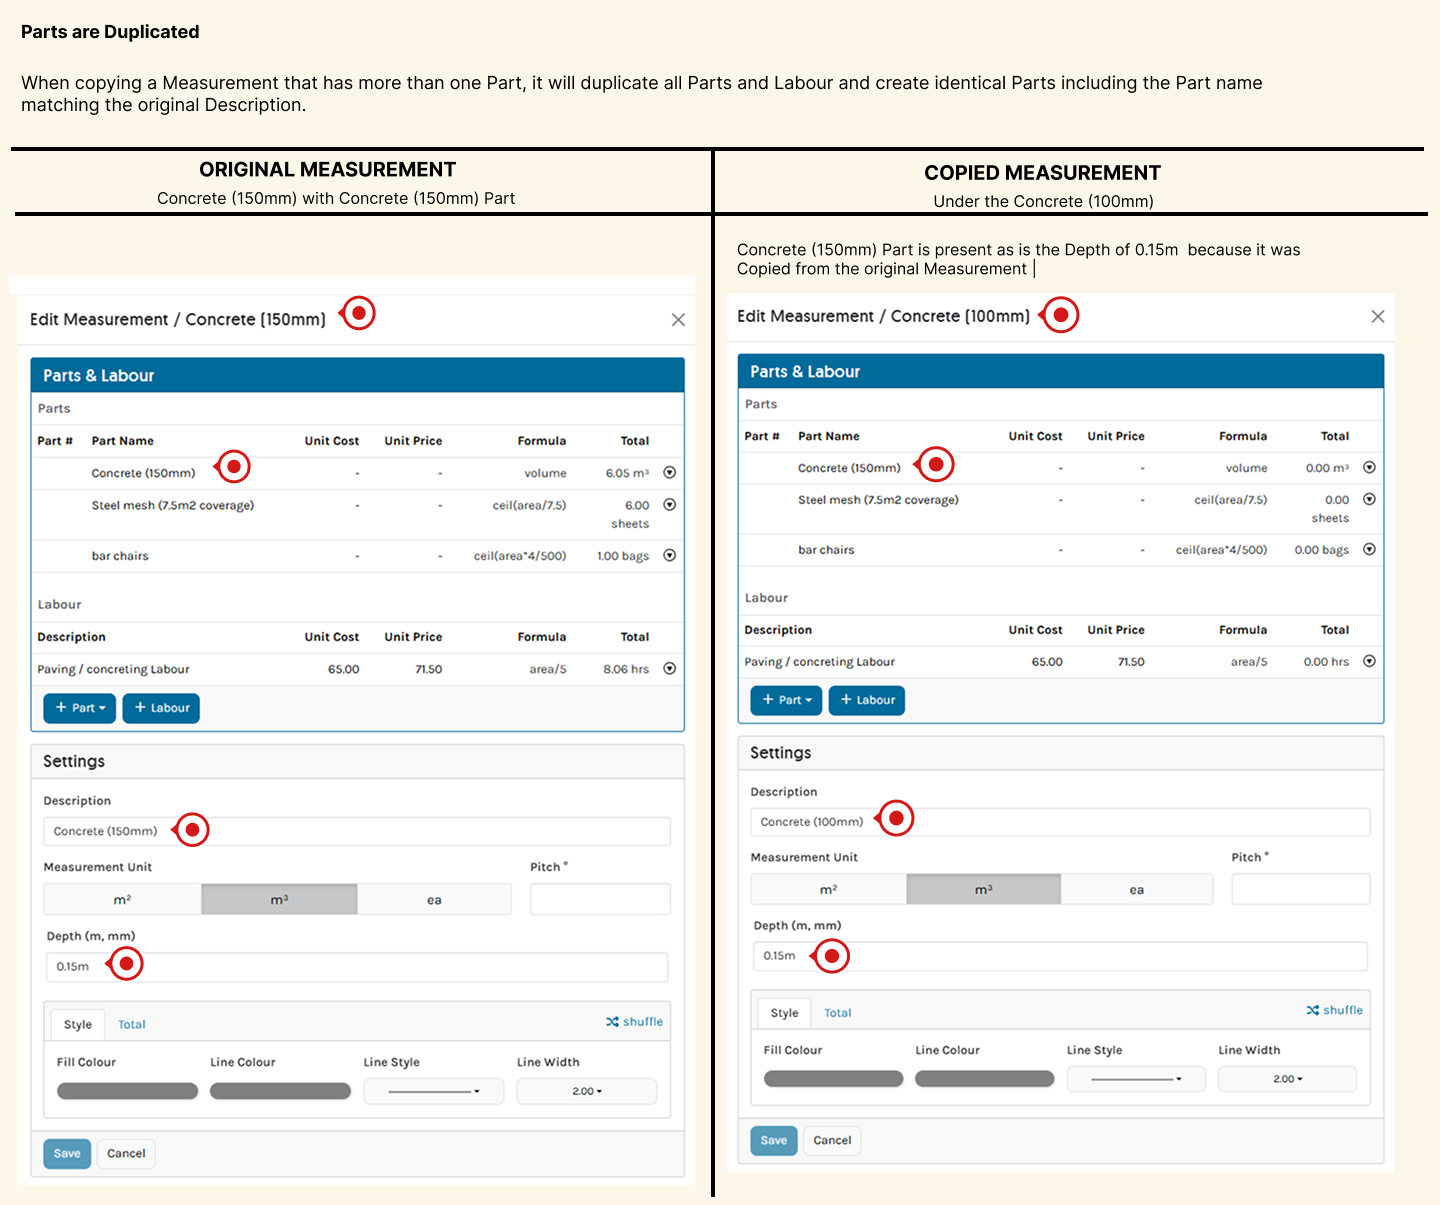
Copy Measurements will Copy all Parts, Pricing, Formula and Labour to another Measurement in the same or another Stage.
Measurement Unit Options and all Parts and Labour are identical when copied.
- Click Measurement Actions
- Click Copy
- Type the New Measurement Name
- Select option of where to Copy to:
- Current Stage:
(name) - Another Stage (choose another existing in the Project)
- Current Stage:
- Click Copy Measurement
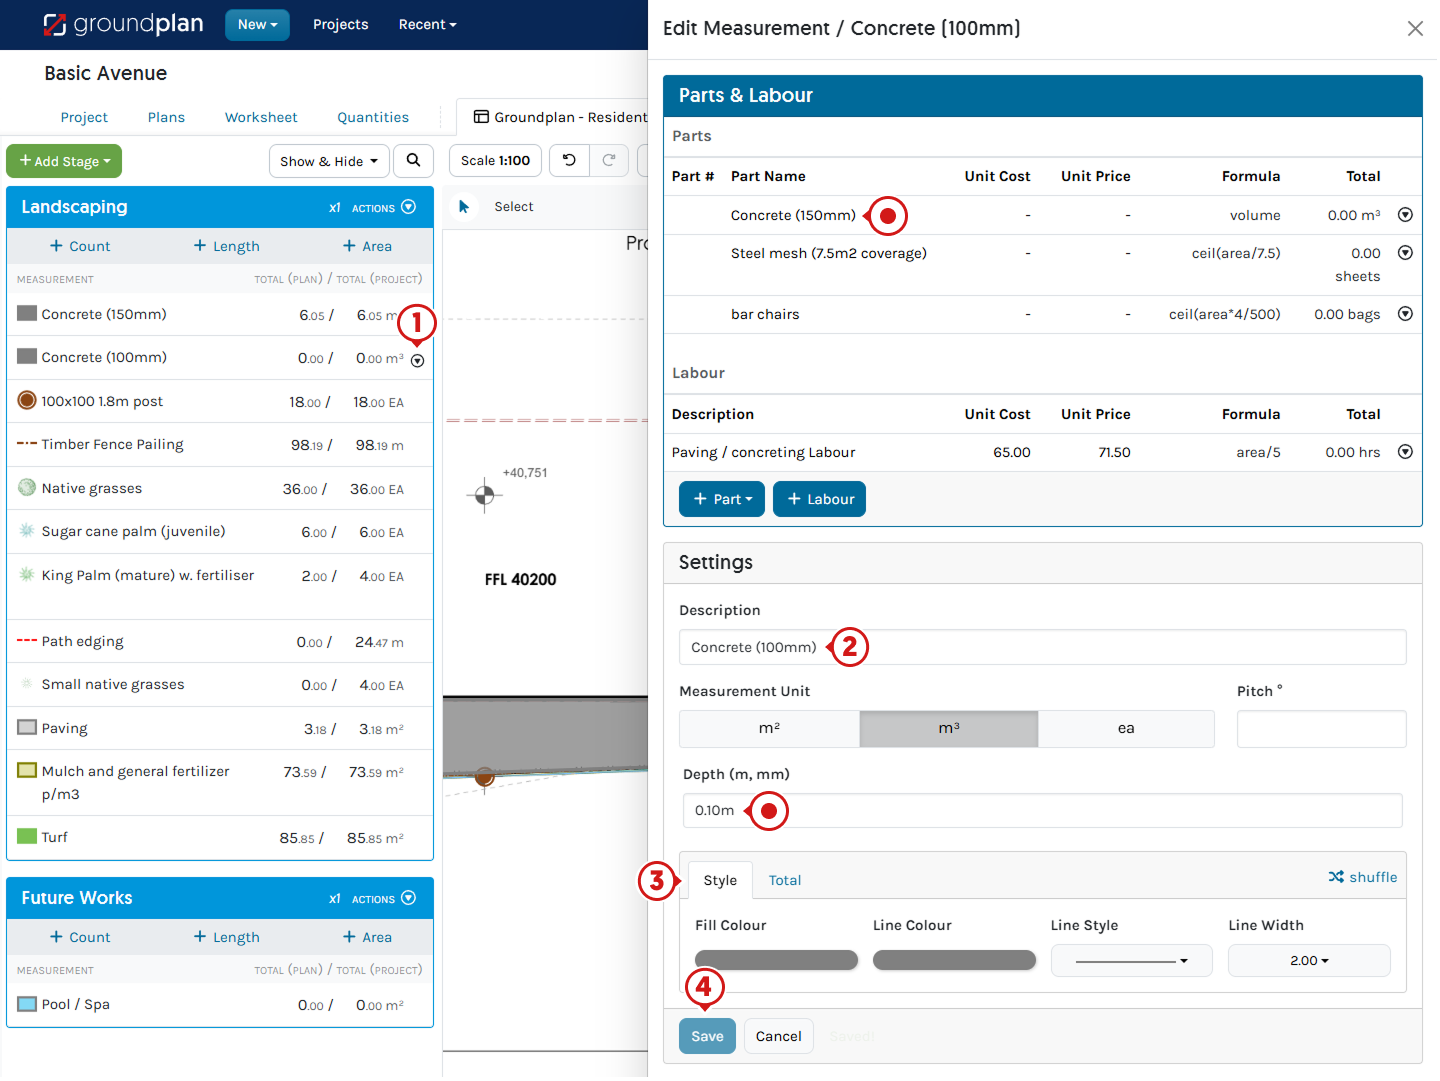
Click here if a different Depths or Pitch is required after Copying Measurements
.png)
-
On the Copied Measurement, click Measurement Actions then Parts and Settings
-
Update Measurement Unit - Depth / Pitch
Type the correct value in -
(Recommended) Update the Style
Style is identical to the Measurement it was copied from -
Click Save
-
Click X to Close
Important to noteThe Part (Concrete (150mm) is still incorrect here. Please see the next section for instructions to update.
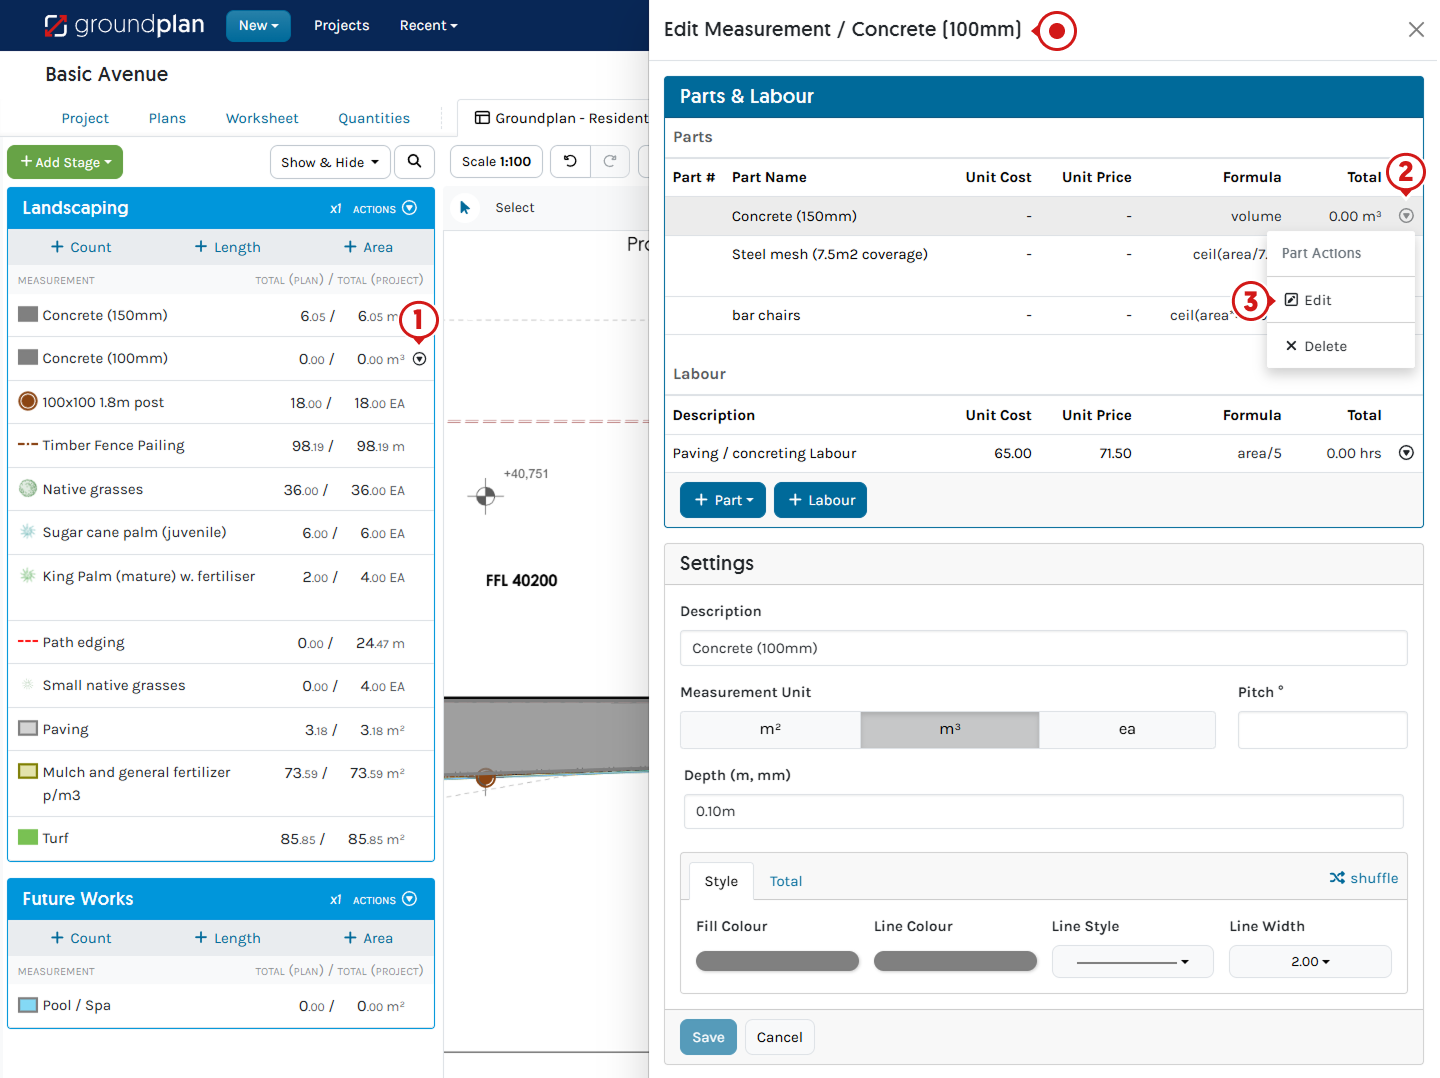
Click here when a Non-Grouped Part is required after Copying Measurements
- On the Copied Measurement, click Measurement Actions then Parts and Settings
- Click Part Actions on the Part to be changed
- Click Edit
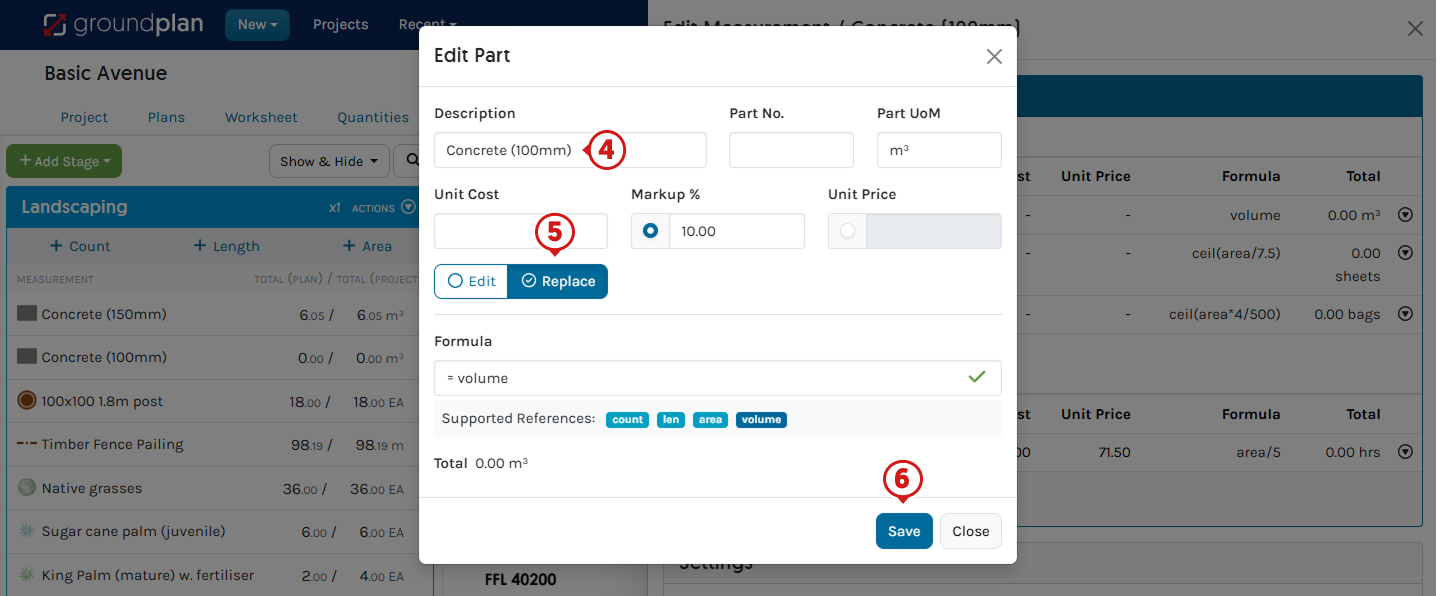
- Rename the Part from the old name, update Pricing or Formula
- Select:
Replace to ensure it is not Grouped / Linked with the Measurement Part it was copied from - Click Save
- Click X to Close
Adjusting Area Totals
Adding or removing Areas after Adjusting the Plan or Project Totals will not be reflected in the Totals.
Editing Individual Areas will not be shown when the Value is Adjusted.
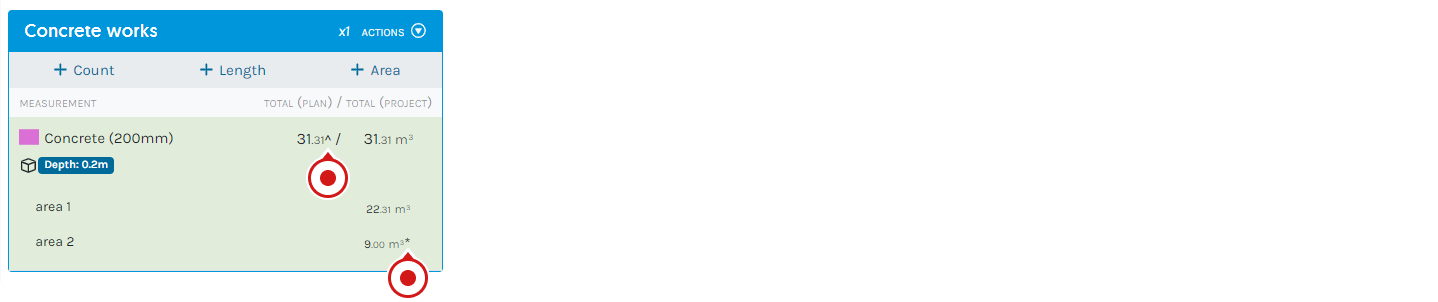
- To Adjust Measurement Totals, click the individual Area Total ( * ), click the Plan Total ( * ) or Project Total (^)
- Enter new Value in Number form (e.g.
3) or via a Formula (e.g.2*10) - Click Save
The asterisk (*) on the Area value means that the Total is Adjusted
The hat (^) on the Measurement Total means that it contains an Area(s) that is Adjusted
- To remove an Adjusted Total, click the Adjusted Total and clear the Value
Please note: Entering 0 will give an Adjusted Total of 0
Unit of Measure and Supported References
There are different options for Unit of Measure when creating Areas.
| Area Measurement Unit of Measure (UoM) | Part Supported References | |
|---|---|---|
 |
▶ |
 |
 |
▶ |
 |
 |
▶ |
 |
Groundplan uses simple Excel-type Formula to calculate Parts and Labour. The Formula follows the PMDAS Rule: Parentheses (brackets) first followed by multiplication, division, addition, then subtraction. Calculations are prioritised within the brackets. More detailed information about Formulas with examples are provided in our article Using Formulas in Groundplan.
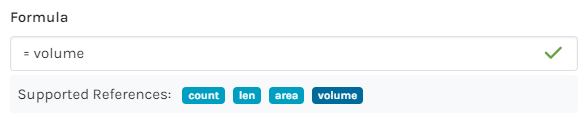
Each Formula must contain a Supported Reference/s to be accepted and relate directly to elements on the Plan.
The below image displays how the main Supported References correspond to a Plan:
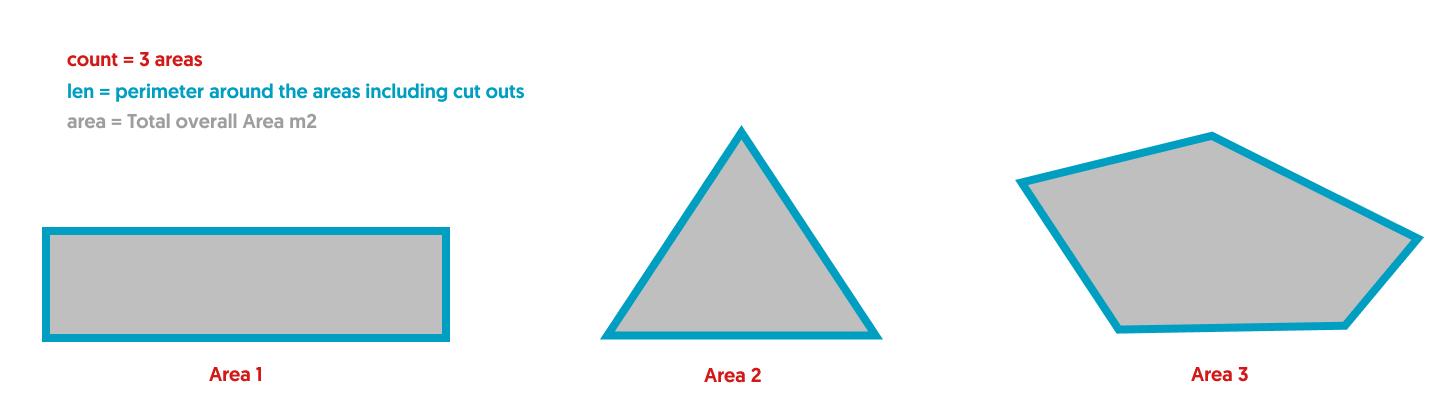
What else can the Area Tool be used for?
- Adding rooms / areas to help create a new floor / construction Plan.
- Draw over items on a hand-drawn plan (Figure A)
- Calculating the roof area with a roof pitch also applied
- Calculating cubic metres / feet when measuring concrete or soil
.png)
Frequently Asked Questions
Is there a way to Show the Total of an Area on the Plan?
Yes. To enable, click Show Total in the Style section when creating a new Measurement
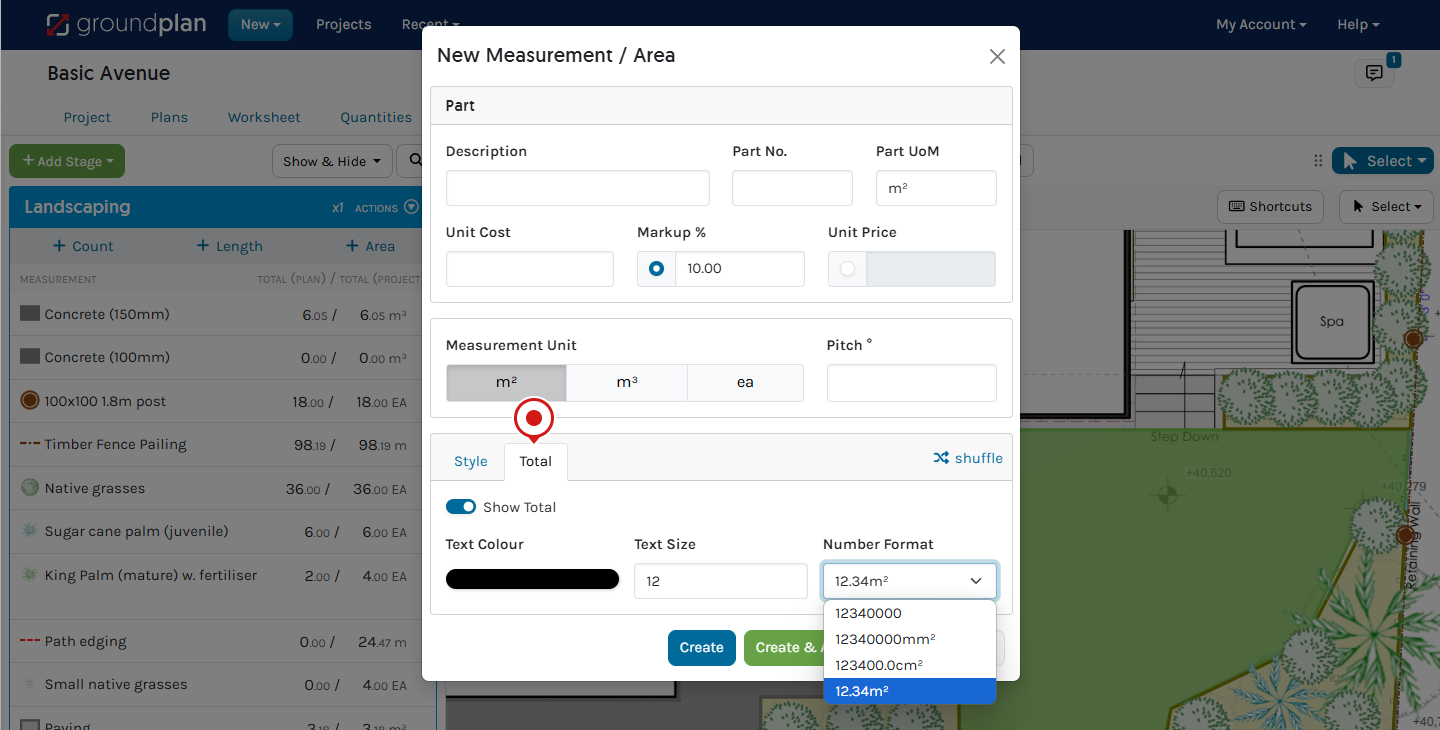
Alternatively, within an existing Measurement, head to Settings then click Total to enable Show Total. Number Formats include metric (mm², cm², m²) and imperial (in², ft²).
How can I measure the same item across the Project instead of creating a new one each time?
Selecting Link from Worksheet allows an existing Stage to be selected and used to create one Project Total for the Measurement.
To combine marked-up Stages, please use the Transfer Tool. This moves Measurement Totals from one Stage or one Measurement to another.
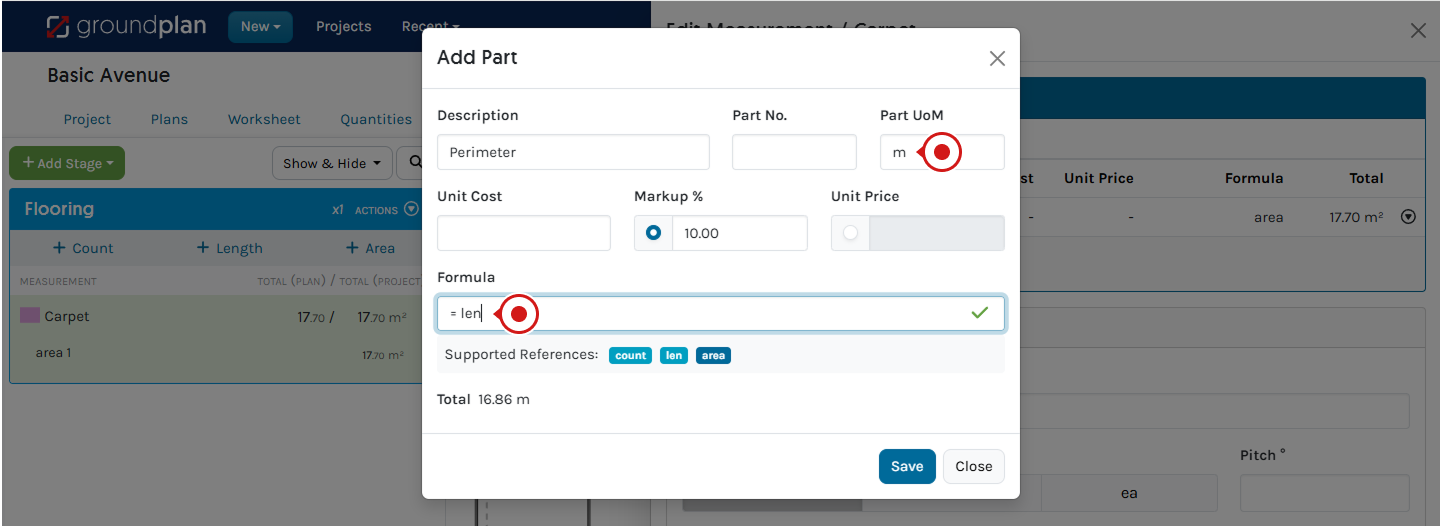
How can I work out the perimeter of an Area I drew to calculate requirements for tack strips?
After creating an Area, you can add a Part for Perimeter inside the Measurement. Calculate the perimeter using the Formula =Len and the Unit of Measure as m.
This Formula measures the perimeter around the Area and the perimeter of any Area Cut-Out that has been created.
Is there a way to see the list of Cut-outs I made?
Unfortunately no. As these are cut from the Total quantity, there is no record kept.